
Add User from User Management
Overview
As an admin, you can add new users to your CarbonSig account through the User Management section. This guide walks you through inviting both internal team members and external collaborators.
Who can do this: Only users with the Admin role can add new users.
Before You Start
Understanding User Types
When you add someone to CarbonSig, they'll be categorized as either:
Internal User (User)
- Your employees or primary team members
- Each person can be an internal User in only ONE organization
- Their primary professional affiliation in CarbonSig
External User
- Consultants, partners, vendors, auditors from other organizations
- Already have a CarbonSig account elsewhere
- Can be External Users for multiple organizations simultaneously
- Maintain their primary account with another organization
How the system decides: When you enter an email address, CarbonSig automatically checks:
- ✓ Account found → Added as External User
- ✗ Account not found → Added as internal User (new account created)
Step-by-Step: Adding a User
Step 1: Access User Management
Navigate to the User Management section.
Where to find it:
- Look for the "Users" tab in your left sidebar
- Click to open User Management
- This tab is only visible to users with Admin role
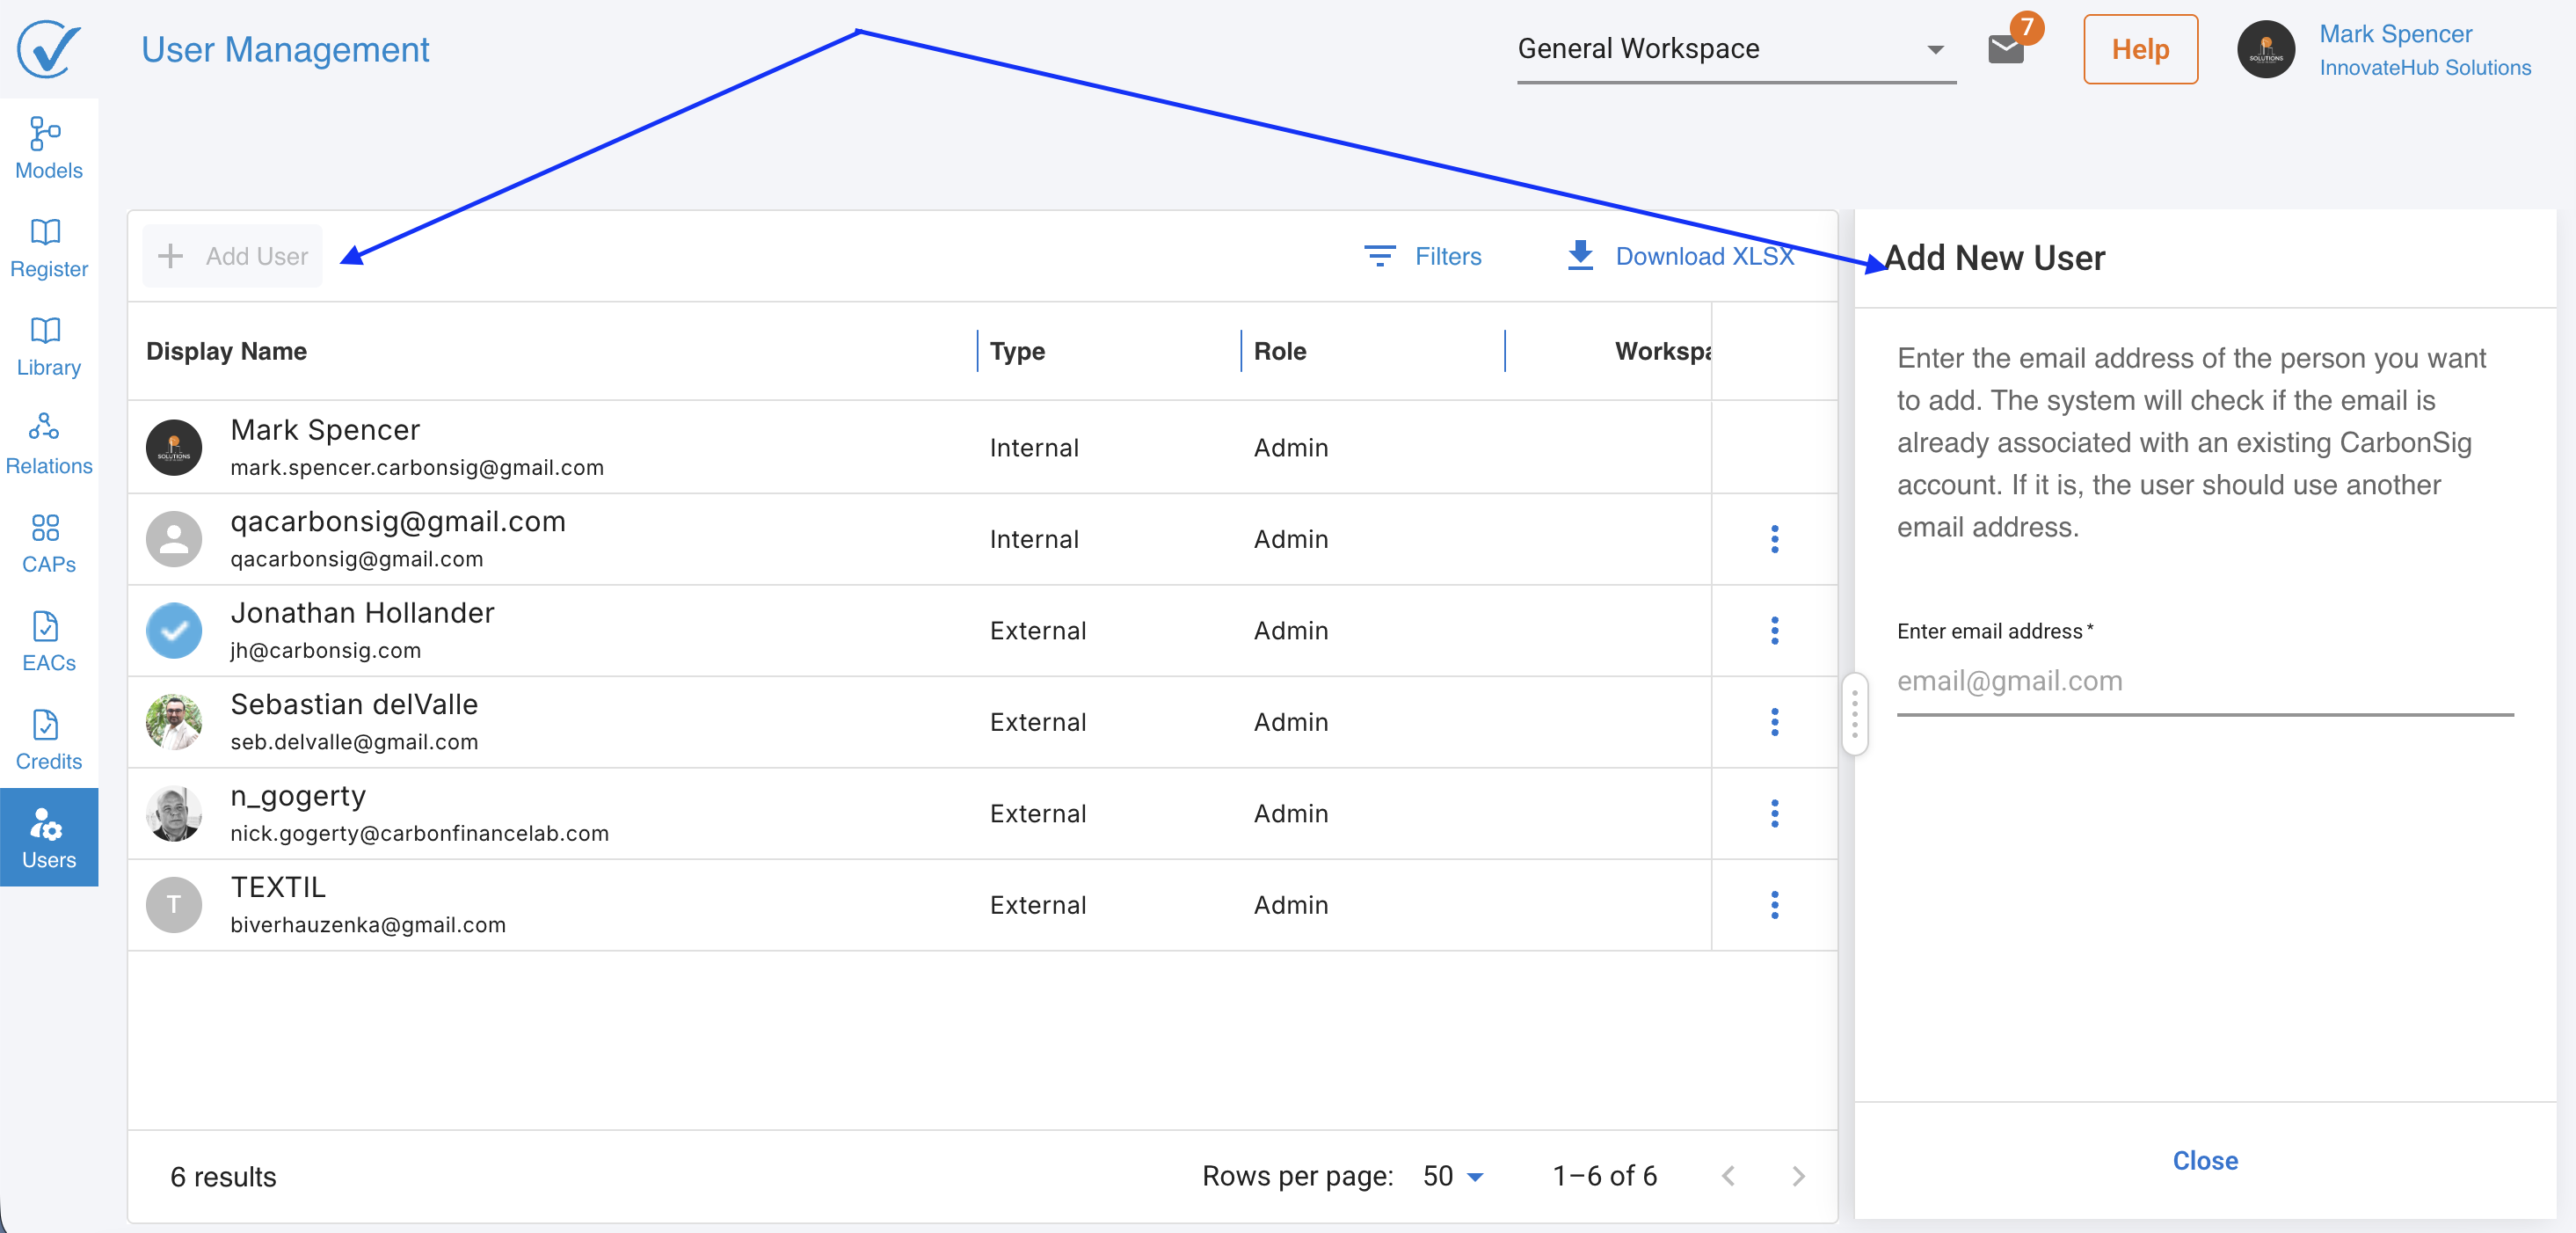
Step 2: Click "Add User"
In the User Management section, click the "Add User" button.
What happens next:
- A form appears to collect user information
- You'll enter their email and configure their access
Step 3: Enter Email Address
Type the email address of the person you want to invite.
System behavior:
- CarbonSig checks if this email is already registered
- If account exists → They'll be added as External User
- If account doesn't exist → They'll be added as internal User (new account)
Best practice: Confirm the email address is correct before proceeding to avoid sending invitations to wrong addresses.
Step 4: Assign Workspace(s)
Select which workspace(s) this user should have access to.
Understanding workspaces: Workspaces are separate areas within your account that organize data by:
- Location (e.g., different facilities)
- Team (e.g., different departments)
- Project (e.g., specific initiatives)
- Business unit (e.g., divisions)
Assignment options:
Single workspace
- Assign to one specific workspace
- Use for: Users working on specific projects or locations
Multiple workspaces
- Select several workspaces
- Use for: Users who work across multiple teams or projects
All workspaces (Admin role only)
- Admins automatically get access to all workspaces
- No need to assign individually
Strategic considerations:
- ✓ Only assign workspaces where they need to work
- ✓ Start with minimum necessary access
- ✓ You can always add more workspaces later
- ✓ Less access = better security and clarity
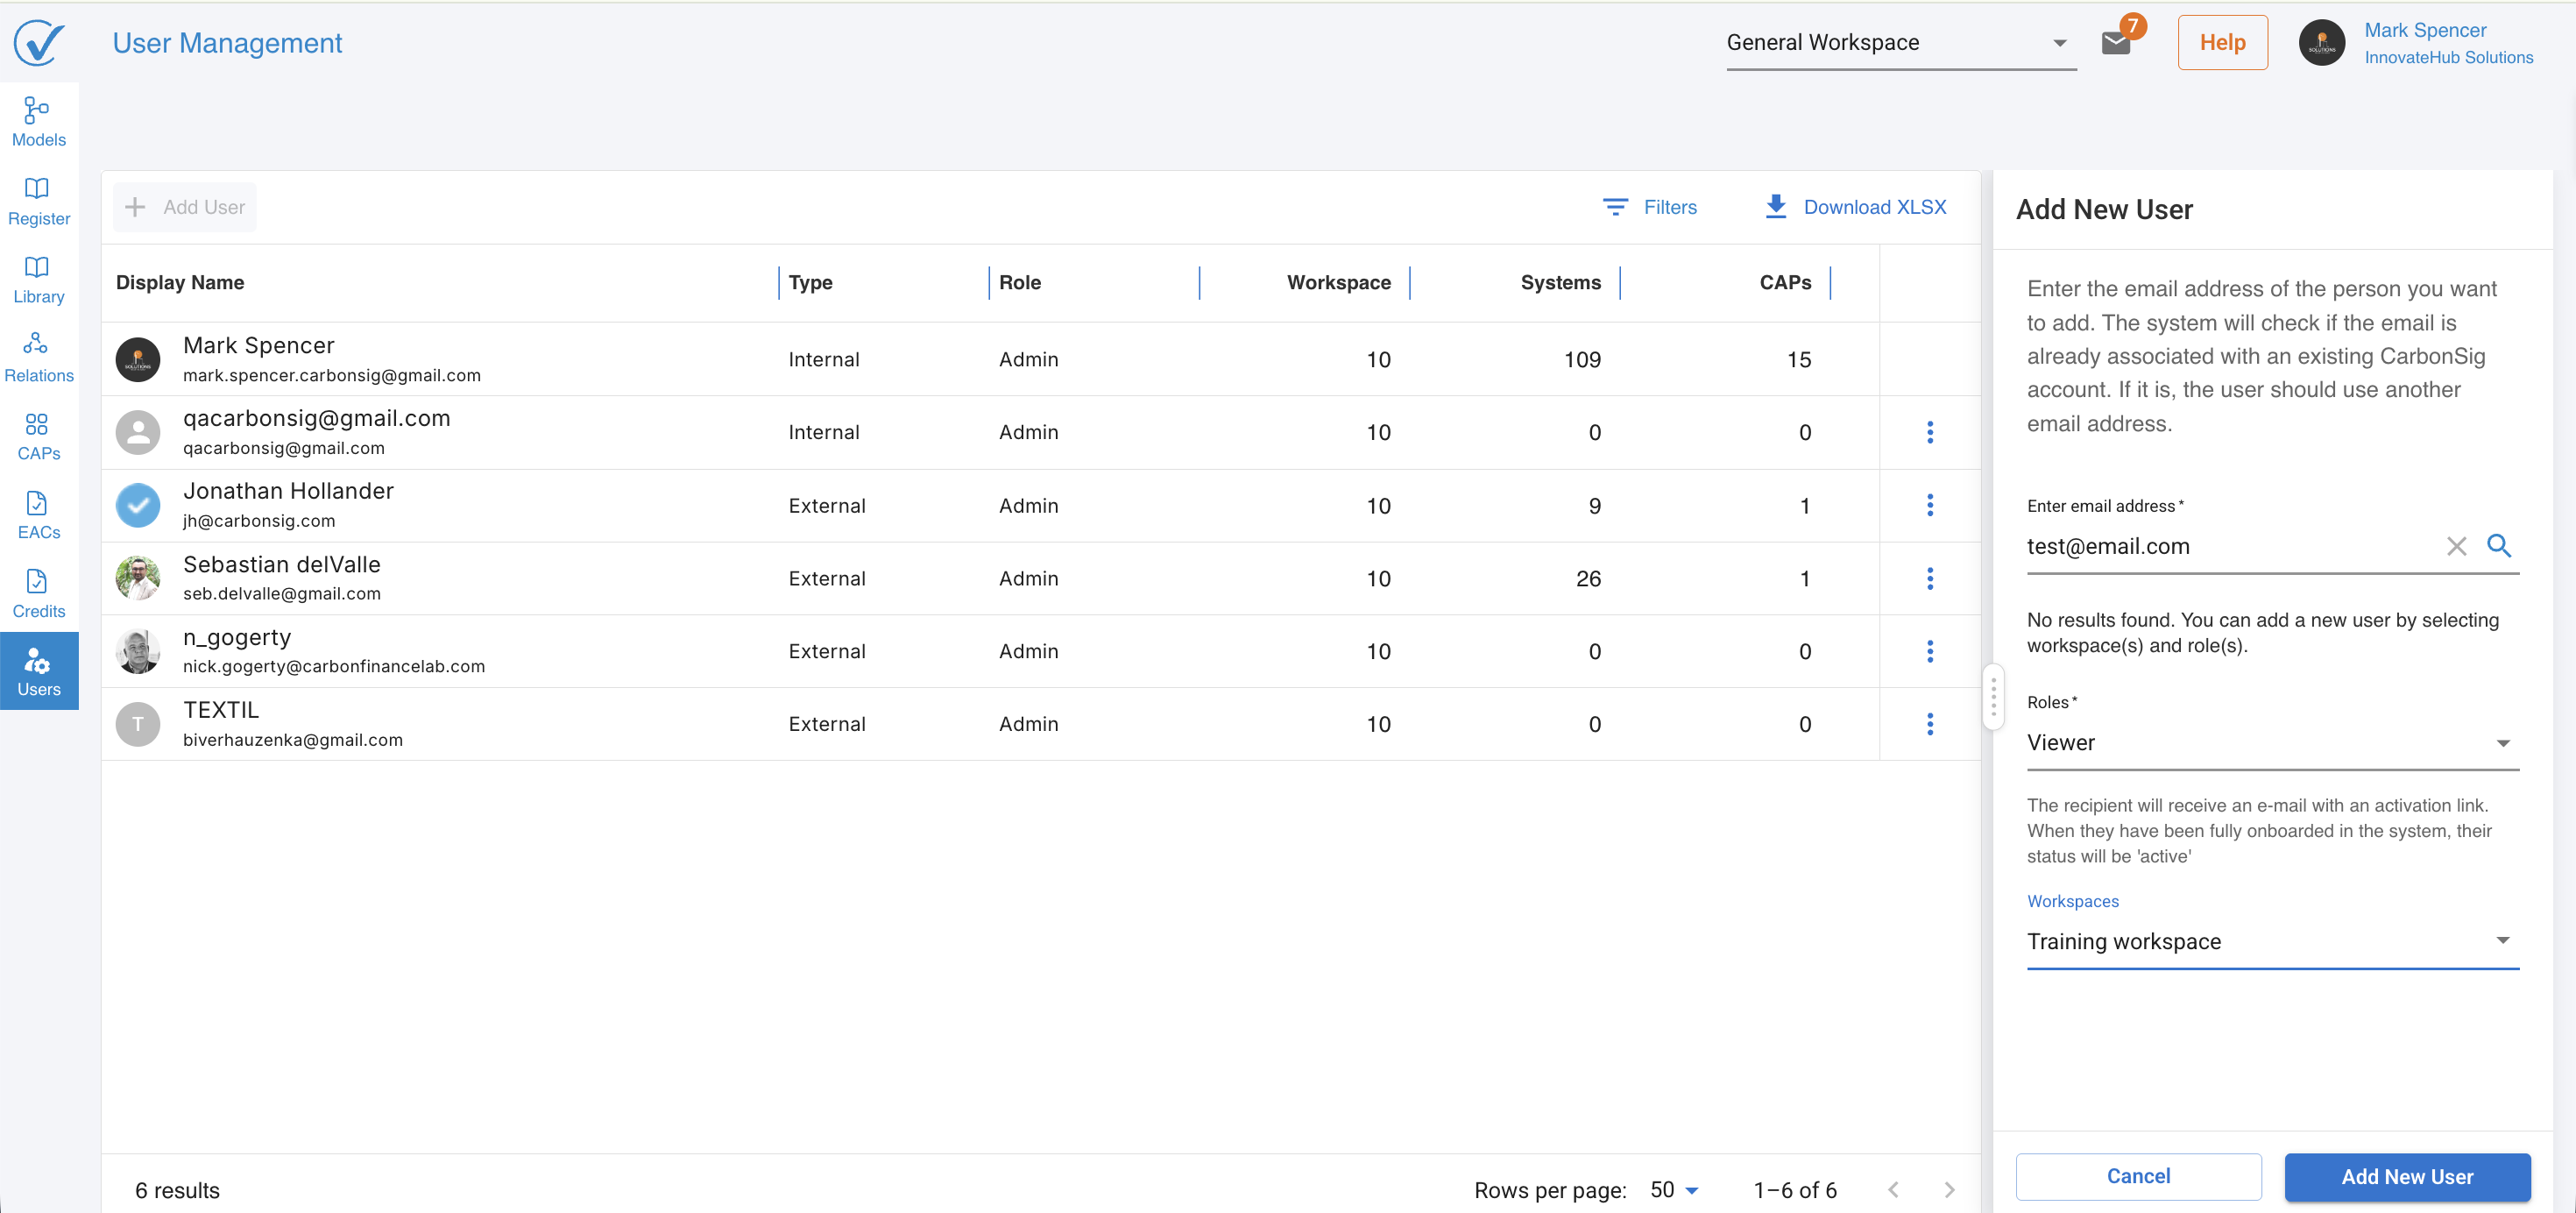
Step 5: Select Role
Choose the appropriate role based on what this user needs to do.
Available roles:
Admin → Master key to all workspaces
Full access to everything, including user management
Permissions:
- Complete access to every workspace (current and future)
- Can see and manage entire organizational landscape
- Access to "Users" tab for user management
- Can add, remove, and suspend users
- Can assign or modify roles for any user
- Automatically grants access to all workspaces
Use for:
- Senior team members managing the carbon program
- Trusted managers who need oversight of everything
- Users who will manage other team members
- Anyone who needs unrestricted access
Important: System requires at least one Admin at all times. If you're the last Admin, you cannot remove your own Admin role.
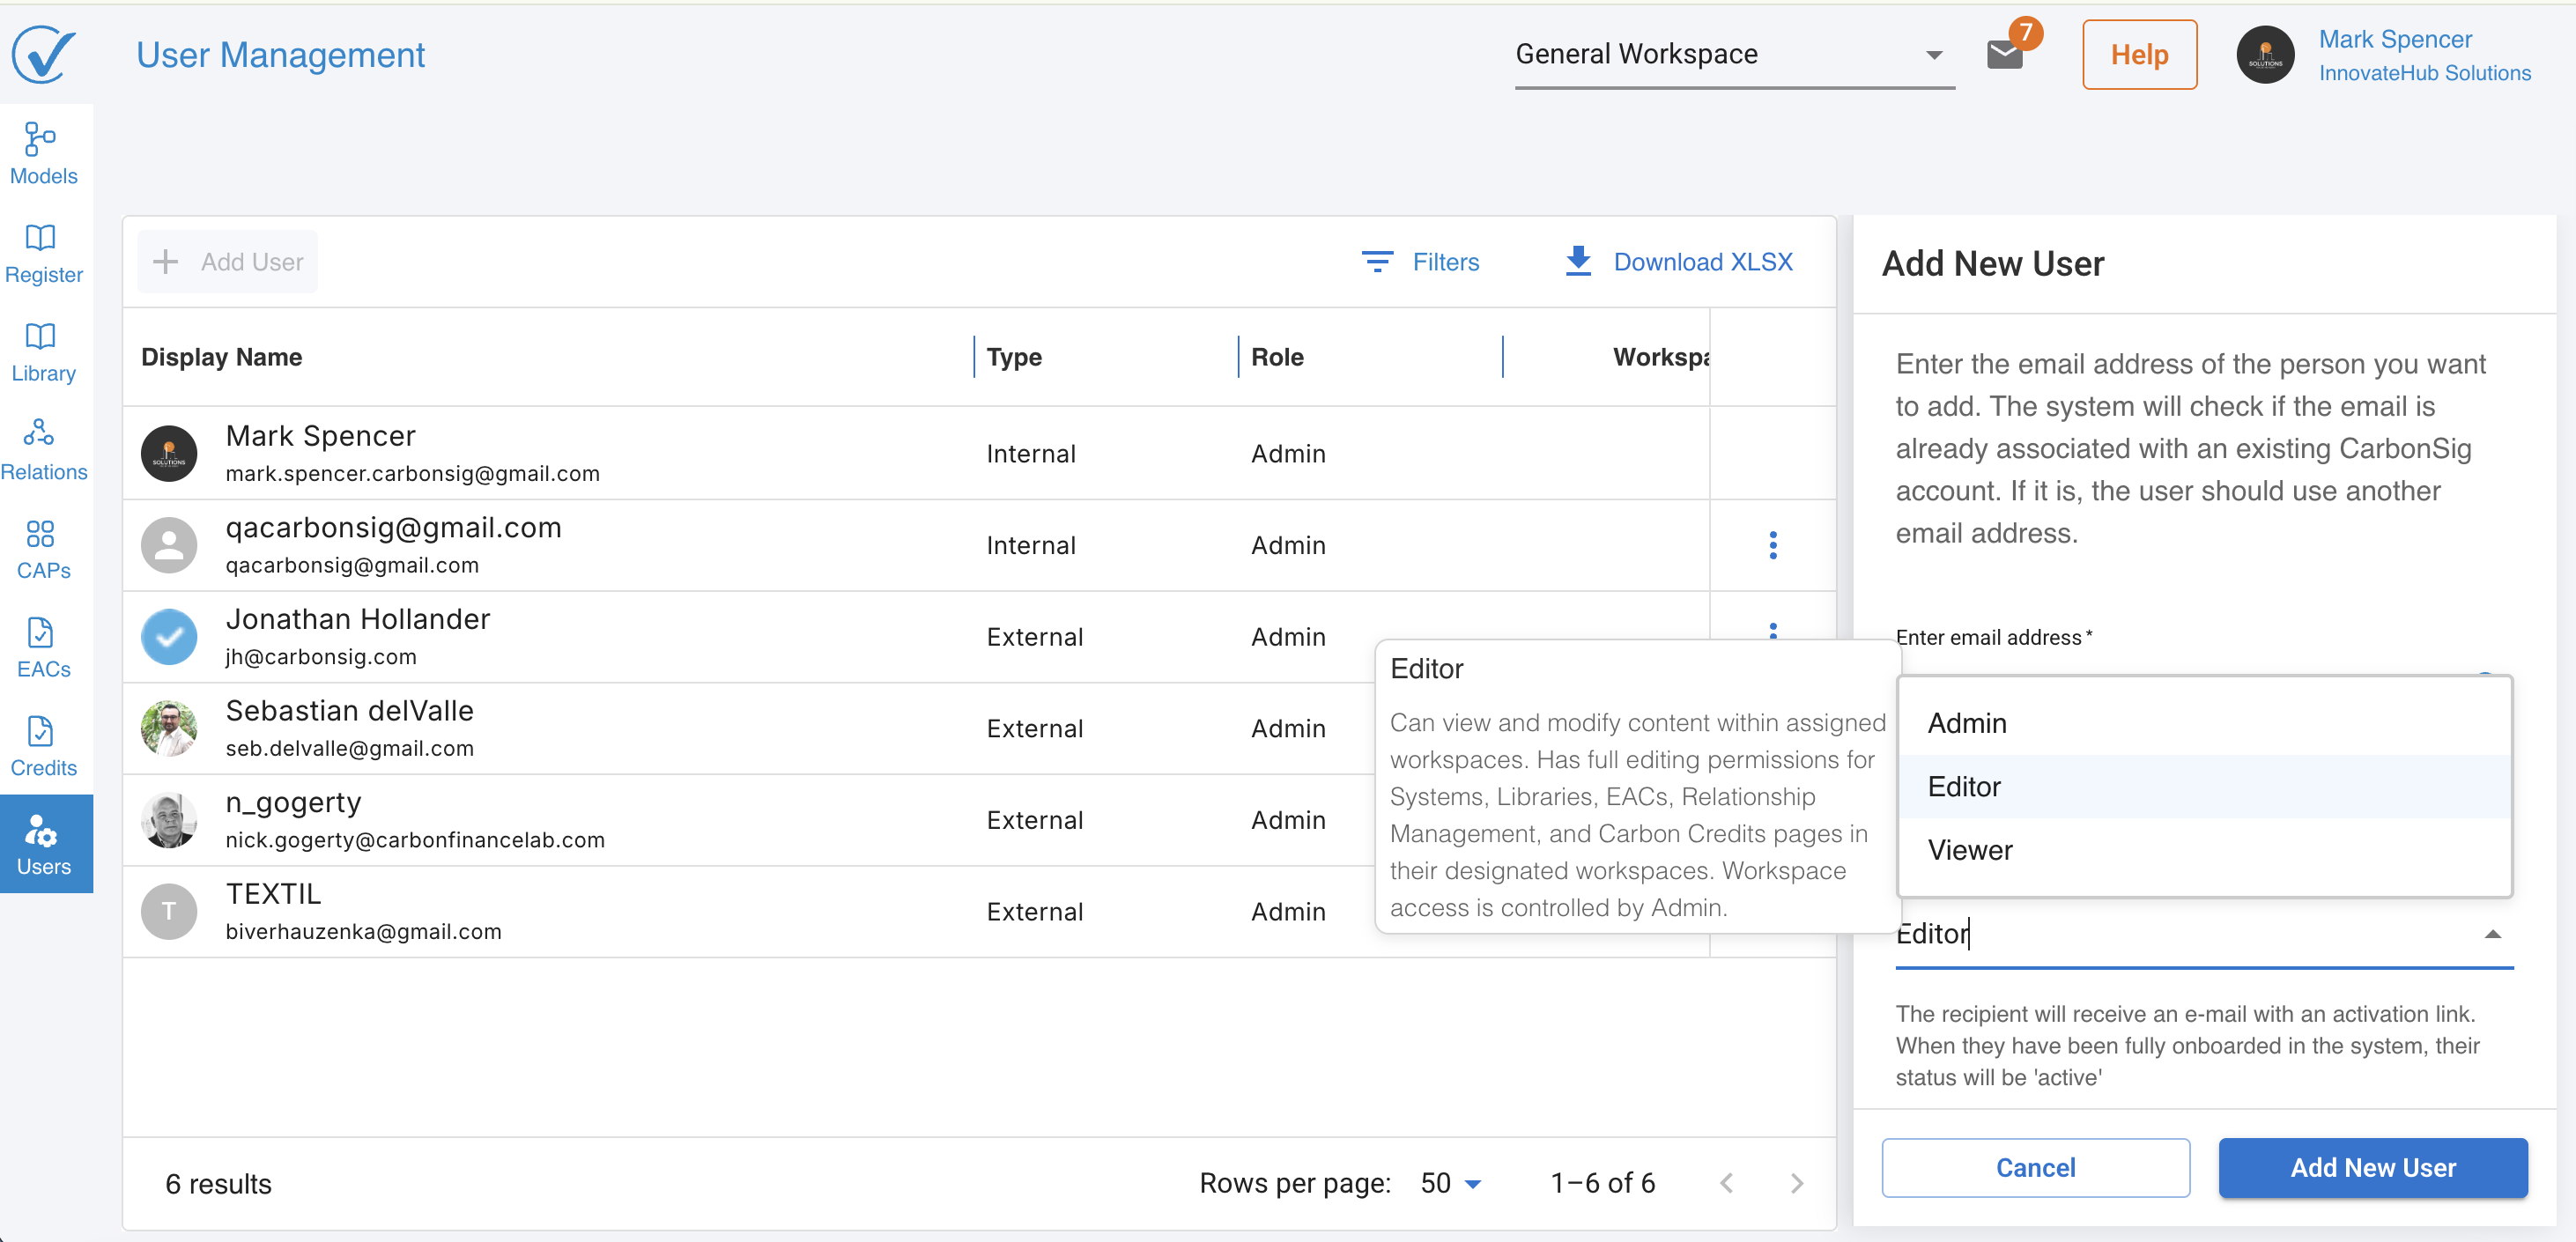
Editor → View and modify content in assigned workspaces
Full editing permissions within designated workspaces
Permissions:
- Full editing access to assigned workspaces only
- Can create, modify, and delete content
- Full editing permissions for:
- Systems
- Libraries (LCI, RFI)
- EACs (Environmental Attribute Certificates)
- Relationship Management
- Carbon Credits pages
- Cannot access workspaces not explicitly assigned
- Cannot manage users
Use for:
- Team members creating carbon accounting systems
- Staff building and managing carbon data
- Employees working on specific projects
- Anyone who needs to create and edit content
Best practice: Assign Editors only to workspaces where they actively create or modify content.
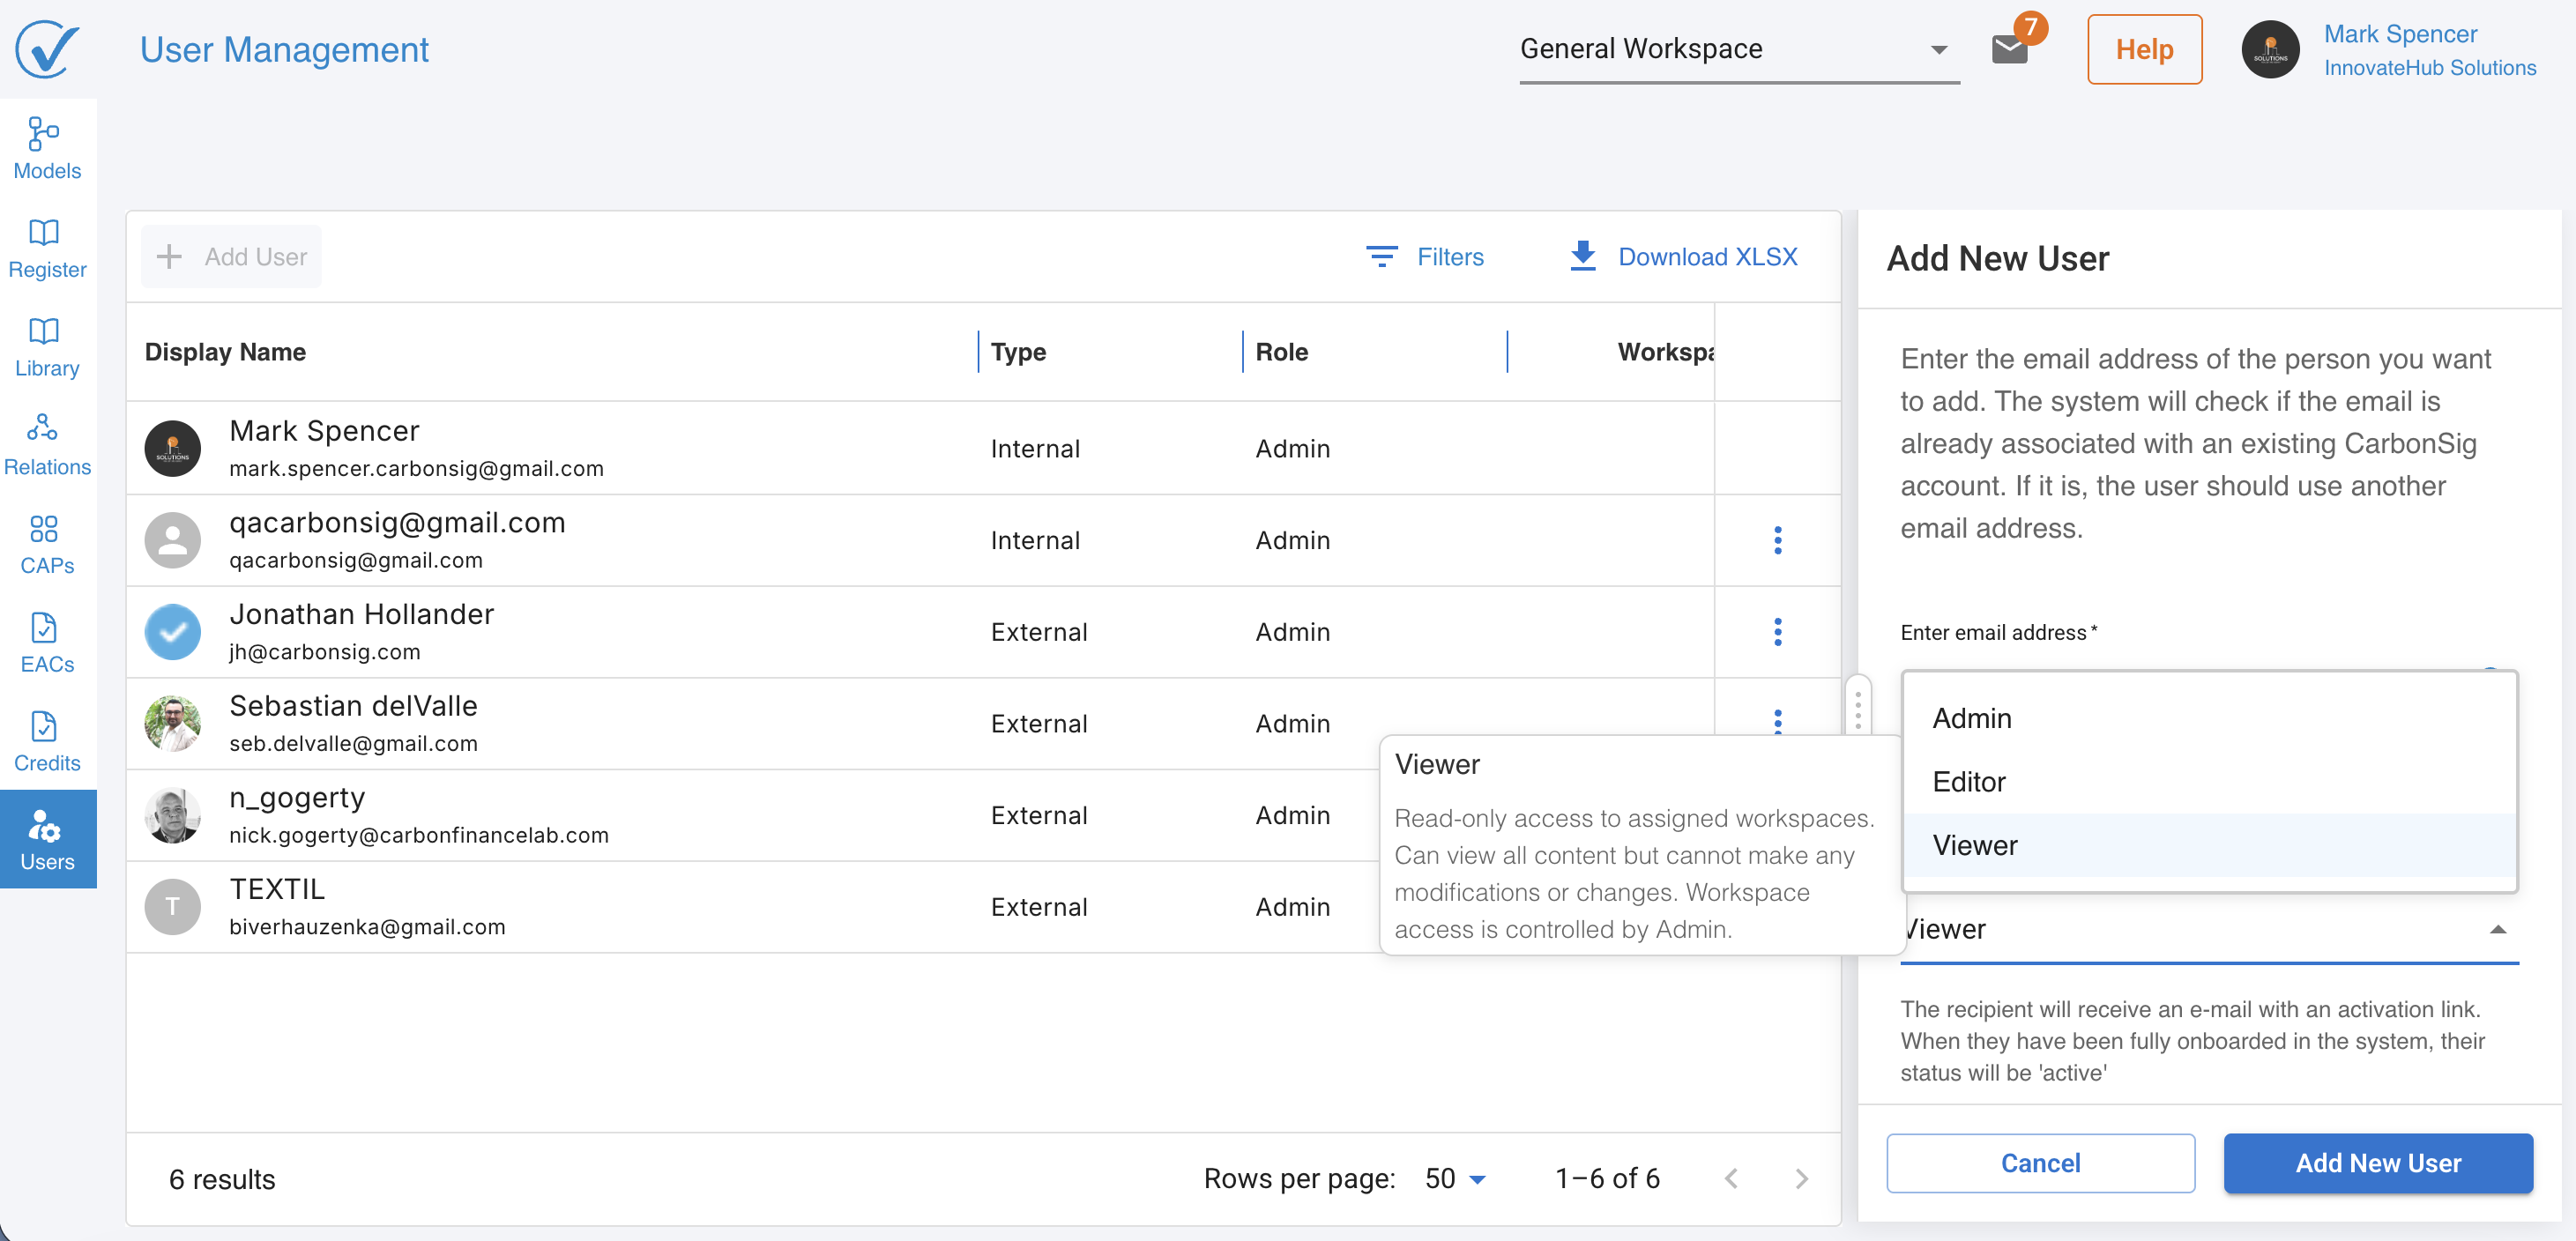
Viewer → Read-only access to assigned workspaces
View all content without modification capabilities
Permissions:
- Read-only access to assigned workspaces only
- Can view all content including:
- Systems
- Libraries
- EACs
- Relationships
- Carbon Credits
- Reports
- Cannot make any modifications or changes
- Cannot access workspaces not explicitly assigned
- Cannot manage users
Use for:
- Stakeholders needing visibility
- Management reviewing data
- Finance team checking carbon credits
- Anyone who needs to see but not change data
Best practice: Default to Viewer when users only need to monitor or review. You can always upgrade to Editor later.

Role Selection Decision Guide
Ask yourself:
- Do they need to manage users or access all workspaces?
- Yes → Admin
- No → Continue to question 2
- Do they need to create or modify content?
- Yes → Editor (assign specific workspaces)
- No → Viewer (assign specific workspaces)
- Will they work across all areas or just specific ones?
- All areas → Consider Admin
- Specific areas → Editor or Viewer
- What's their primary responsibility?
- Managing team/program → Admin
- Creating carbon data → Editor
- Reviewing/monitoring → Viewer
Step 6: Review and Send Invitation
Review all the information you've entered:
- ✓ Email address is correct
- ✓ Workspace assignments are appropriate
- ✓ Role matches their responsibilities
Click "Invite User" (for new users) or "Invite External User" (for existing accounts).
What happens next:
For new users (internal):
- Invitation email sent to their address
- They click the activation link
- They create their name and password
- Account is immediately active
- They can log in and access assigned workspaces
For existing users (external):
- Invitation email sent to their address
- Notification appears in their CarbonSig account
- They review and accept the invitation
- Access granted immediately
- They can switch to your organization in their workspace selector
Timeline: Most users complete onboarding within 5 minutes of receiving the invitation.
After Sending the Invitation
Track Invitation Status
In User Management, you can see Status indicators:
- Pending: Invitation sent, waiting for acceptance/completion
- Active: User has accepted and can access the account
- Suspended: Access temporarily revoked (can be reactivated)
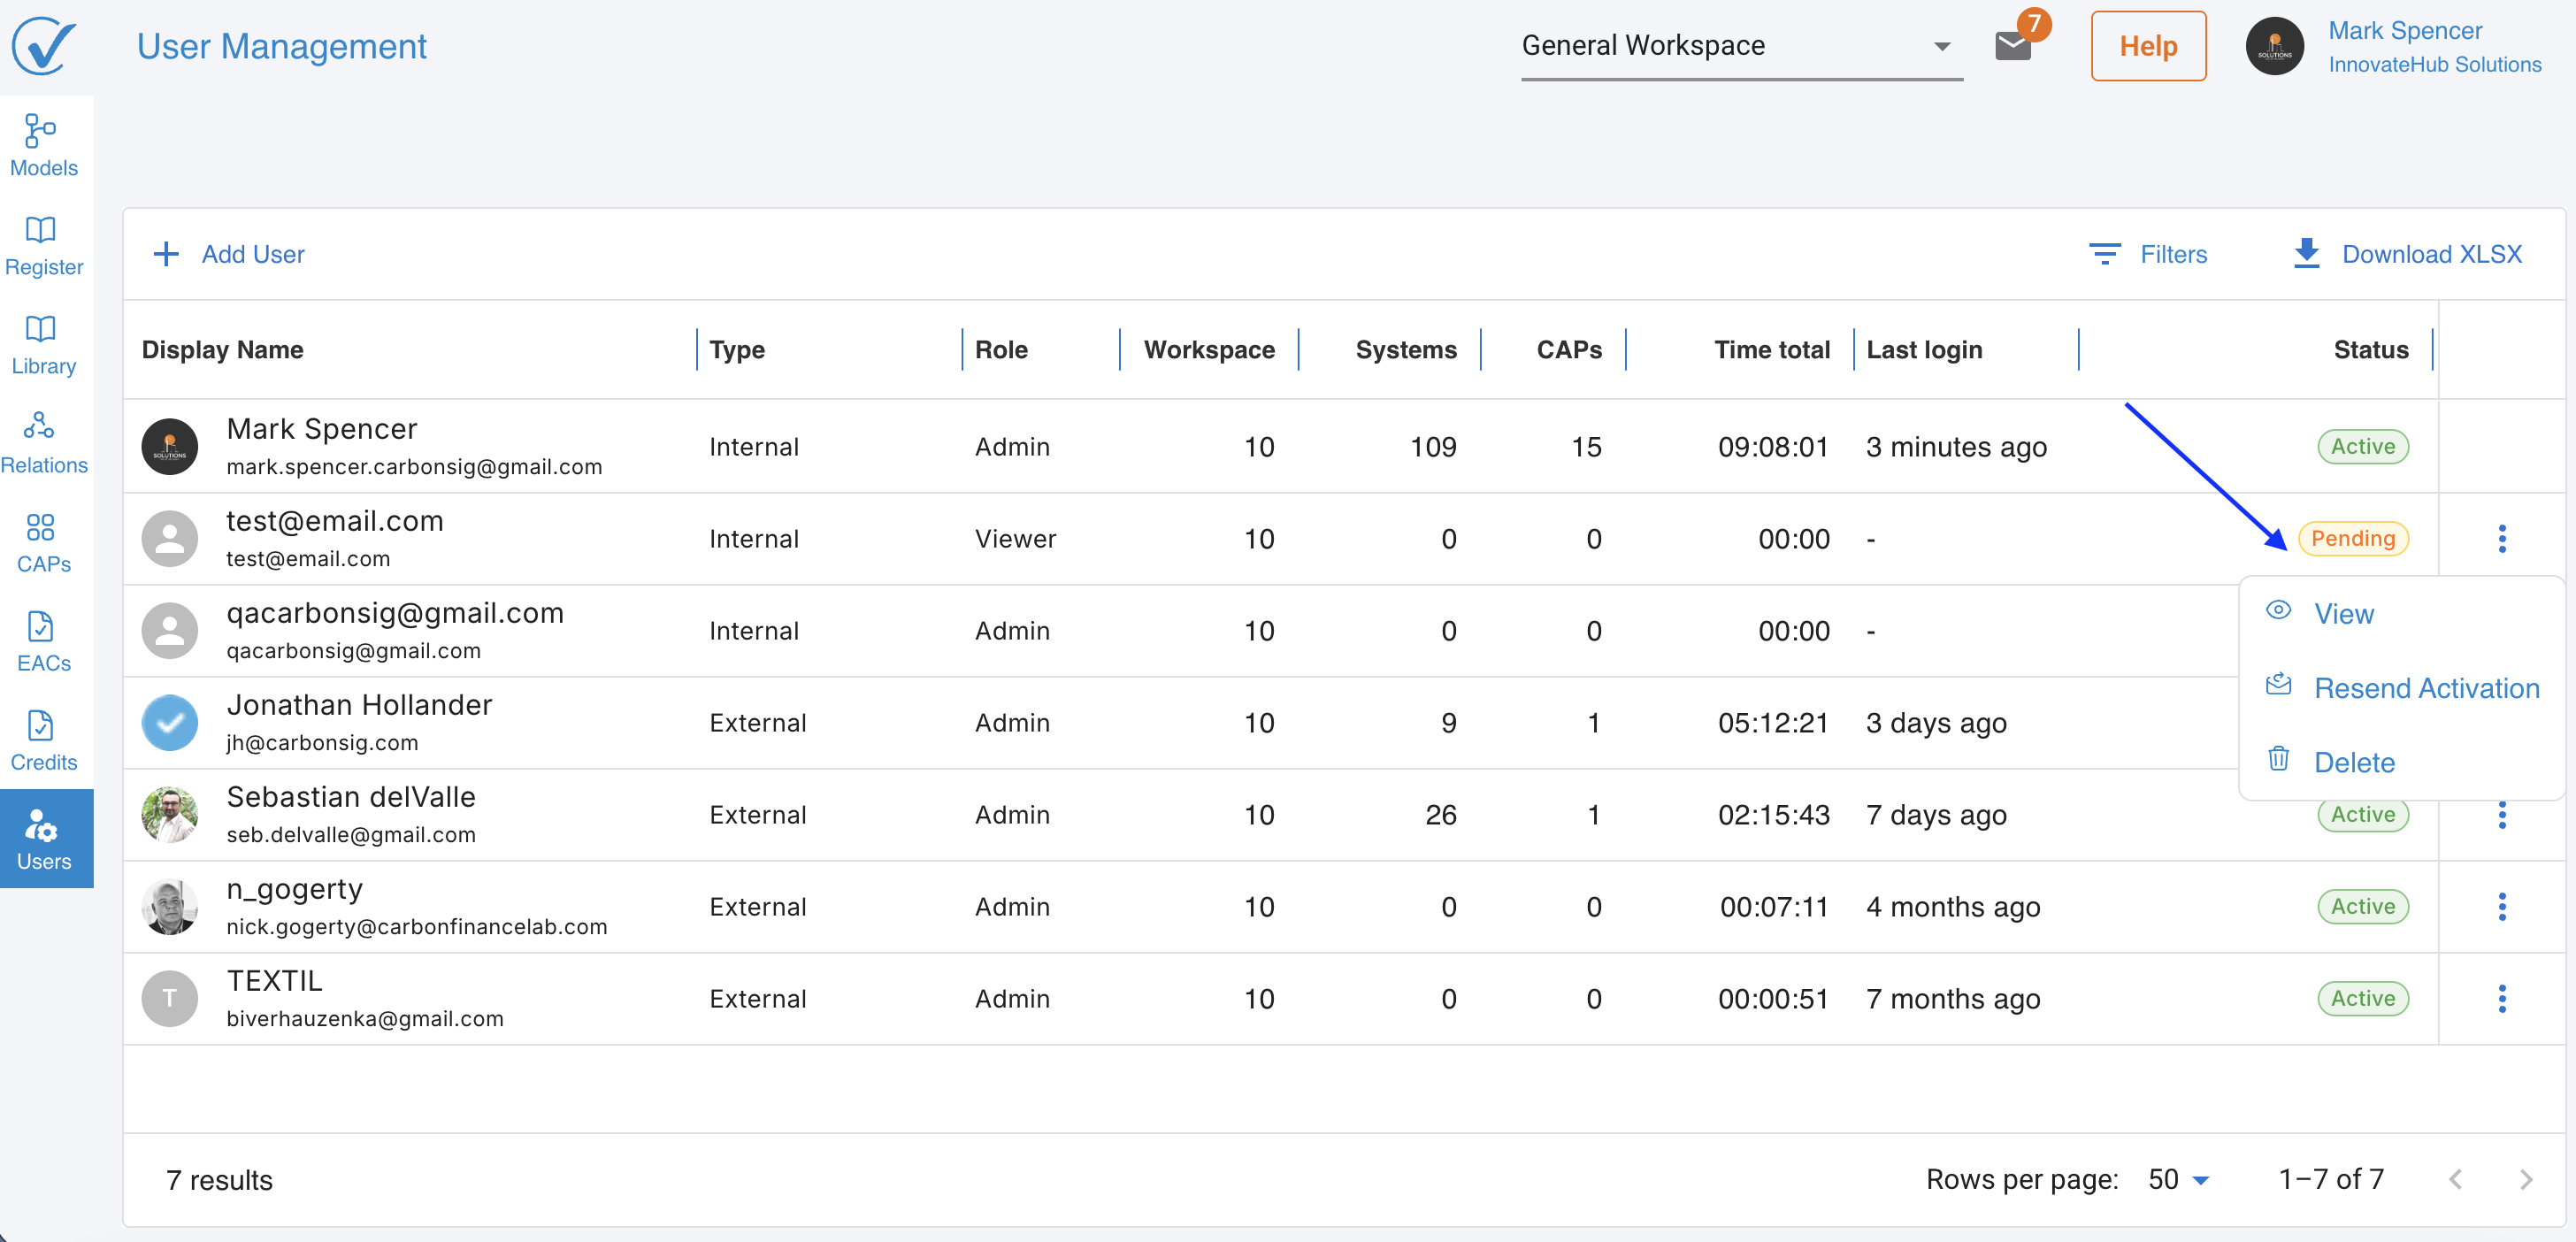
Resend Invitations
If someone didn't receive the invitation:
- Go to User Management
- Find the pending invitation
- Click "Resend Invitation"
- Ask them to check spam folder
Modify Access Before They Accept
You can change workspace assignments or role before they accept:
- Find the pending invitation
- Click to edit
- Make your changes
- Save
Managing Users After Onboarding
Viewing Users
In User Management, you can see:
- All active users in your account
- Their roles (Admin, Editor, Viewer)
- Their user type (Internal or External)
- Which workspaces they can access
- Their account status
Modifying User Access
You can adjust any user's access anytime:
Change role:
- Select the user
- Click "Edit"
- Choose new role
- Save changes
Add/remove workspaces:
- Select the user
- Click "Edit"
- Adjust workspace assignments
- Save changes
Suspend access temporarily:
- Select the user
- Click "Suspend"
- Their access is immediately revoked
- Unsuspend anytime to restore access
Remove user permanently:
- Select the user
- Click "Remove User"
- Confirm removal
- Their access is permanently revoked
Important: Changes take effect immediately. Users may need to refresh their browser to see updated access.
Best Practices
Security & Access Control
✓ Principle of least privilege - Start with minimum access, add more as needed
✓ Regular audits - Review user list quarterly
✓ Remove promptly - Delete access when people leave or projects end
✓ Document decisions - Note why each person has their specific access
✓ Limit Admin role - Only assign to trusted managers
Workspace Assignment
✓ Be specific - Assign only workspaces they need
✓ Think long-term - Consider their future responsibilities
✓ Review regularly - Adjust as roles change
✓ Group logically - Assign by team, project, or location
Role Selection
✓ Default to Viewer - Start conservative, upgrade as needed
✓ Editor for creators - Anyone building systems or managing data
✓ Admin sparingly - Only for managers overseeing programs
✓ Match to job function - Role should reflect actual responsibilities
Communication
✓ Inform users - Tell them they'll receive an invitation
✓ Set expectations - Explain what workspaces they'll access
✓ Provide context - Share why they're being added
✓ Offer onboarding - Point them to relevant documentation
Troubleshooting
Invitation email not received
Check these first:
- Verify email address is correct
- Ask recipient to check spam/junk folder
- Confirm invitation was actually sent
- Check if invitation expired
Solutions:
- Resend invitation from User Management
- Try a different email address if available
- Contact support if issues persist
Can't assign certain workspaces
Possible reasons:
- You may not have Admin role
- Workspace might not exist yet
- System might be experiencing issues
Solutions:
- Confirm you have Admin role
- Create workspace first, then assign users
- Refresh page and try again
User can't see workspace after accepting
Common causes:
- Workspace wasn't assigned correctly
- User needs to refresh browser
- Role doesn't have appropriate permissions
Solutions:
- Double-check workspace assignments
- Ask user to log out and back in
- Verify role has access (Viewer, Editor, or Admin)
- Check User Management to confirm access granted
Need to change user type (Internal ↔ External)
Not possible directly:
- User type is determined when account is created
- Based on whether email already existed in CarbonSig
- Cannot convert between Internal and External User
Workarounds:
- Remove current user
- Add them again (system will re-determine type)
- Or adjust roles/workspaces to give them appropriate access
Multiple Admins needed but only have one
Solution:
- Current Admin promotes another user to Admin
- Then both users have Admin role
- System always requires at least one Admin
Accidentally removed last Admin
Prevention:
- System prevents you from removing yourself if you're the last Admin
- This situation shouldn't occur
- If it does, contact support immediately
Understanding User Types: Quick Reference
Internal User (User)
- Primary account in your organization
- One per person - can only be internal User in one org
- Full capabilities - can have any role (Admin, Editor, Viewer)
- Use for: Your employees, primary team members
External User
- Additional access to your organization
- Multiple allowed - can be External User for many orgs
- Full capabilities - can have any role (Admin, Editor, Viewer)
- Primary account elsewhere - maintains their main org affiliation
- Use for: Consultants, partners, vendors, auditors
Key difference: Just organizational affiliation - permissions are identical for any given role.
Related Articles
For comprehensive user management information:
- User Onboarding Process - What new users experience
- External User Onboarding - Detailed external user guide
- Understanding User Management - Complete user management concepts
- Understanding Workspaces - How workspaces organize data
Need Help?
Questions about user management:
- Visit our Help Center
- Email support@carbonsig.com
Build your team and manage access effectively! 👥
Last updated: April 2026