
Latest Update December '25 - System Builder UX Improvements and Smarter AI with Full System Context
We're excited to announce two major improvements that make CarbonSig more intelligent and easier to use:
(1) Enhanced System Builder UX with improved modals and workflows, and
(2) Expanded AI LCI Suggestions with full System context.
Important action required:
To see these visual improvements properly in your existing systems, please follow these simple steps:
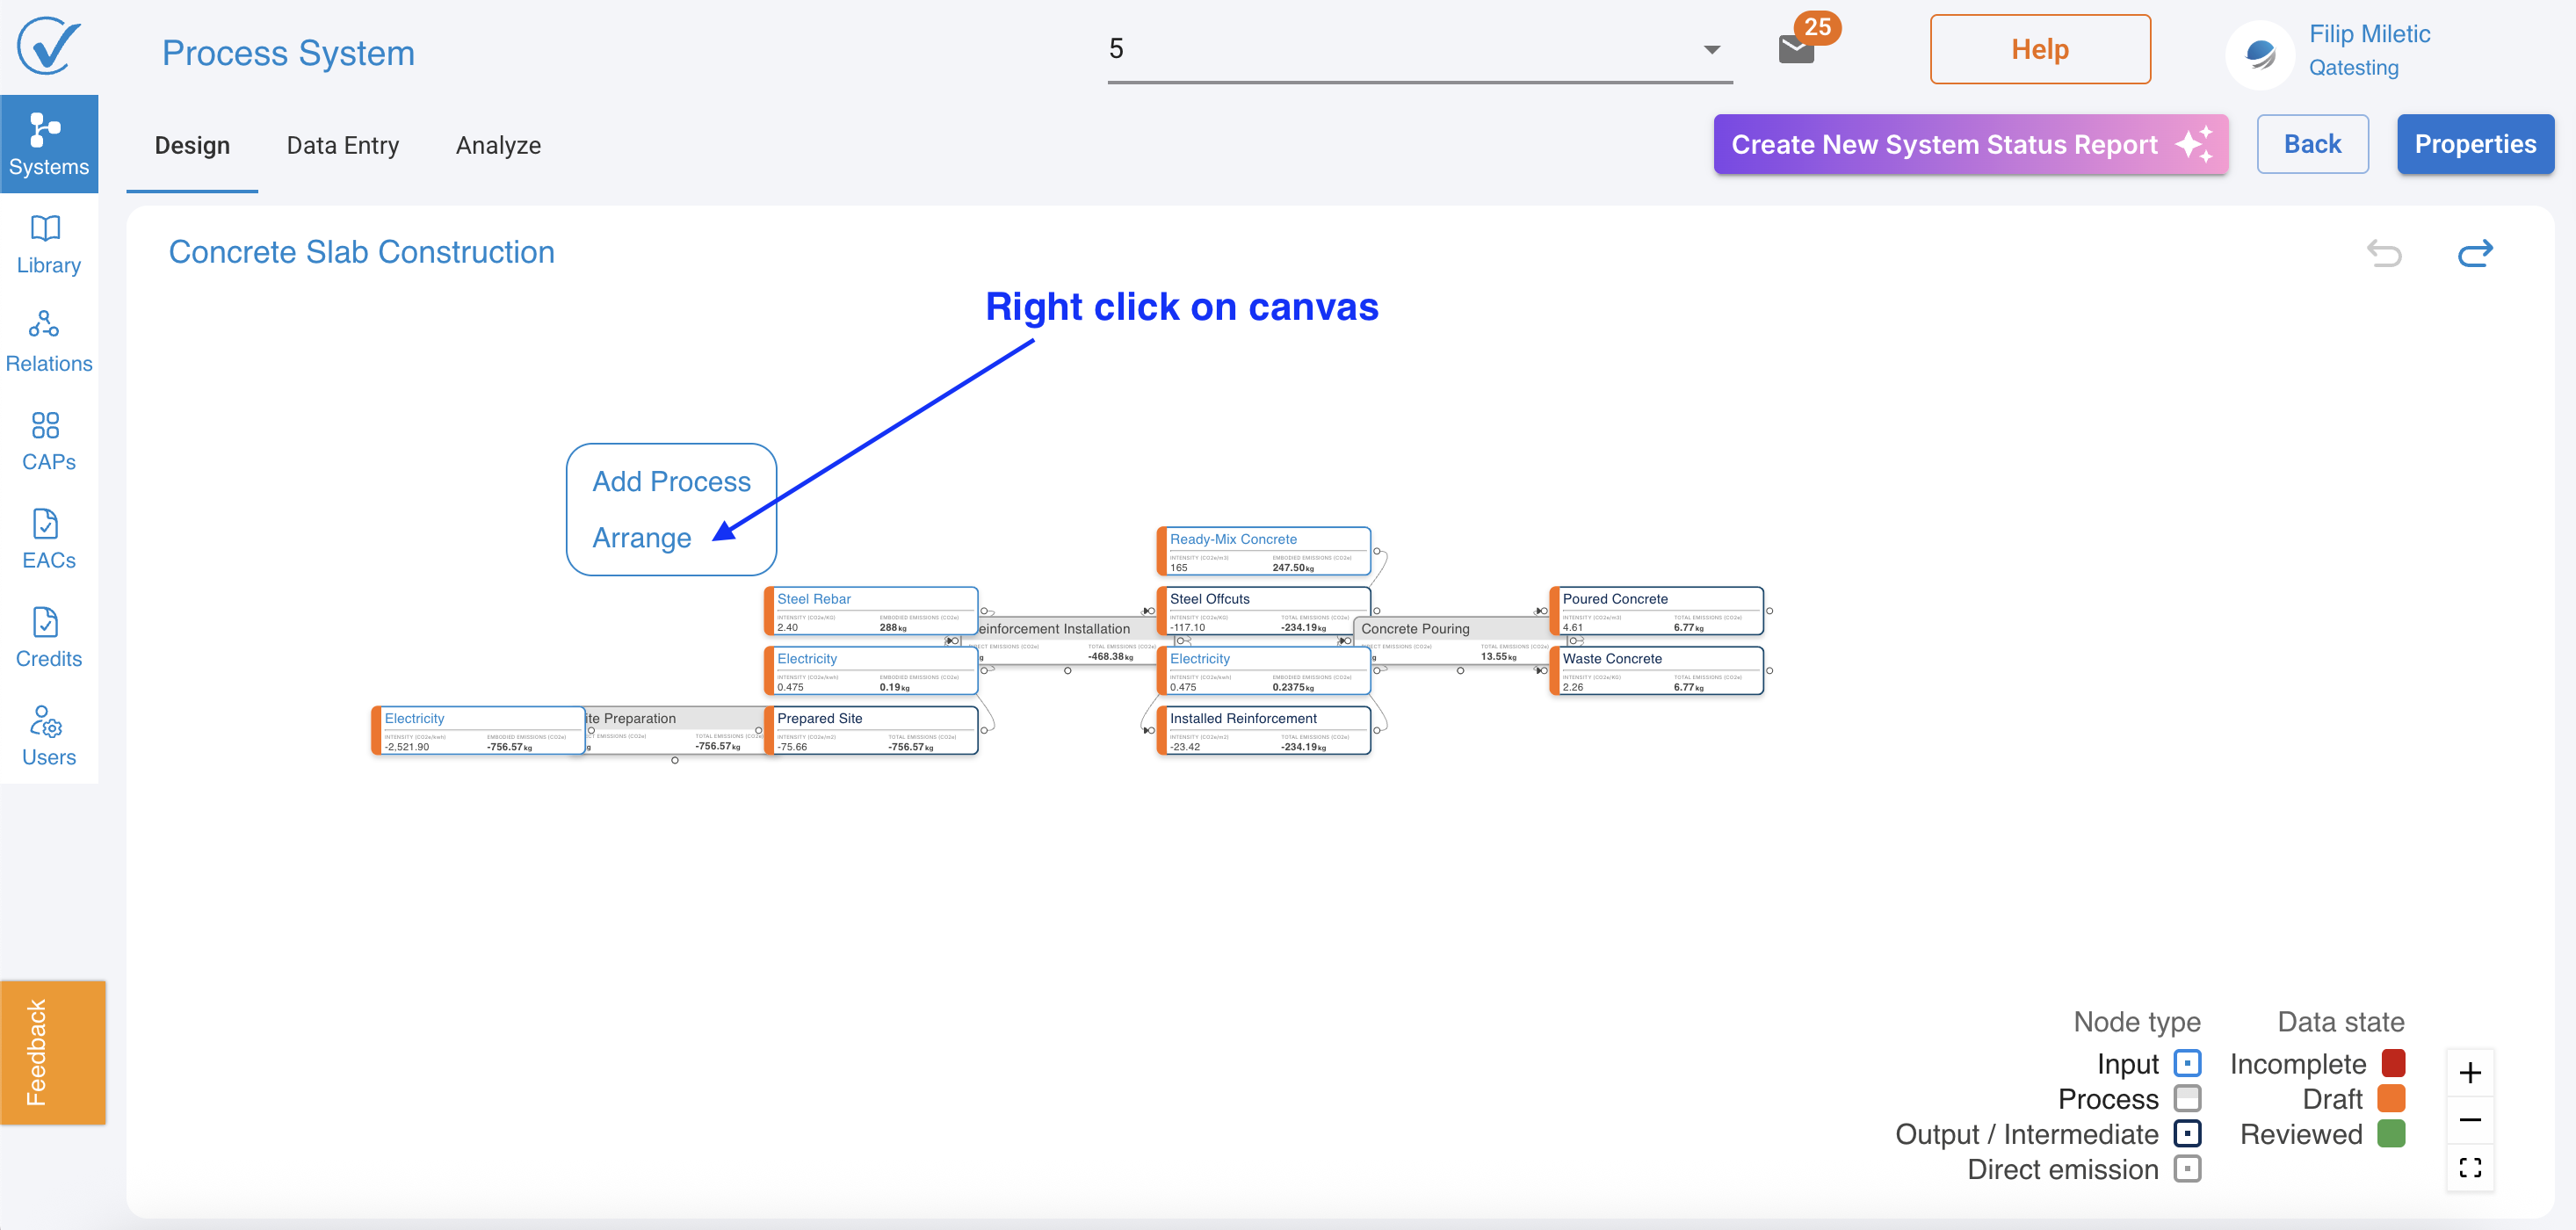
When opening any system:
- Right-click on blank space in the system canvas
- Select "Arrange" from the menu
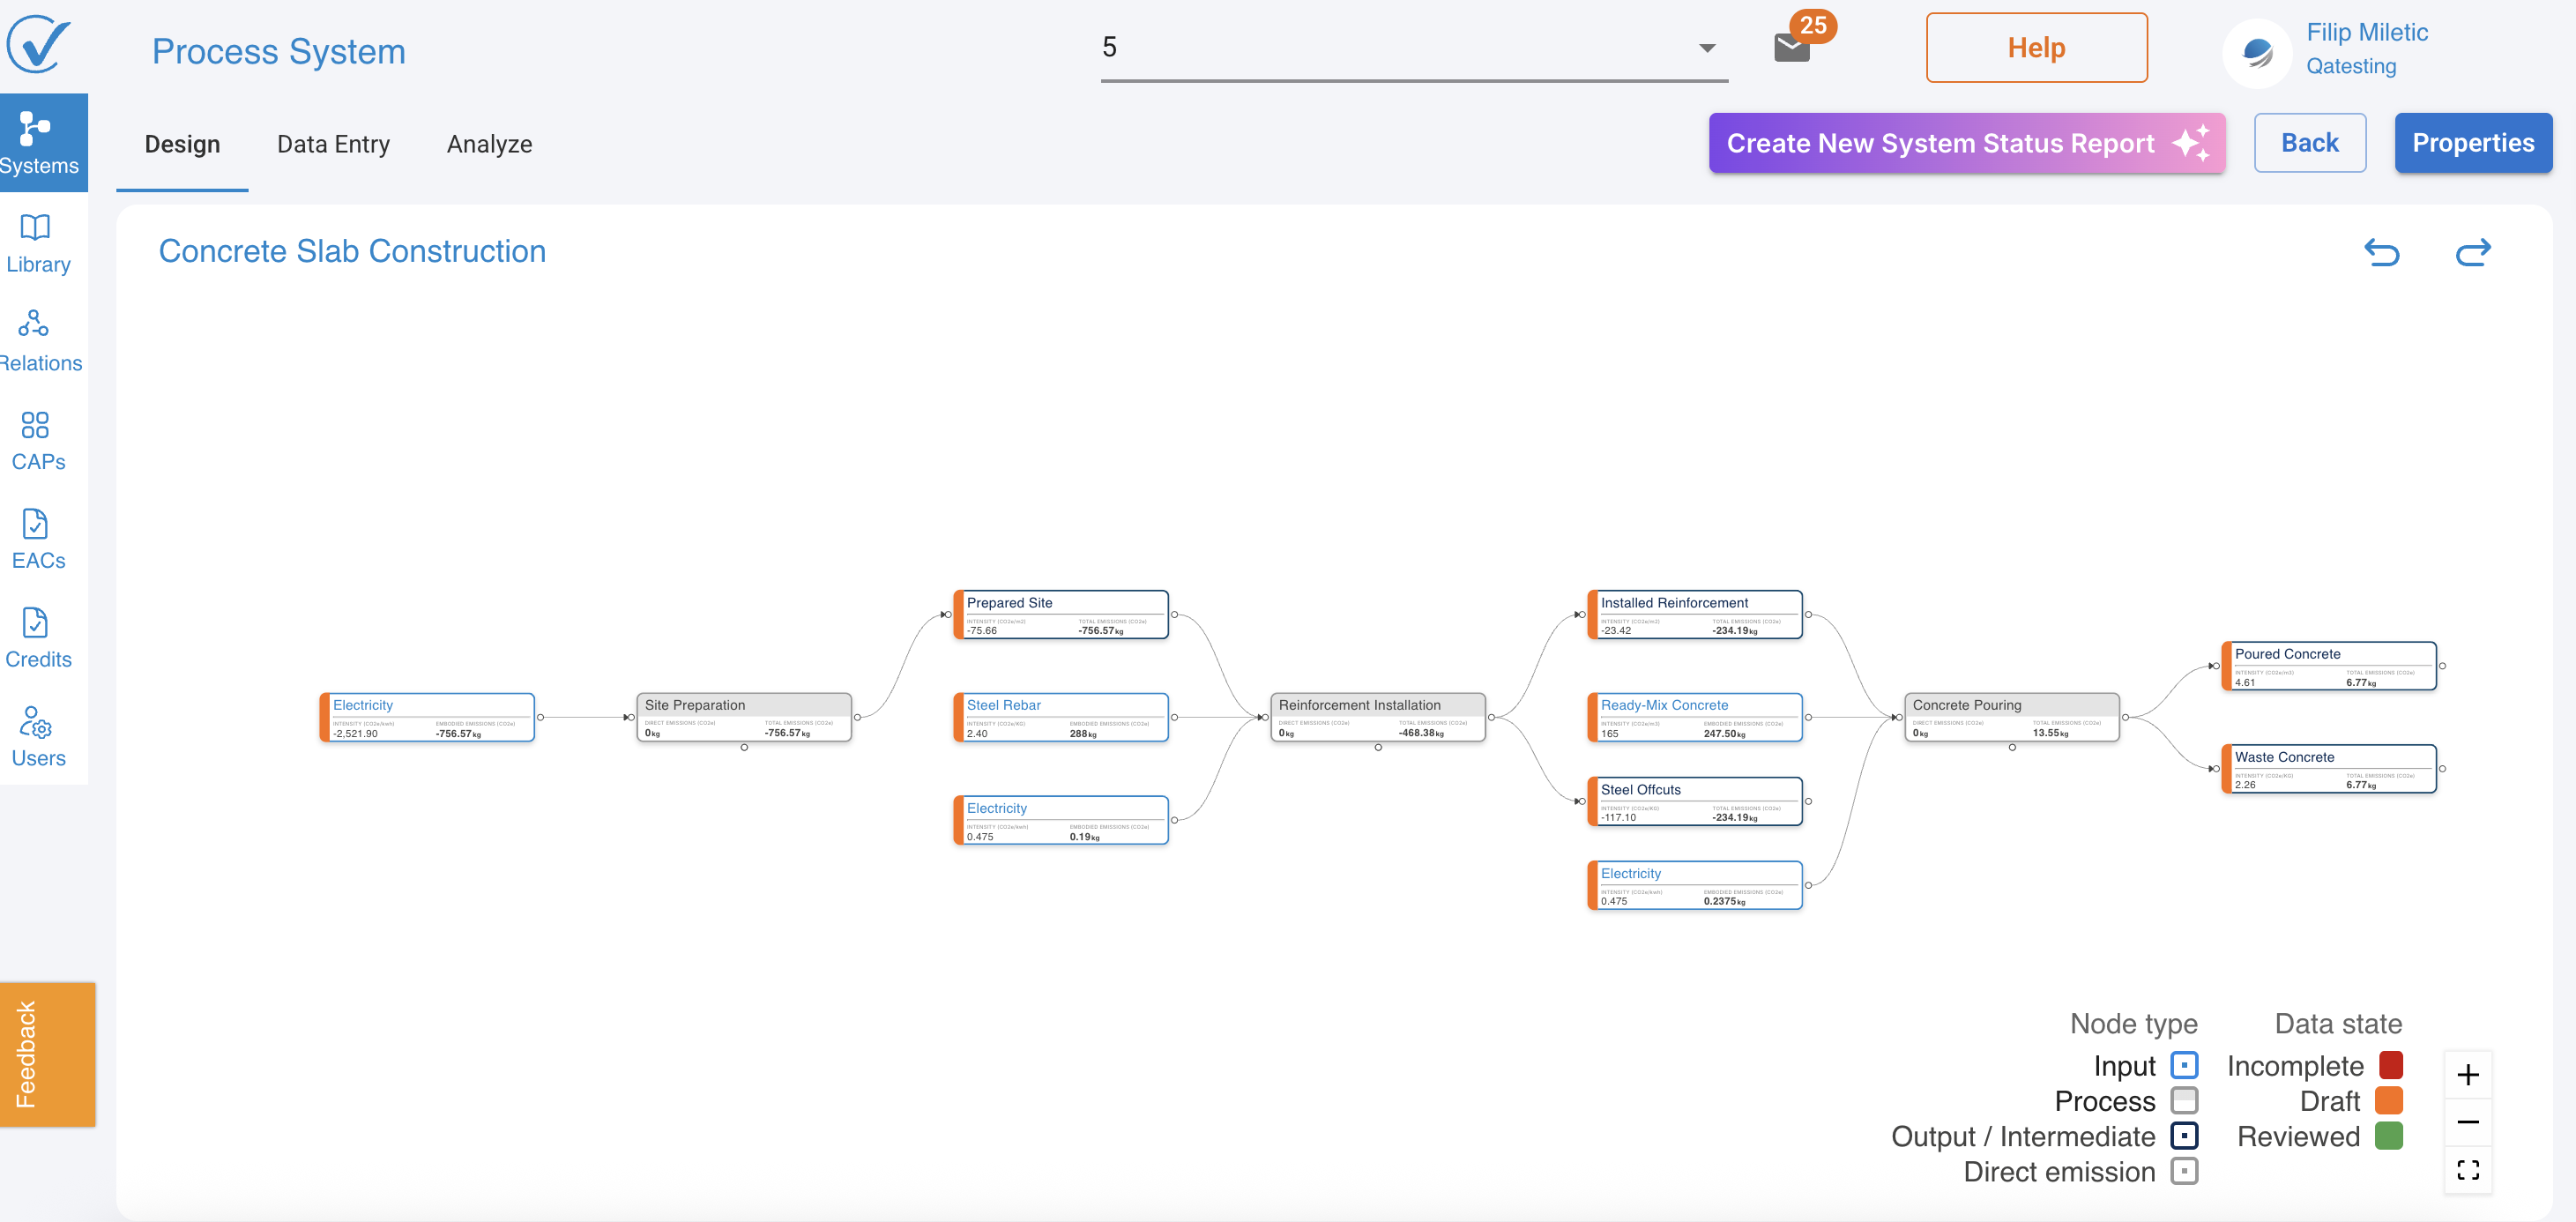
- What happens: Your system layout automatically adjusts to display the new visual indicators correctly
- Time required: 2-3 seconds per system
 |  |
1. Smarter System building with visual data indicators
We're excited to introduce a major enhancement to the System Builder that transforms how you track, verify, and trust your carbon accounting data. The new visual data system makes it instantly clear which data has been reviewed, which needs attention, and what's ready for analysis.
This update brings three powerful improvements that work together to give you complete confidence in your carbon footprint calculations.
What's new
1. Enhanced node information display
2. Three-Color node status system
2. Data review workflow
1. Enhanced node information display
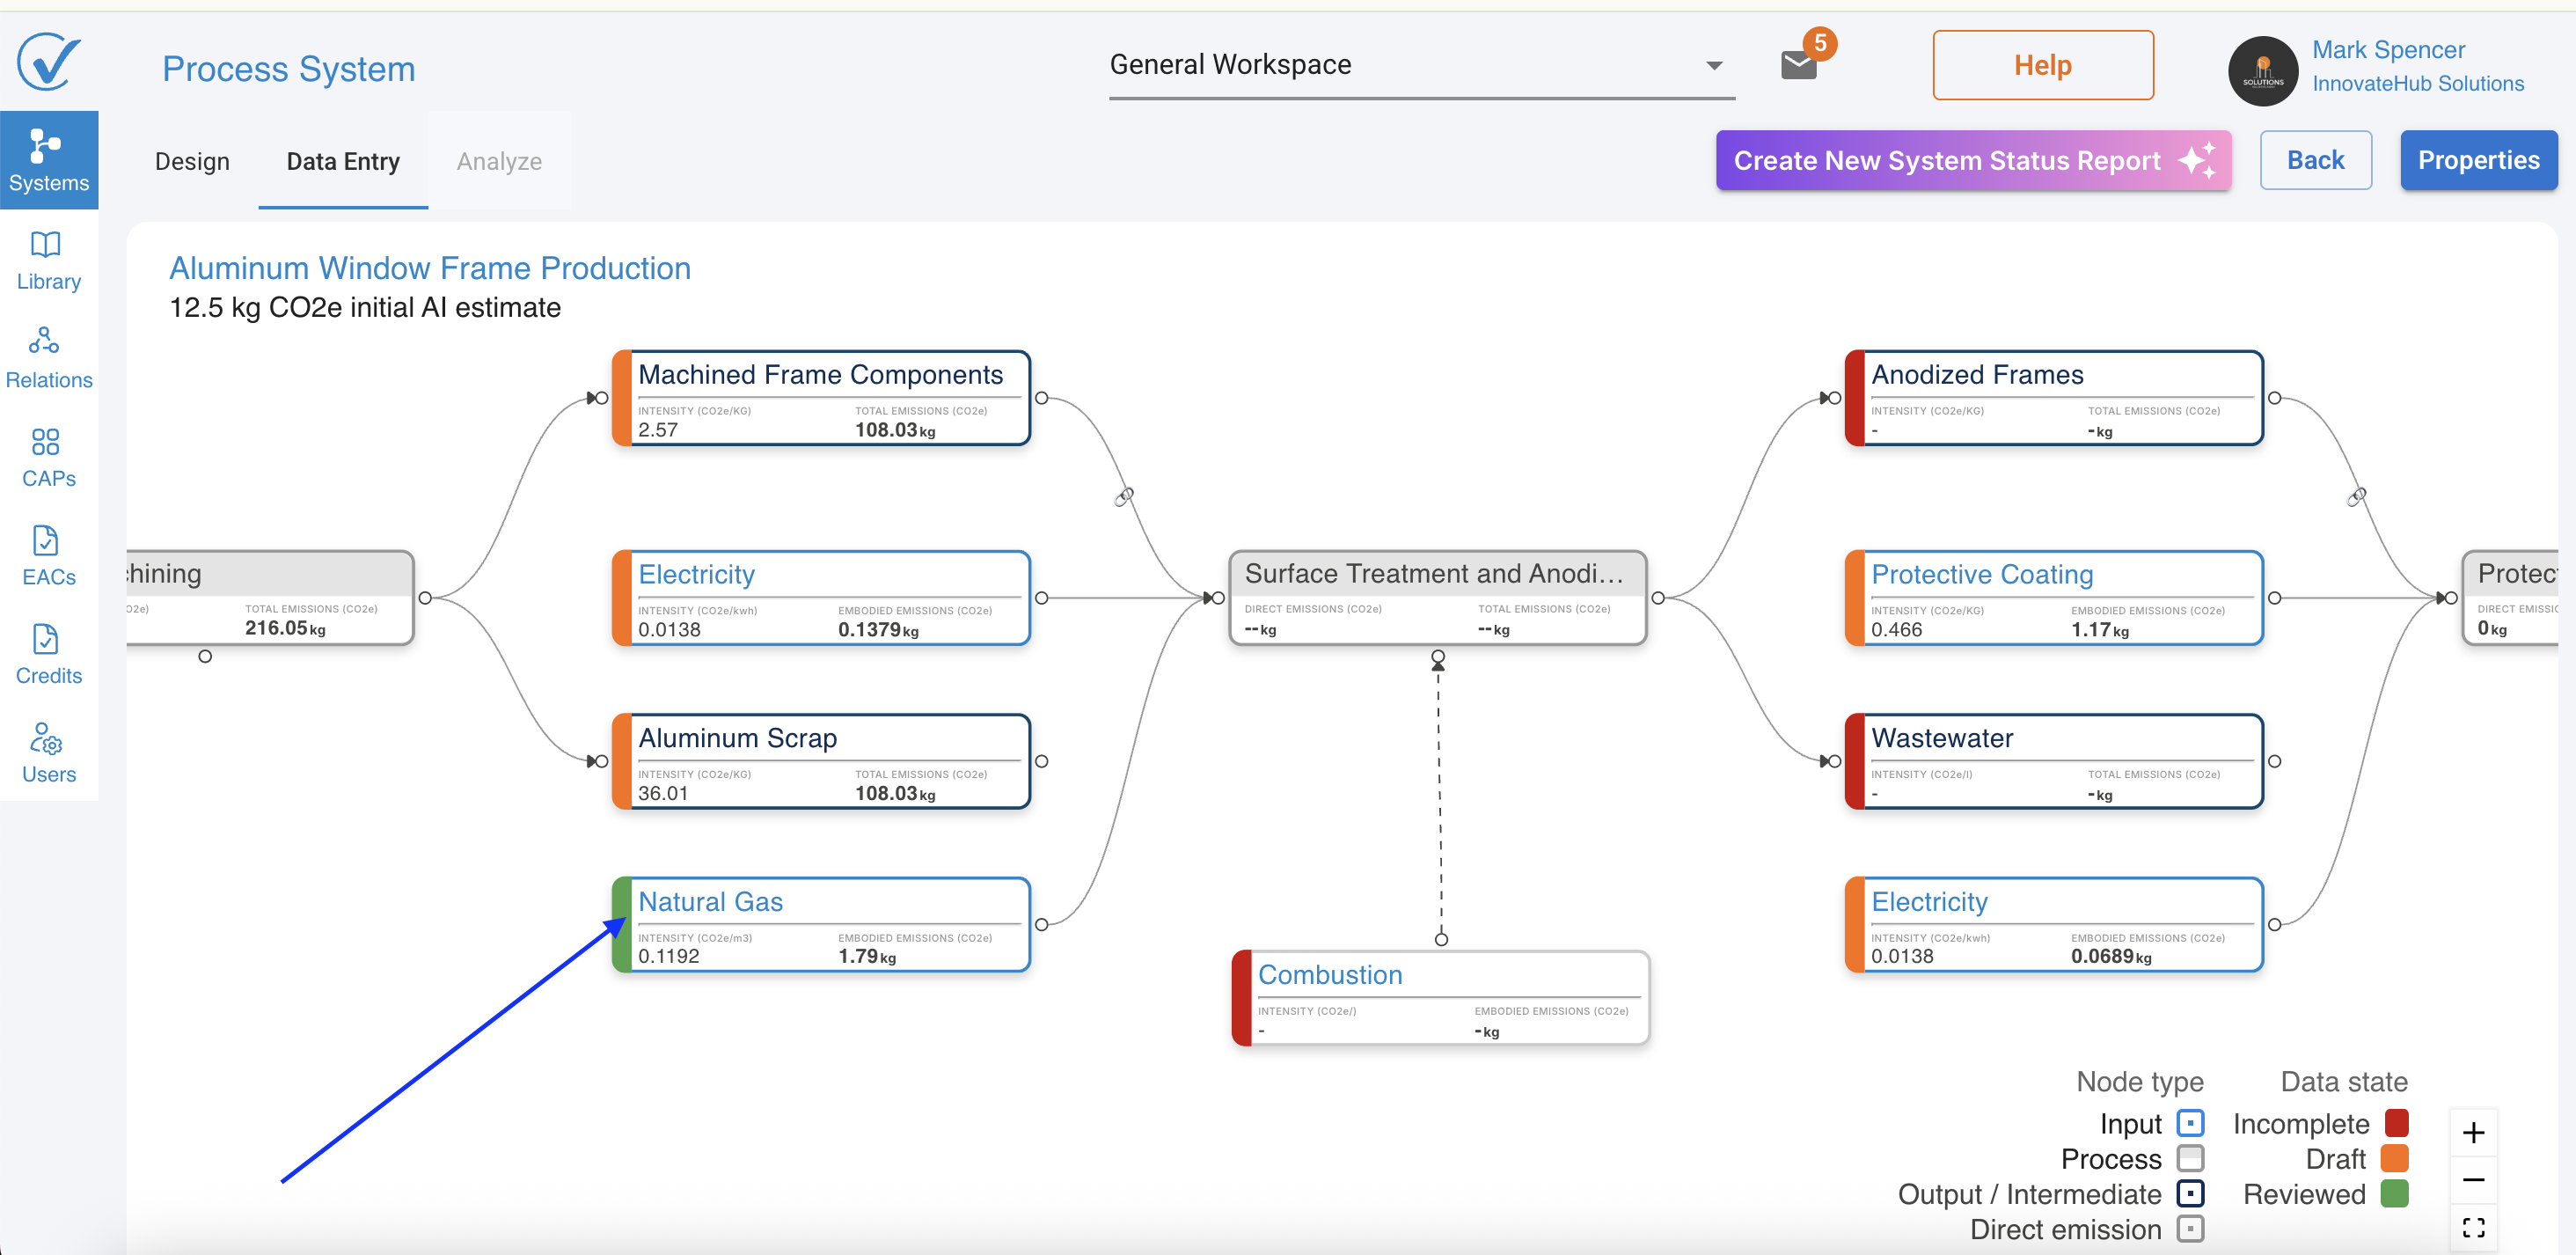
See critical emission data directly on your system canvas—no clicking required.
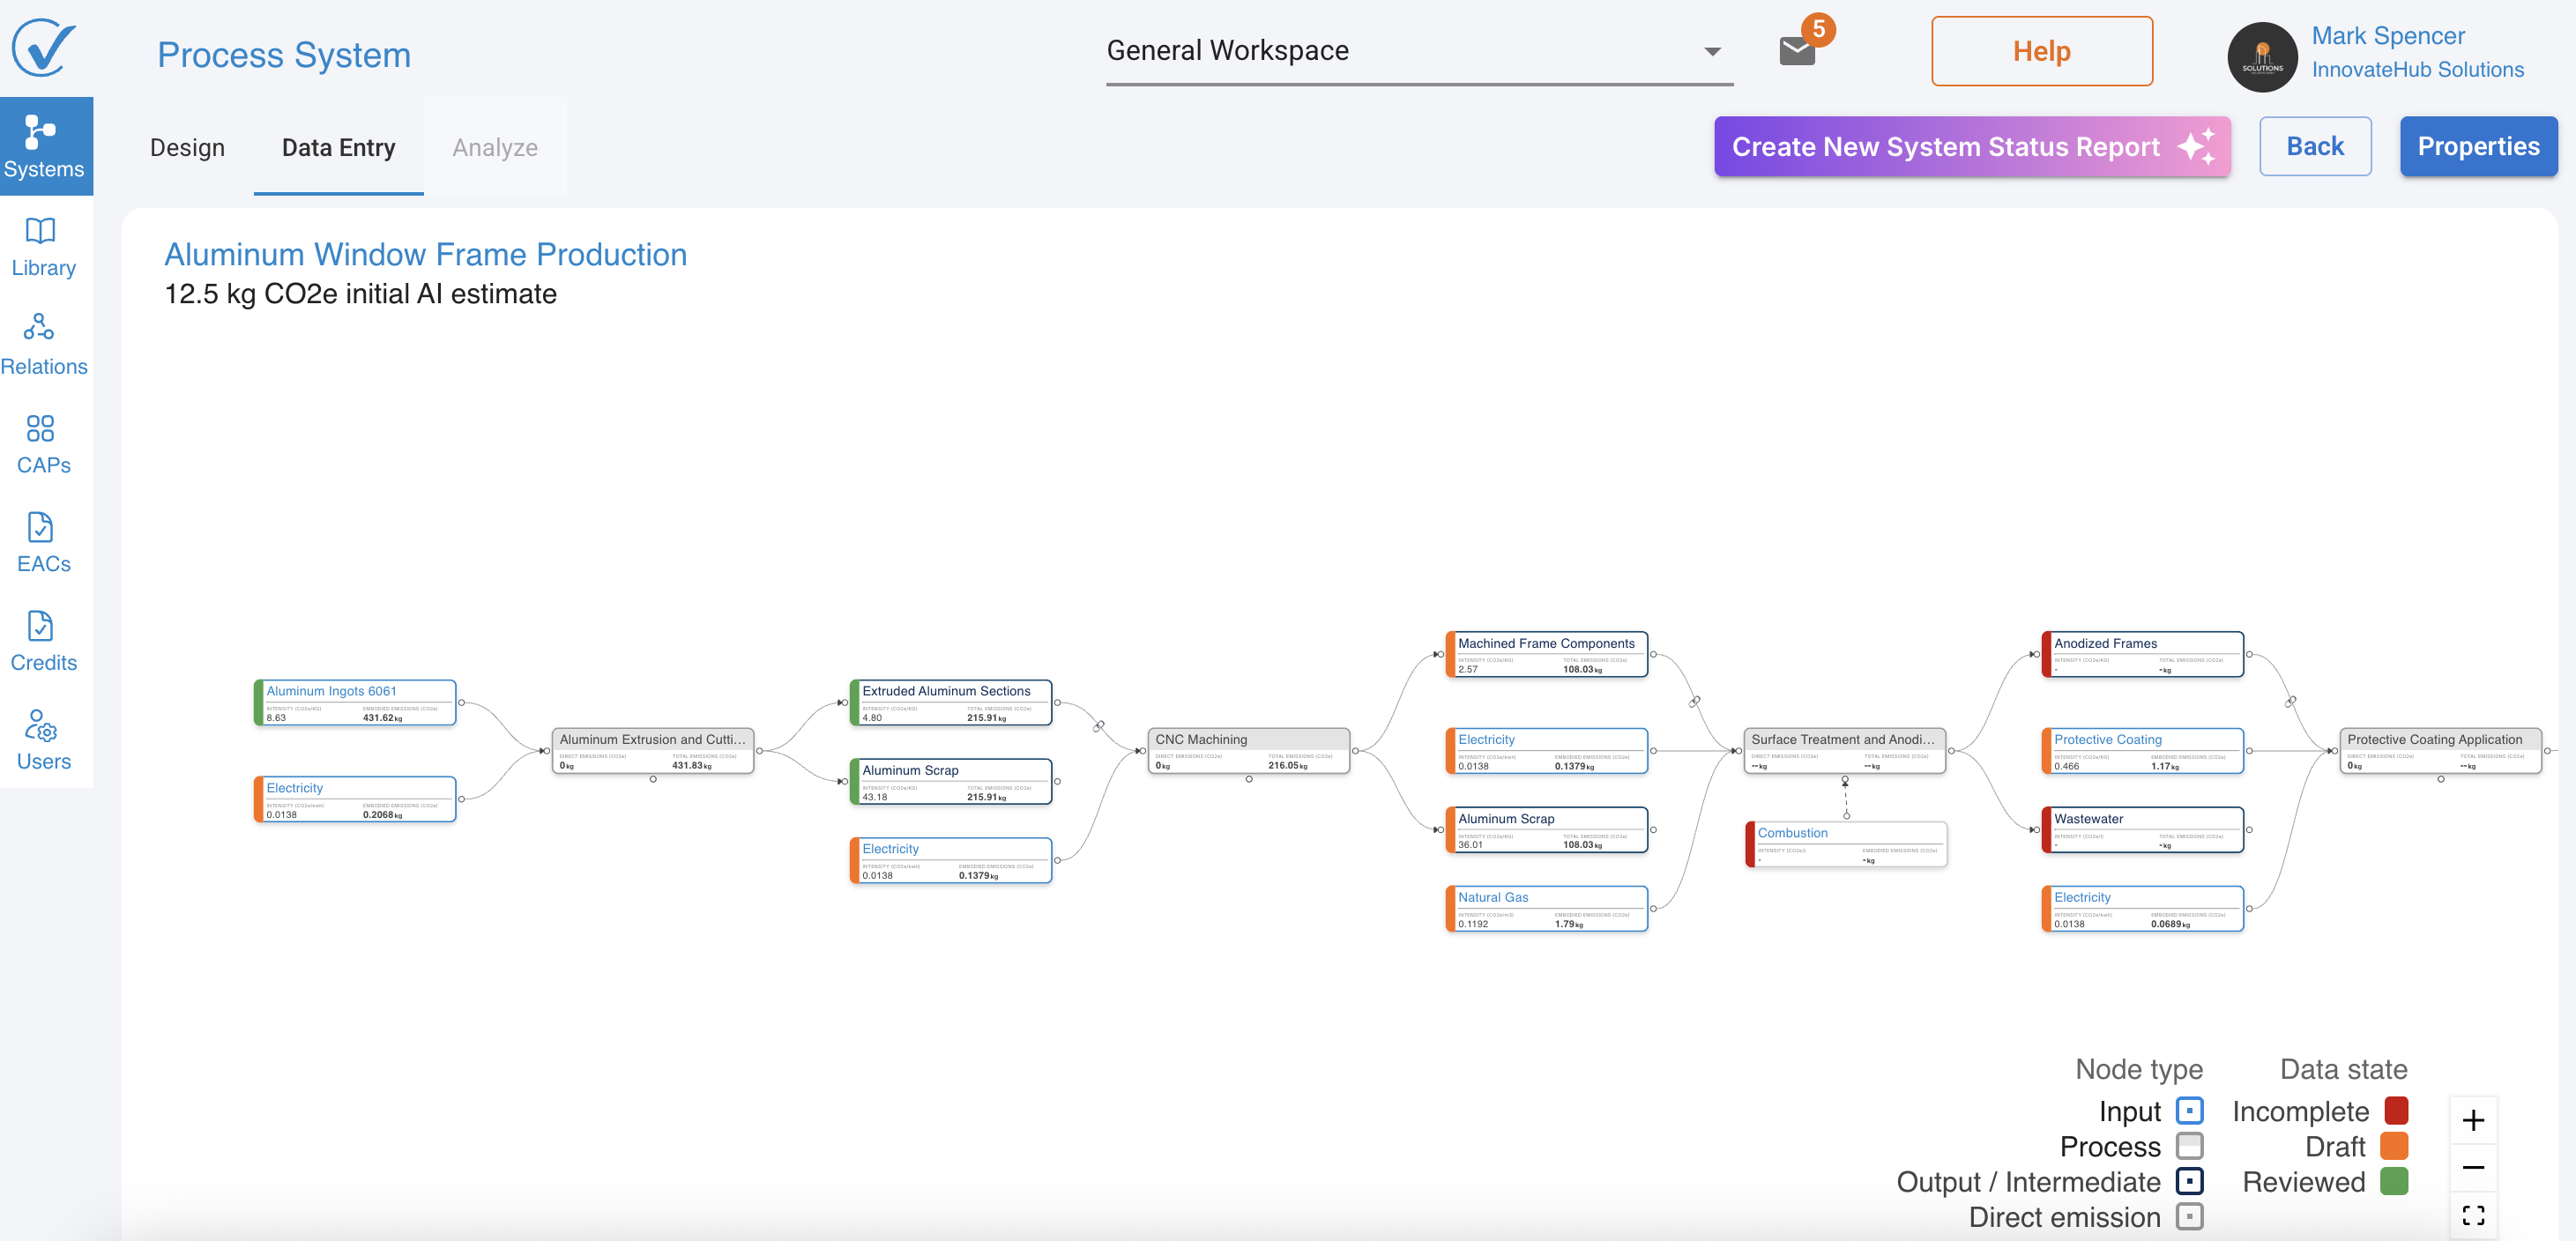
Nodes now display key emission information directly in Design Mode and Entry Mode, eliminating the need to open each node to see basic data.
What you see on each node type - Input, Direct Emission, and Output nodes:
Display three lines of information:
- Node name (e.g., "Electricity")
- Intensity (value + unit) → e.g., "0.0138 kg CO2e/kWh"
- Total Emissions (value + unit) → e.g., "0.2068 kg CO2e"

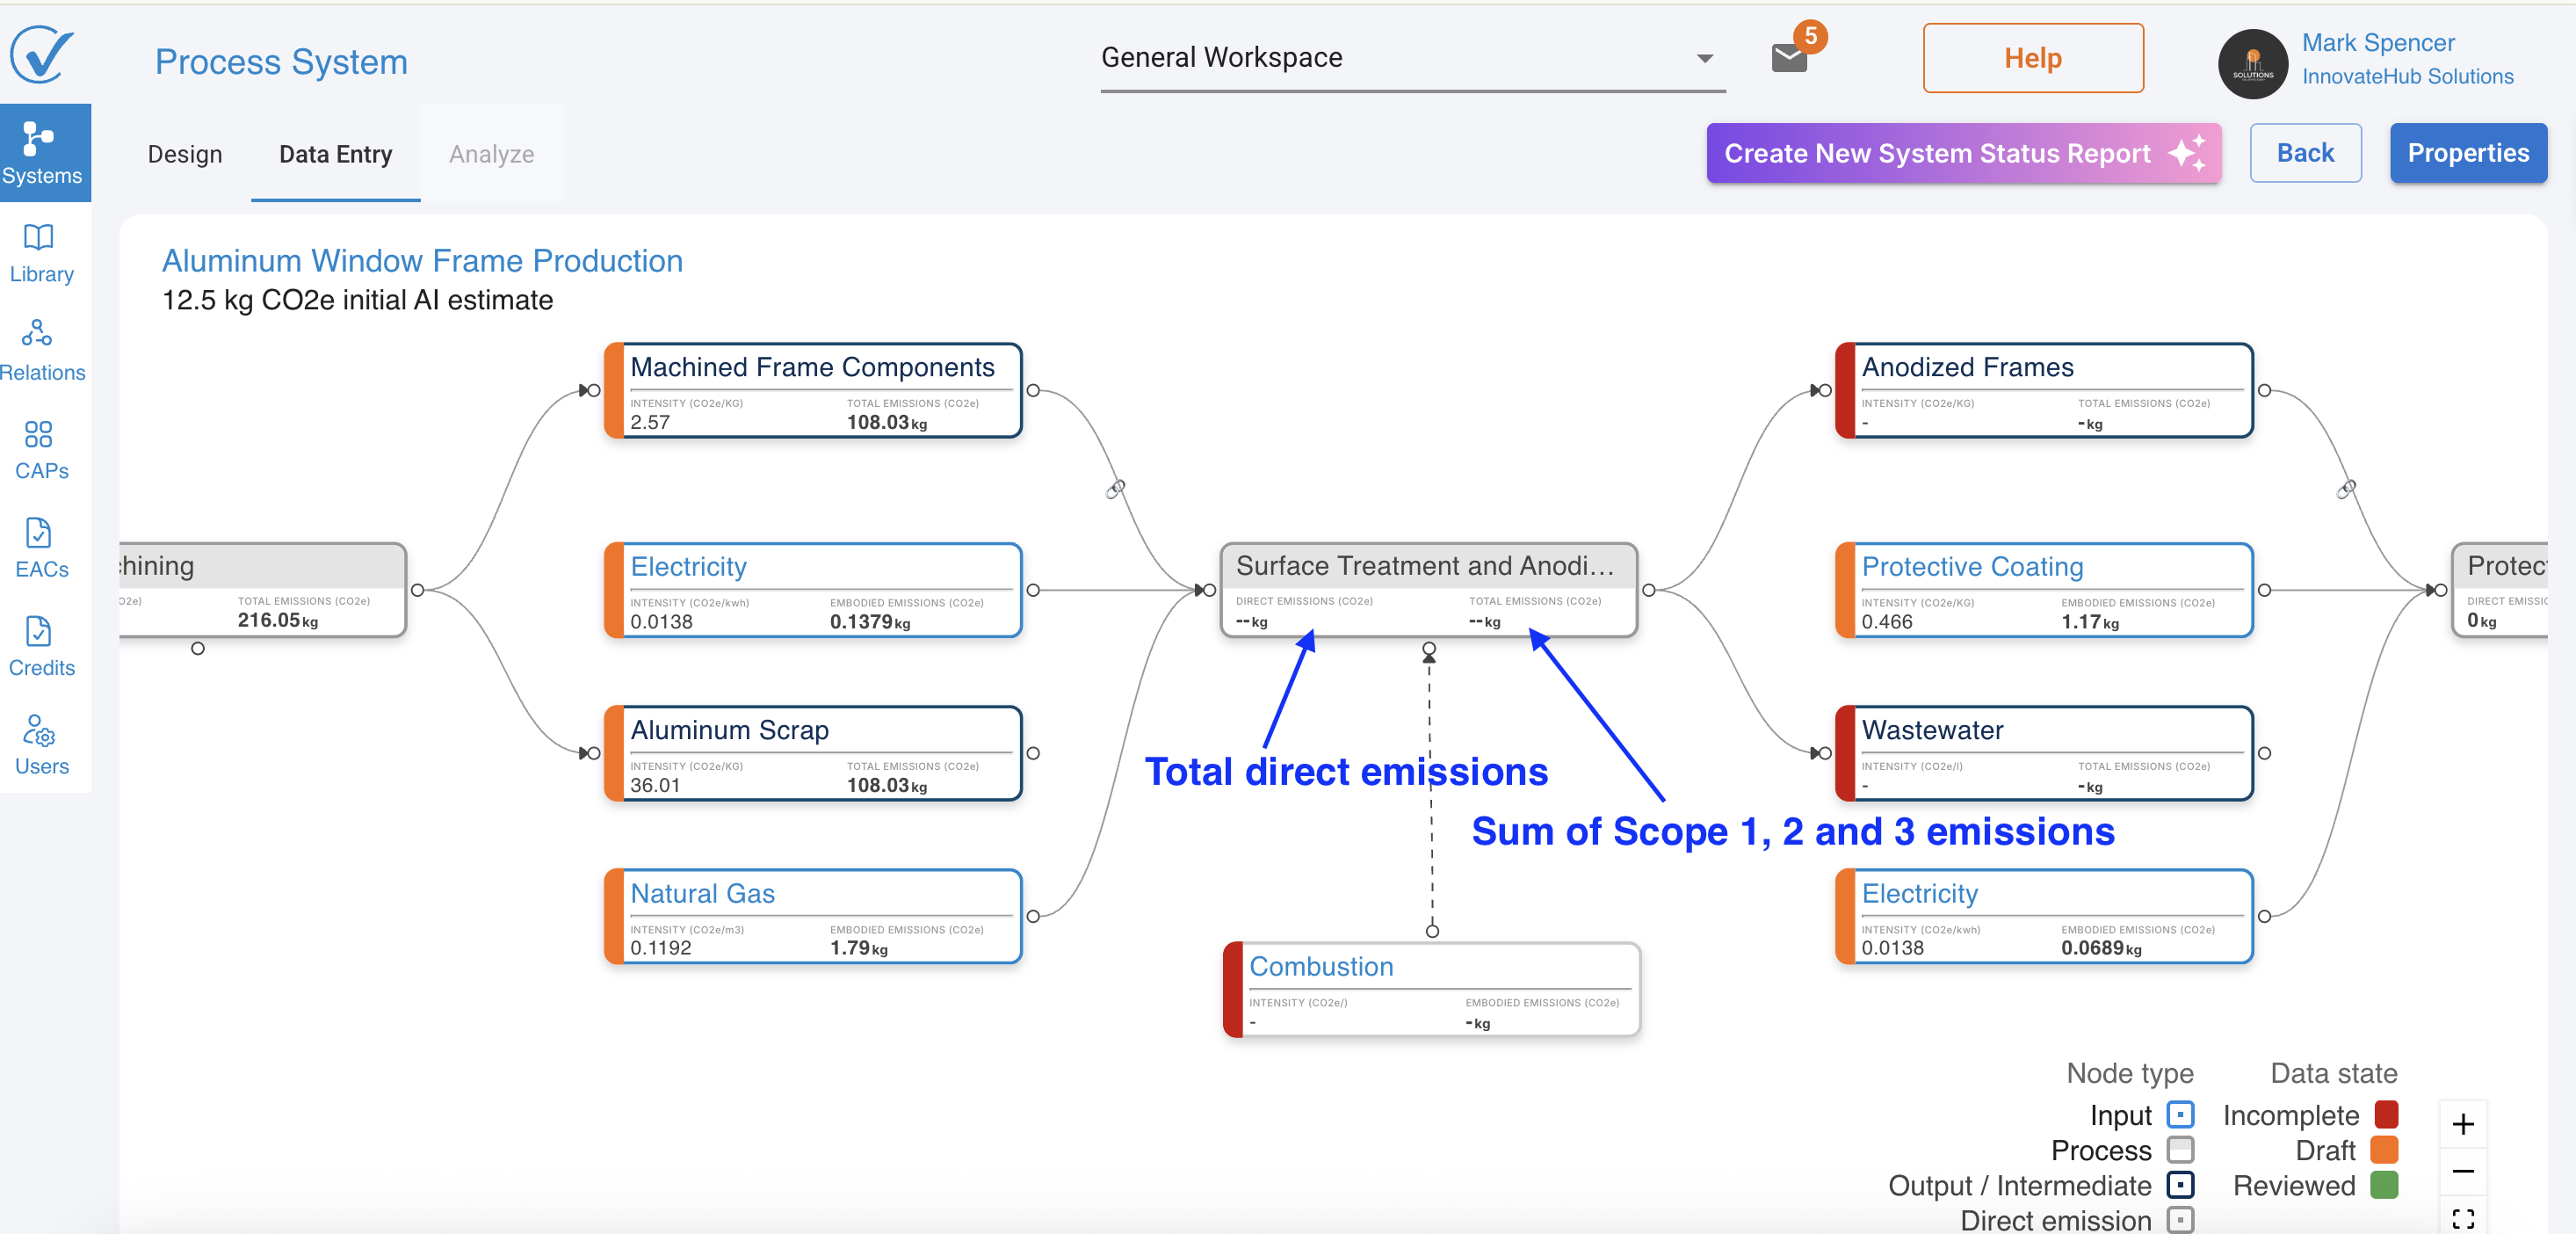
Process nodes:
Display three lines of information:
- Node name (e.g., "Surface Treatment and Anodizing")
- Total Direct Emissions (value + unit) → e.g., -- because some data is missing from the previous nodes
- Sum of Scope 1, 2, and 3 emissions (value + unit) → e.g., -- because some data is missing from the previous nodes
Benefits
- Instant overview: Identify high-emission nodes without opening modals
- Quick comparisons: Compare emission intensities across similar inputs
- Faster validation: Spot anomalies or errors at a glance
- Better context: Understand emission flows while building your system
- Enhanced collaboration: Discuss systems with stakeholders using visible data
2. Three-color node status system
Know exactly what state your data is in—at a glance.
New behavior:
- 🔴 Red = Incomplete (missing required data)
- 🟧 Orange = Draft (has data, needs your review)
- 🟩 Green = Approved (reviewed and confirmed by you)
Understanding the three states
🔴 Red — Incomplete
What it means:
- Node is missing required values
- Required fields not filled (quantity, unit, intensity, etc.)
- Cannot be included in analysis
- Must be completed by you
Behavior:
- Node stays red until ALL mandatory data is entered
- AI-generated values that are missing still show as red
- System cannot run Analyze until all red states are resolved
What to do: → Open the node in Entry Mode → Complete all required fields → Node automatically changes to Orange once data is complete
🟧 Orange — Unverified / AI-Generated / Estimated
What it means:
- Node contains data but hasn't been reviewed by you
- OR contains AI-generated values that is not reviewed
- OR has been edited since last approval
- Can participate in analysis, but results include uncertainty flag
Common reasons for Orange status:
- Data populated by "Build with AI"
- Emission factor suggested by "Suggest LCI with AI" but not reviewed
- You entered data manually but haven't reviewed it yet
- You edited a previously approved (Green) node
Behavior:
- Orange nodes CAN be analyzed (preliminary results available)
- Once you explicitly review and approve → turns Green
- If you edit anything → becomes Orange again until re-approved
- This color merges the old "AI" + "Hybrid" states
What to do: → Open the node in Entry Mode → Review all calculations and data sources → Toggle the approval button ON → Node changes to Green
🟩 Green — Reviewed
What it means:
- All values in the node have been manually reviewed by user
- No unverified AI data
- No missing data
- Ready for full analysis and reporting
- Highest confidence level for carbon calculations
Behavior:
- Only user approval turns a node Green
- If you modify any data, node reverts to Orange
- Indicates you've verified the data is accurate and appropriate
What to do: → Nothing! This node is verified and ready. → Use these nodes confidently for reporting and compliance.
Status Summary Table
| Color | Status | When It Appears | Ready for Analysis? |
|---|---|---|---|
| 🔴 Red | Incomplete | Missing fields, invalid values, required data empty | ❌ No |
| 🟧 Orange | Unverified | AI-generated, partially edited, or mixed values | ⚠️ Preliminary only |
| 🟩 Green | Approved | User manually verified everything | ✅ Yes, full confidence |
3. Data approval workflow
Explicitly confirm your data is accurate—no more ambiguity.
Every node modal in Entry Mode now includes an review toggle button that you must activate to confirm you've reviewed the data.
How it works
Step 1: Enter your data
Click on any node in Entry Mode and complete all required fields:
- Emission source (LCI, CAP, or System)
- Quantity
- Emission category
- Conversion factor
Step 2: Review the Calculations
Check the automatically calculated values:
- Emission intensity (kg CO2e per unit)
- Total emissions (kg CO2e)
Step 3: Review the Data
Toggle the "Review this input" button to ON
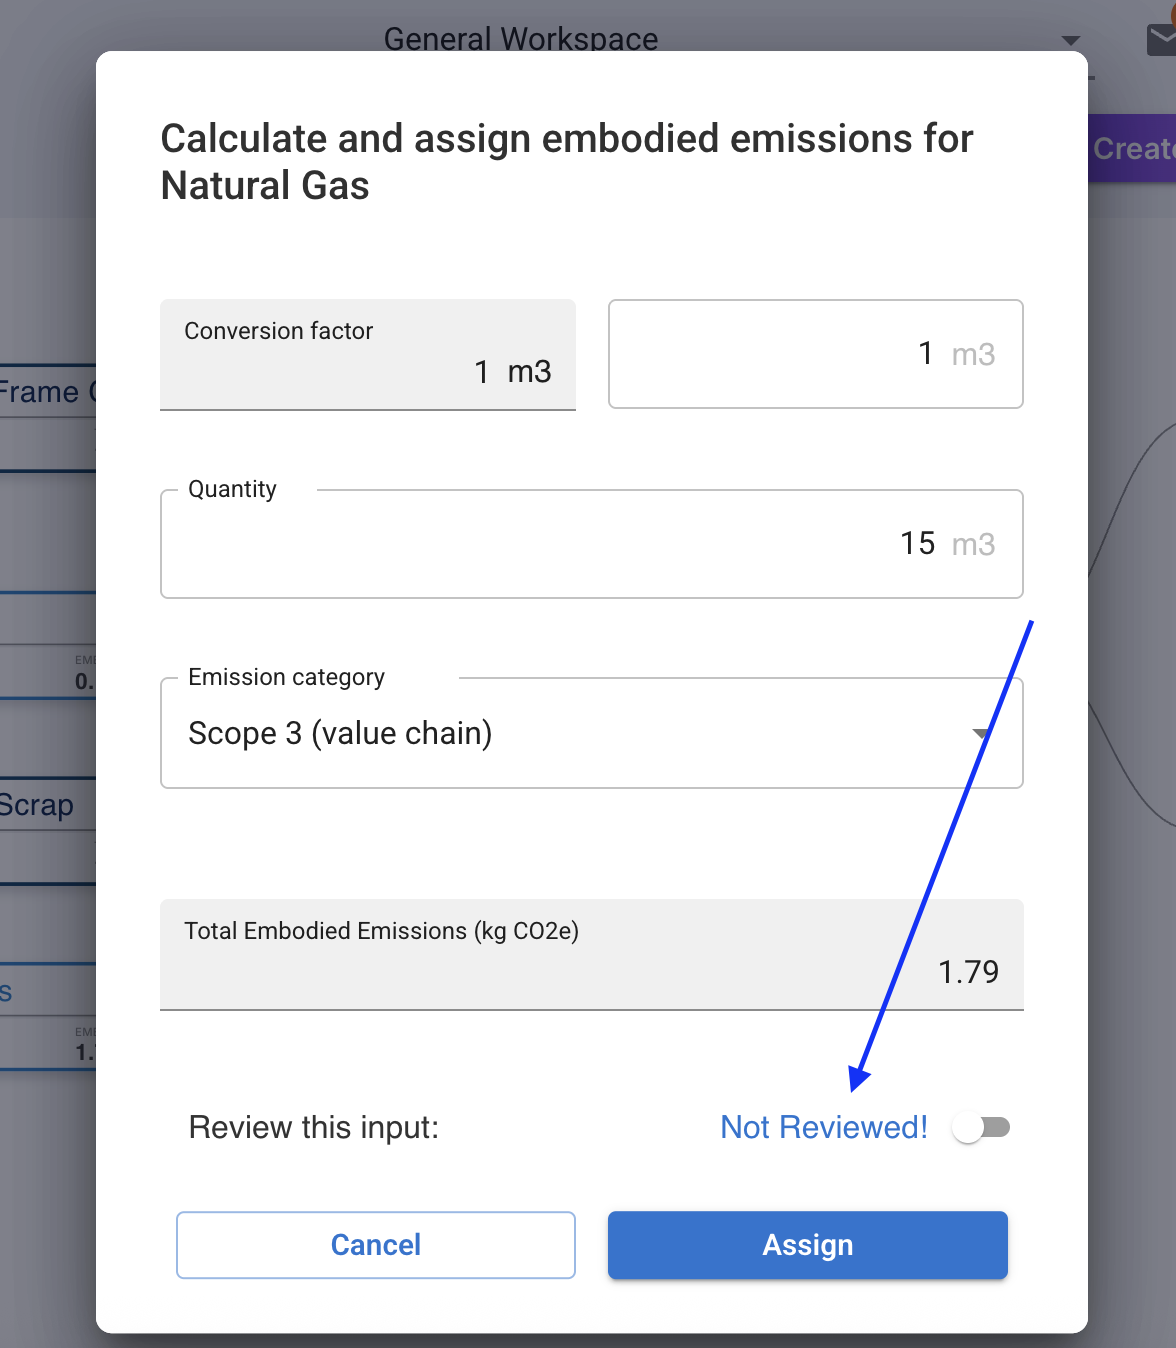
Button states:
- Disabled (greyed out): Some data is still missing
- Enabled (white): All required data is complete, ready for your approval
Step 4: Save
Click Assigne → Node changes from Orange to Green
When nodes require Re-review
Nodes automatically revert to 🟧 Orange (draft) status when:
You edit ANY field:
- Change quantity
- Modify conversion factor
- Switch emission source
- Update any calculation parameter
You import a system:
- Even if nodes were Green when exported
- Ensures new user verifies data applies to their context
Why this matters: Any modification could affect carbon calculations. Re-approval ensures you've reviewed the impact of changes.
Review workflow for AI-Generated Systems
When you use "Build with AI" or "Suggest LCI with AI":
All nodes start as 🟧 Orange (AI-Generated/Unverified)
Your review workflow:
Build with AI creates system
       ↓
All nodes show 🟧 Orange
       ↓
Switch to Entry Mode
       ↓
Open each node → Review AI selections
       ↓
Click "Why This LCI?" to understand reasoning
       ↓
Toggle approval ON if satisfied
       ↓
Node turns 🟩 Green
       ↓
Repeat for all nodes
       ↓
System ready for verified analysis
Important: You can run preliminary analysis and CAP generaition on Orange nodes, but Green nodes are required for final reporting, compliance documentation.
How these features work together
Example workflow: Creating a new System
Step 1: Build Structure in Design Mode
- Create processes, inputs, outputs
- All nodes show 🔴 Red (no data yet)
- See node structure clearly
Step 2: Switch to Entry Mode
- Click first Red node
- Enter emission data
- Node turns 🟧 Orange (data entered but not approved)
- Intensity and total emissions now visible on canvas
Step 3: Review and Approve
- Review calculations in modal
- Toggle approval button ON
- Click Accept
- Node turns 🟩 Green (verified)
- Continue for all nodes
Step 4: Visual Confirmation
- Return to Design Mode
- See mix of Red/Orange/Green nodes
- Instantly identify completion status
- All emission values visible on canvas
Step 5: Complete System
- All nodes Green = Highest confidence
- Ready for analysis, reporting, and CAP generation
Special behaviors to understand
Import/Export System behavior
Important change for system sharing:
When you export a system:
- System exports with current node colors (Red/Orange/Green)
- All data and approval states included in export file
When you import that system:
- ALL nodes revert to 🟧 Orange (Unapproved) status
- Even nodes that were Green before export
Why this happens:
- The person importing may be in different context (location, facility, processes)
- Data verification doesn't transfer between users or workspaces
- Each user must confirm data applies to their specific situation
- Ensures data quality and prevents blind acceptance
What to do after importing:
- Review each Orange node in Entry Mode
- Verify data matches your context and operations
- Toggle approval for nodes you've verified
- Nodes turn Green as you review them
Troubleshooting
Node won't turn green
Problem: I toggled approval but node is still Orange
Possible causes:
- Not all required fields completed
- Approval didn't save (check network connection)
- Page needs refresh
Solution:
- Verify ALL fields are filled (quantity, unit, emission source)
- Ensure approval toggle is ON
- Click Assigne to save
- Refresh page if needed
- If issue persists, contact support
Approval Button is Disabled
Problem: Can't toggle the approval button
Why:
- Button remains disabled until ALL required data is complete
- Missing fields prevent approval
Solution:
- Check for empty fields in the modal
- Look for red asterisks (*) indicating required fields
- Complete all mandatory fields
- Button will enable automatically
Node turned orange after I reviewed it
Problem: My Green node is Orange again
Why this happens:
- You (or a teammate) edited the node data
- Any modification reverts status to Orange
- System requires re-approval after changes
Solution:
- Review the modified data
- Verify calculations are still correct
- Toggle approval button ON again
- Node returns to Green
All Nodes Orange After Import
Problem: I imported a system and all nodes are Orange, even though they were Green before export
This is expected behavior:
Why:
- Import/export workflow requires re-verification
- Ensures data applies to new user's context
- Prevents blind acceptance of data
Solution:
- Review each Orange node in your context
- Verify data applies to your operations
- Approve nodes that are accurate for you
- Update nodes that need different values
Can I analyze with orange Nodes?
Yes, but with caveats:
Orange nodes:
- CAN be included in Analyze calculations
- CAN generate the CAP
- Provide preliminary carbon footprint estimates
- Results flagged as containing unverified data
- NOT recommended for final reporting or compliance
For final analysis:
- Ensure all nodes are Green (approved)
- Provides highest confidence results
- Suitable for regulatory reporting
Migration: What happened to existing Systems?
Your existing Systems are safe
All existing systems migrated automatically:
✅ Data integrity preserved
✅ Calculations remain accurate
✅ No action required on your part
Status mapping:
Why Orange not Green:
- Previous system couldn't track user verification
- Orange status prompts you to review existing data
- One-time verification process for legacy systems
Recommended action
For critical systems:
- Open in Entry Mode
- Review each Orange node
- Verify data is still accurate and current
- Toggle approval for verified nodes
- Node turns Green
For reference-only systems:
- Orange status is fine
- Review and approve when you need to use them
- No urgent action required
2. AI LCI Suggestions Now Understand Your Entire System
The Suggest LCI with AI feature just got significantly smarter — the AI now analyzes your complete system context, not just individual input names.
What Changed
Previously, AI suggestions were based only on:
- Input name
- Input description
- Notes field
- Attached documents
Now, the AI also considers:
- System-level context — your industry, location, and process type
- Connected processes — what happens before and after this input
- Other inputs in the system — materials and energy already defined
- System notes and attachments — uploaded BOMs, EPDs, and specifications
- Process relationships — how inputs flow through your operations
Why this matters
Example scenario: Steel input in Manufacturing system
| Before (Input-Only Context) | After (full system context) |
|---|---|
| AI sees: "Steel sheet" | AI sees: "Steel sheet" + automotive manufacturing + German location + followed by stamping process + part of vehicle frame system + connected to powder coating process |
| Suggests: Generic global steel data | Suggests: Cold-rolled automotive steel (EU region), appropriate grade for structural applications, suitable for stamping and coating processes |
| Confidence: Medium | Confidence: High |
Result: More accurate, context-aware recommendations that match your specific use case.
Real-World Benefits
Use Case 1: Complex Manufacturing Systems
Situation: Building a laptop computer assembly system
Before:
- AI suggested generic "aluminum" data for laptop chassis
- No differentiation between cast, extruded, or sheet aluminum
- Generic global data didn't match electronics manufacturing
After:
- AI sees: chassis → follows PCB assembly → precedes quality testing
- System context: electronics manufacturing, Asia region
- Other inputs: precision components, cleanroom processes
- Result: Suggests high-grade aluminum alloy (6000 series), sheet form, suitable for CNC machining, appropriate for electronics housing
Time Saved: 15-20 minutes per input Accuracy Improvement: ~40% reduction in manual corrections
Use Case 2: Food & Beverage Production
Situation: Creating a bottled juice production system
Before:
- "Glass bottle" → generic glass data
- No consideration of beverage context
- Missing food-grade requirements
After:
- AI sees: bottles → used in filling process → part of juice packaging
- System context: food manufacturing, Europe, pasteurization process
- Other inputs: fruit concentrate, water, energy for heating
- Result: Suggests food-grade glass bottles, beverage industry standard, appropriate for hot-fill pasteurization
Confidence Score: Improved from Medium to High Verification Time: Reduced by 60%
Use Case 3: Construction Materials
Situation: Modeling concrete production for building project
Before:
- "Cement" → generic Portland cement data
- No regional energy mix consideration
After:
- AI sees: cement → mixed with aggregates → produces ready-mix concrete
- System context: construction materials, Nordic region, cold climate
- Process relationships: batching → mixing → delivery
- Result: Suggests Nordic cement (lower-carbon European production), appropriate for freeze-thaw resistance, regional energy grid accounted for
Accuracy: Climate-specific recommendations ensure realistic carbon footprints
Best practices for maximum benefit
1. Build System structure first
Do this:
- Complete all processes, inputs, and outputs in Design Mode
- Connect nodes to show material and energy flows
- Add descriptions to processes and key inputs
- Then switch to Entry Mode for data population
Why: AI needs complete structure to understand relationships
2. Use notes & attachments strategically
Do this:
- Attach EPDs and product specifications at system level
- Add process-specific notes for specialized equipment
- Include supplier documentation for key materials
- Upload energy bills for accurate grid data
Why: AI can extract relevant information from all uploaded documents
3. Provide rich System context
Do this:
- Write detailed system descriptions with industry and location
- Upload complete BOMs and technical specifications
- Add process notes explaining unique characteristics
- Specify geographic region and energy sources
Why: More context = smarter AI suggestions
4. Leverage related Inputs
Do this:
- Populate major inputs first (energy, primary materials)
- Let AI use these as reference points for related inputs
- Notice how AI suggestions become more consistent
- Build up system data iteratively
Why: AI learns from your choices to improve subsequent suggestions
5. Review AI explanations
Do this:
- Always check "Why This LCI?" for context-based reasoning
- Verify geographic and process matches
- Confirm AI understood your system relationships
- Provide feedback if suggestions miss the mark
Why: Helps you understand AI logic and improve future suggestions
Feedback and support
We value your feedback as we continue to enhance CarbonSig:
Share your experience
Have you noticed:
- Faster system building?
- More relevant AI suggestions?
- Better confidence scores?
- Improved modal usability?
Let us know:
- In-App Feedback: Use the Feedback button to share your experience
- Email Support: support@carbonsig.com for questions or issues
- Help Center: Visit help.carbonsig.app for guides and tutorials
Related documentation
AI features
- Build with AI: AI-Powered System Builder
- Suggest LCI with AI: AI-Powered Emission Data Selection
- How to Write Effective Prompts for Build with AI
- AI LCI Explanation Report
System building
- Quick Start: Build Your First System
- Design Your System (Design Mode)
- Add Data to Your System (Entry Mode)
- Manage Your Systems
Data management
Keywords
Primary: AI system context, enhanced LCI suggestions, System Builder UX, intelligent carbon accounting, context-aware AI, semantic search carbon data, full system analysis, enhanced modal design
Secondary: process relationship AI, geographic LCI matching, system-wide AI suggestions, improved user experience, carbon footprint automation, smart emission matching, workflow optimization, modal improvements
Technical: system graph analysis, context vector embeddings, multi-factor AI ranking, process topology analysis, Material-UI components, WebGL canvas rendering, semantic LCI search, relationship-aware suggestions
Thank you for being part of the CarbonSig community. Together, we're making carbon accounting more intelligent, efficient, and accurate.
Last updated: December 2025