
External User Onboarding Guide
What is an External User?
External Users are professionals from outside your organization who need access to your CarbonSig workspace. They might be:
- Consultants working with multiple clients
- Partners collaborating on joint projects
- Vendors providing specialized services
- Auditors reviewing carbon data
- Contractors supporting specific projects
Key difference: External Users maintain their primary CarbonSig account with another organization while accessing your workspace. This allows one person to work across multiple organizations seamlessly.
Two Perspectives
This guide covers the onboarding process from both viewpoints:
👤 Part 1: For External Users receiving an invitation
⚙️ Part 2: For Admins inviting External Users
Part 1: For External Users
You've Been Invited to Collaborate! 🤝
An organization has invited you to join their CarbonSig workspace as an External User. This means you'll be able to collaborate with their team while maintaining your primary account elsewhere.
What Happens During External User Onboarding
Step 1: Receive the Invitation Email
You'll get an email invitation from the organization inviting you to their workspace.
What you need to do:
- Open the email from CarbonSig
- Review which organization is inviting you
- Click the invitation link
Good to know: This invitation is specifically for adding you to their workspace - you'll keep your existing CarbonSig account and credentials.
Step 2: Accept the Invitation
When you click the invitation link, you'll be taken to an acceptance page.
What you'll see:
- Which organization is inviting you
- Which workspace(s) you're being added to
- What role you'll have (your permissions)
What you need to do:
- Review the details
- Sign in with your existing CarbonSig credentials
- Accept the invitation
Why this matters: You're granting this organization permission to add you to their workspace. You'll be able to access their data according to the role assigned to you.
Step 3: Access Your New Workspace
After accepting, you'll have immediate access to the new organization's workspace.
How to switch between accounts:
- Look for the workspace selector in your CarbonSig navigation
- You'll see both your primary organization and any external organizations
- Click to switch between workspaces
What you can do: Your permissions depend on the role assigned to you:
- Admin: Full access to all workspaces, user management, and complete organizational control
- Editor: Create, modify, and delete content in assigned workspaces (Models, Registered, Libraries, EACs, Relations, Carbon Credits)
- Viewer: Read-only access to view data and reports in assigned workspaces
Learn more about roles and permissions →
Understanding Your External User Status
What It Means
As an External User:
- ✓ You maintain your primary CarbonSig account
- ✓ You can work with multiple organizations simultaneously
- ✓ Each organization controls your access to their data
- ✓ You have the same capabilities as internal users within your assigned role
- ✓ You can be an Admin for external organizations (full permissions)
Your Primary Account
You can only be a primary User (internal team member) for ONE organization, but you can be an External User for unlimited organizations. Your primary organization is typically your employer or main affiliation.
Data Access & Security
Data separation: You only see data from workspaces you've been specifically granted access to. Even if you're an External User for multiple organizations, their data stays completely separate.
Security: All workspace data is protected with:
- 🔒 Role-based access control
- 🔐 Workspace-level data isolation
- 👥 Permission management by each organization
- 📊 Audit trails for all actions
Managing Your External User Relationships
Switching Between Organizations
Use the workspace selector to move between organizations:
- Click your current workspace name
- Select the organization you want to work with
- Access that organization's data and tools
Leaving an External Organization
If you no longer need access to an external organization:
- Contact that organization's admin to remove your access
- Or wait for them to remove you when your project ends
Note: You cannot remove yourself from external organizations - only their admins can manage access.
Troubleshooting
Can't find the invitation email?
- Check your spam or junk folder
- Search for emails from "CarbonSig" or the inviting organization
- Ask the admin to resend the invitation
Invitation link not working?
- Make sure you're signed in to your CarbonSig account first
- Try copying and pasting the link into your browser
- Clear your browser cache and try again
- Contact the inviting organization's admin
Don't see the new workspace after accepting?
- Refresh your browser
- Check the workspace selector for the organization name
- Verify you accepted the invitation successfully
- Contact the organization's admin to verify access was granted
Having other issues?
📧 Contact support: support@carbonsig.com
📚 Help Center: help.carbonsig.app
Part 2: For Admins
How to Invite External Users
As an admin, you can invite professionals from other organizations to collaborate in your workspace.
When to Use External Users
Use External Users for:
- Consultants working on specific projects
- Partners collaborating on joint initiatives
- Auditors reviewing your carbon data
- Vendors supporting your operations
- Any external professional who already has a CarbonSig account
Key indicator: The person already has a CarbonSig account with another organization and maintains their primary affiliation there.
Step-by-Step: Inviting External Users
Step 1: Access User Management
Navigate to the User Management section in your CarbonSig admin panel.
Where to find it:
- Look for the "Users" tab in your left sidebar
- This is only visible to users with Admin role
Step 2: Start Adding a User
Click the "Add User" button.
What happens next:
- A form appears asking for the user's email address
- You'll enter their existing CarbonSig email
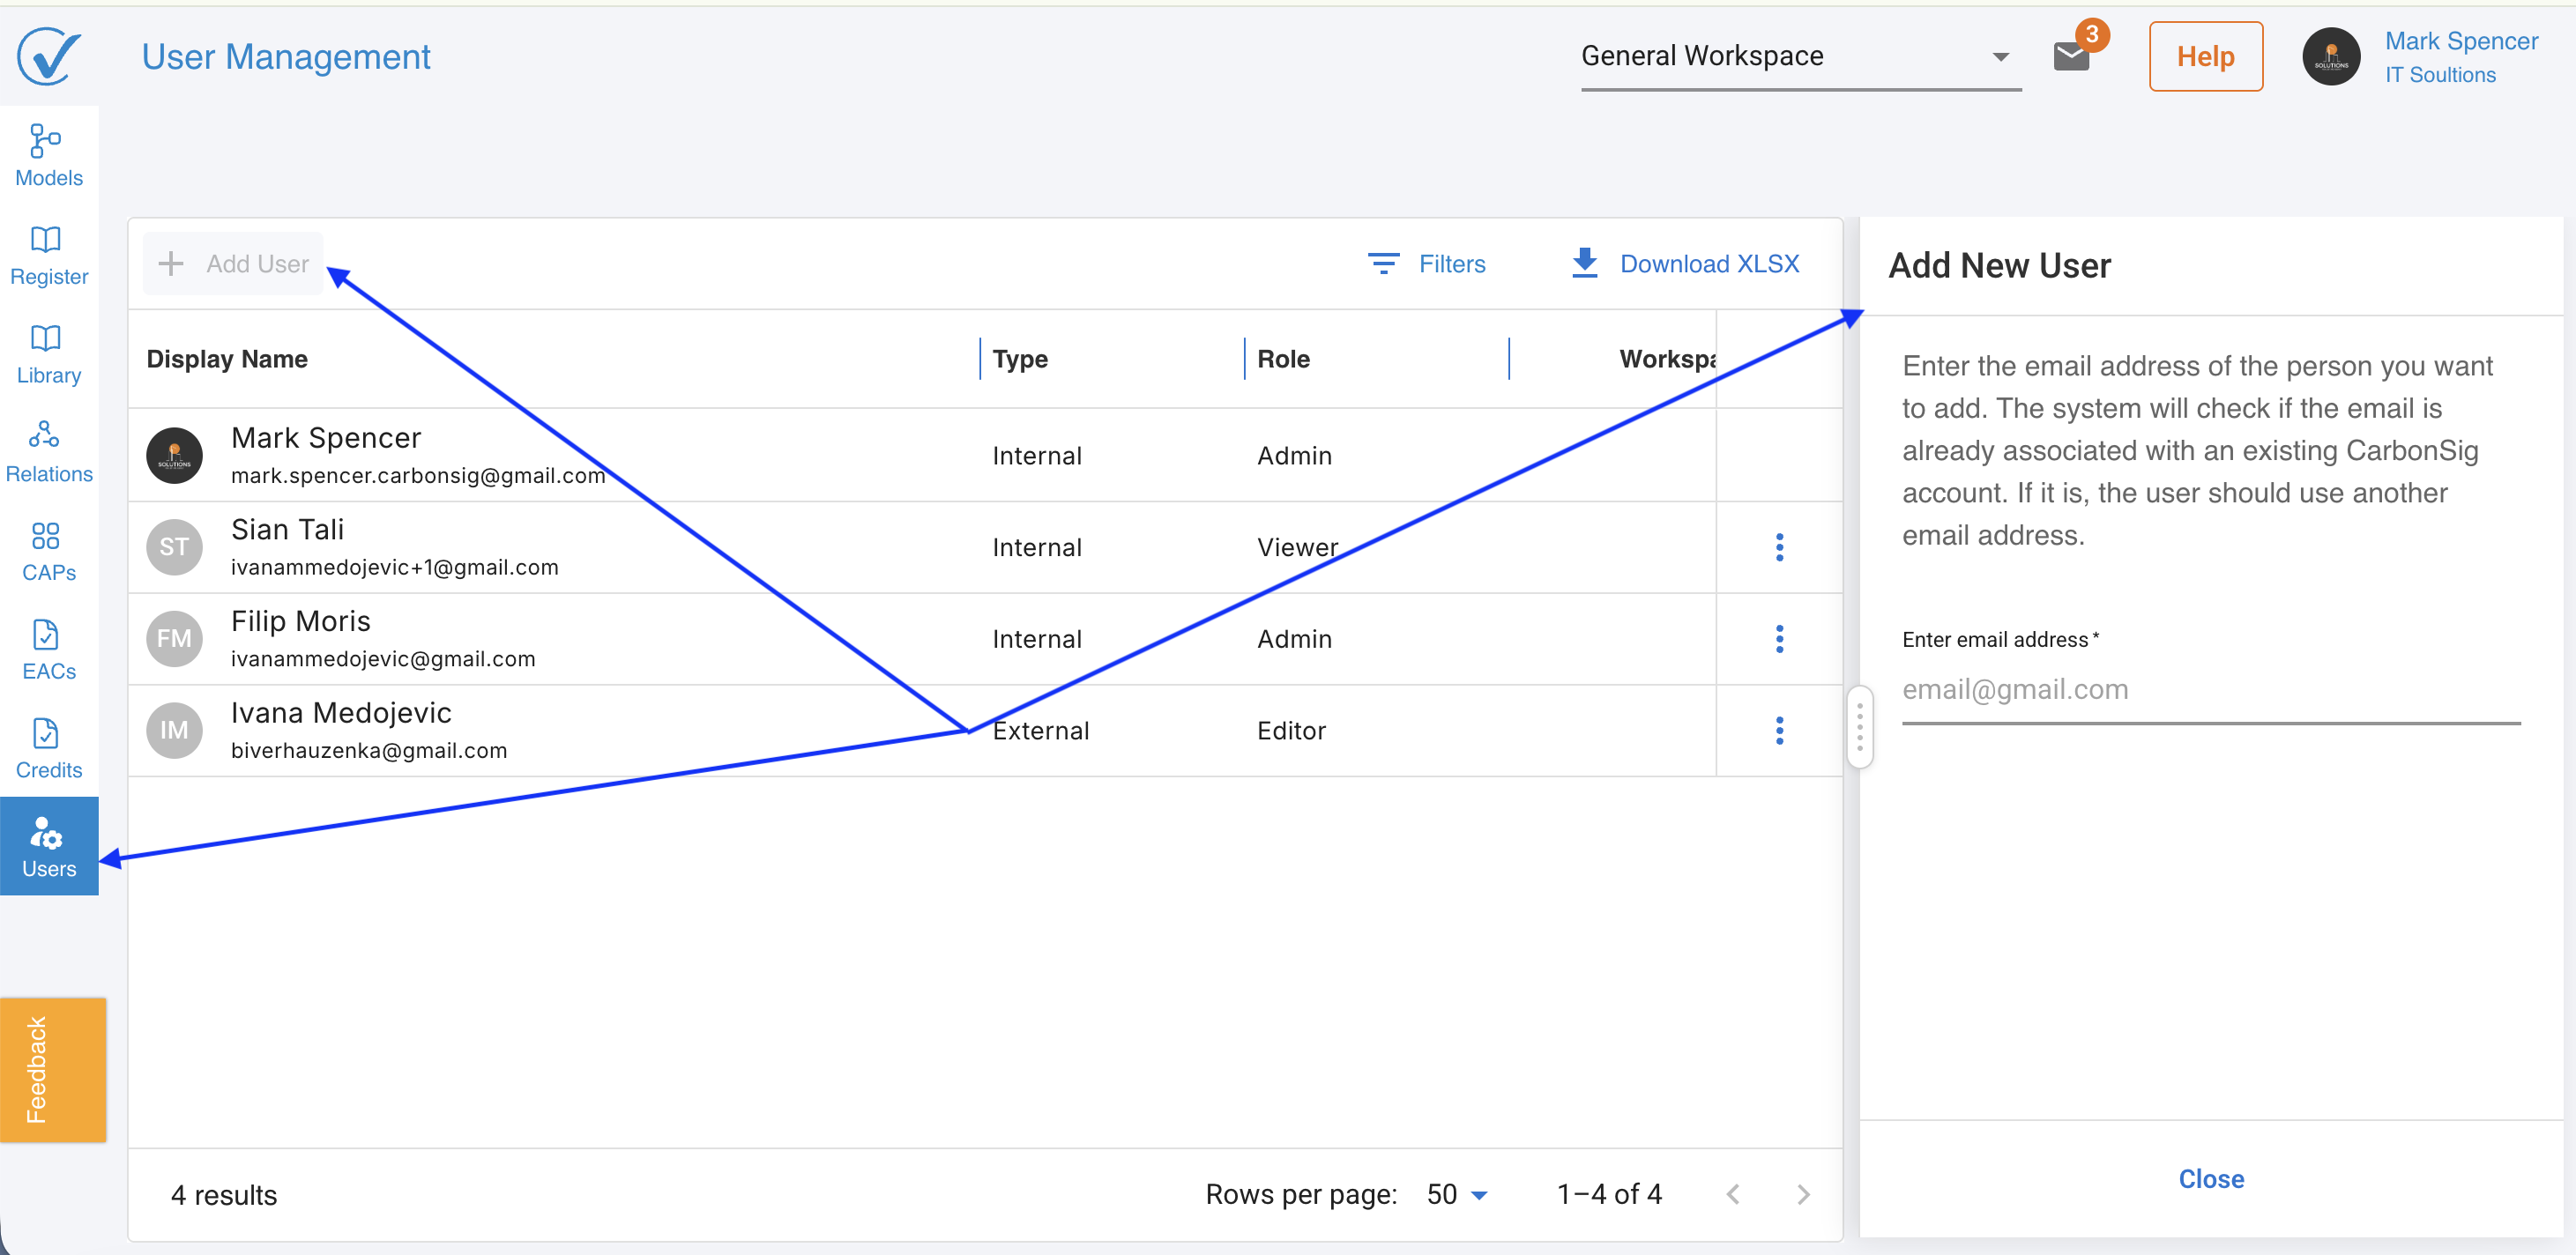
Step 3: Enter Email Address
Type the email address of the person you want to invite.
System check: CarbonSig automatically checks if this email is already registered:
- ✓ Account found: The person already has a CarbonSig account → They'll be added as an External User
- ✗ Account not found: The person doesn't have an account yet → They'll be added as an internal User (different process)
Why this matters: External Users already have CarbonSig accounts elsewhere. The system prevents duplicate accounts and maintains their primary organization relationship.
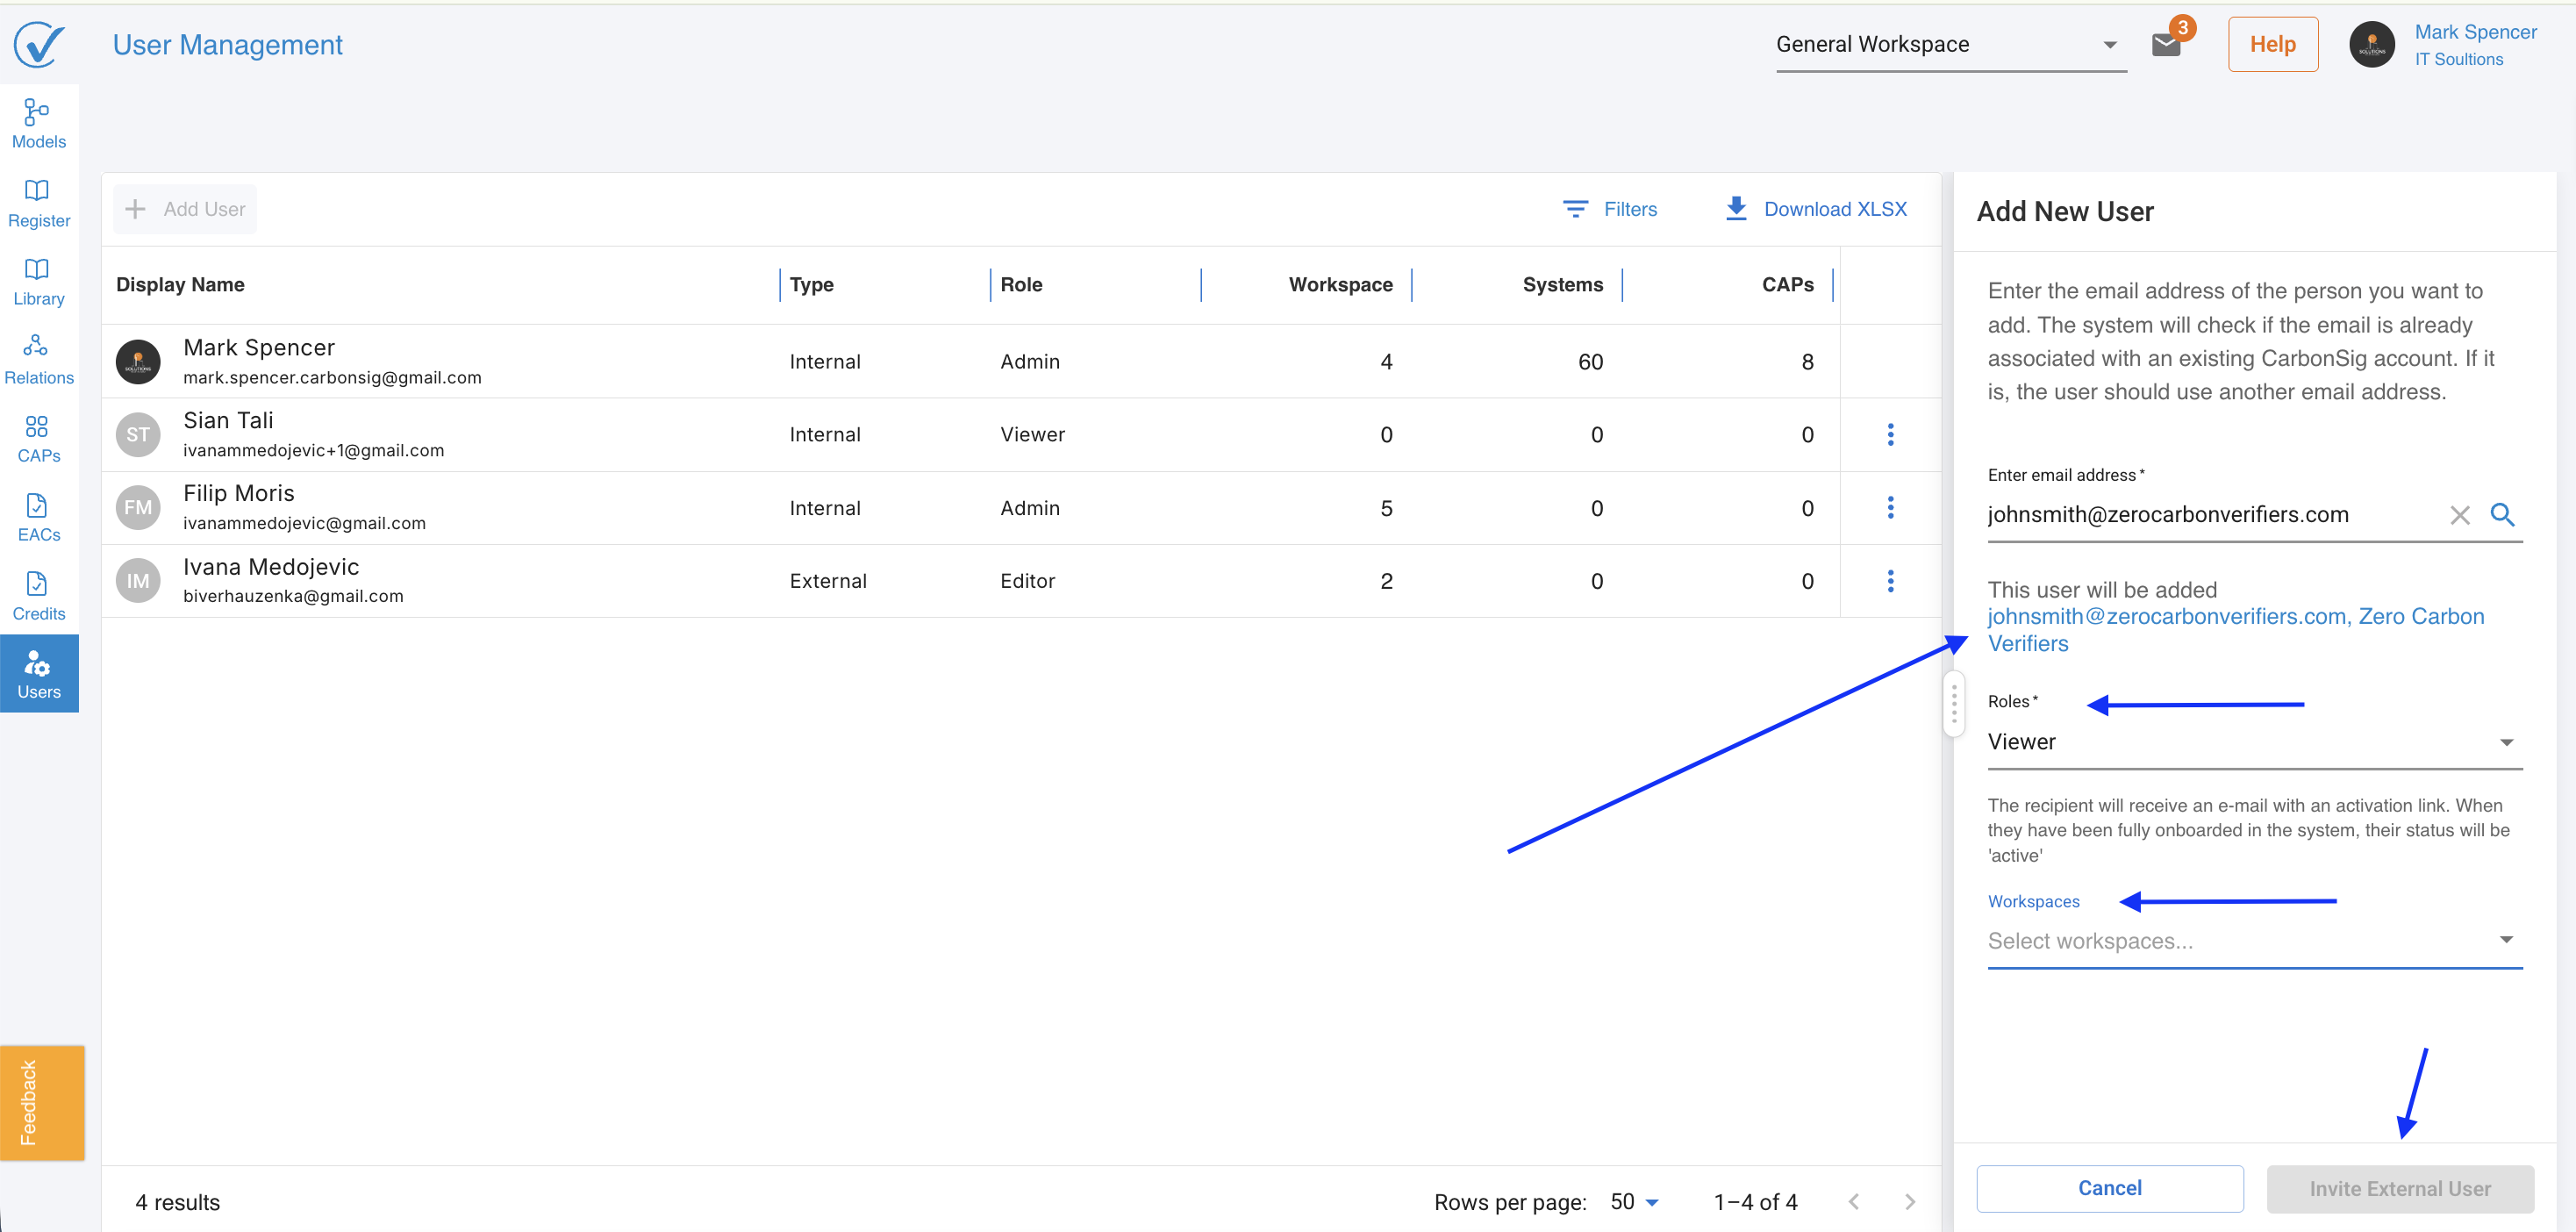
Step 4: Assign Workspace(s)
Select which workspace(s) this External User should access.
Options:
- Assign to one specific workspace
- Assign to multiple workspaces
- Grant access to all workspaces (if they have a cross-cutting role)
Best practice: Only grant access to workspaces where they need to work. You can always add more workspaces later.
Step 5: Select Role
Choose the appropriate role for this External User:
Available roles:
Admin → Master key to all workspaces
Full access to everything, including user management
Permissions:
- Complete access to every workspace within the account
- Can see and manage the entire organizational landscape
- Access to "Users" tab for user management
- Can add, remove, and suspend users
- Can assign or modify roles for any user in any workspace
- Automatically gains access to all current and future workspaces
Use for:
- Trusted consultants managing your entire carbon program
- External partners with full management responsibility
- Auditors requiring comprehensive access
- Senior contractors overseeing all operations
Important: The system requires at least one Admin at all times. If they're the last Admin, the system prevents them from removing their own role.
Editor → View and modify content in assigned workspaces
Full editing permissions within designated workspaces
Permissions:
- Full editing access to assigned workspaces only
- Can create, modify, and delete content
- Full editing permissions for:
- Systems
- Libraries
- Relationship Management
- Carbon Credits pages
- Workspace access controlled by Admin
Use for:
- Consultants building carbon accounting systems
- External experts creating and managing carbon data
- Partners collaborating on specific projects
- Contractors working on designated workspaces
Best practice: Assign Editors only to workspaces where they actively need to create or modify content.
Viewer → Read-only access to assigned workspaces
View all content without modification capabilities
Permissions:
- Read-only access to assigned workspaces only
- Can view all content including:
- Models
- Register
- Libraries
- CAPs
- EACs
- Relationships
- Carbon Credits
- Cannot make any modifications or changes
- Workspace access controlled by Admin
Use for:
- Auditors reviewing carbon data
- Stakeholders needing visibility
- External reviewers
- Partners monitoring progress
- Any external professional who needs to see but not change data
Best practice: Default to Viewer when External Users only need visibility. You can always upgrade to Editor later if needed.
Role Selection Decision Guide
Ask yourself:
- Do they need to manage users or access all workspaces?
- Yes → Admin
- No → Continue to question 2
- Do they need to create or modify content?
- Yes → Editor (assign specific workspaces)
- No → Viewer (assign specific workspaces)
- Will they work across multiple workspaces?
- All workspaces → Consider Admin
- Some workspaces → Editor or Viewer
- One workspace → Editor or Viewer
Step 6: Send Invitation
Click the "Invite External User" button.
What happens:
- An invitation email is sent to the External User
- They receive a notification in their CarbonSig account
- They can accept the invitation with one click
- Access is granted immediately upon acceptance
Timeline: External Users typically gain access within minutes of accepting the invitation.
Managing External Users
Viewing External Users
In User Management, External Users are clearly marked:
- Look for the "External" label next to their name
- You can filter to show only External Users
- View which workspaces they have access to
Modifying Access
You can adjust an External User's access anytime:
- Add or remove workspace assignments
- Change their role
- Suspend their access temporarily
- Remove them completely
To modify access:
- Go to User Management
- Find the External User
- Click to edit their settings
- Make your changes
- Save
Removing External Users
When collaboration ends:
- Navigate to User Management
- Select the External User
- Click "Remove User"
- Confirm removal
What happens: The person loses access to your workspace immediately but retains their primary CarbonSig account with their main organization.
Best Practices for External Users
Security & Access
✓ Grant minimum necessary access - Only workspaces they need
✓ Review permissions regularly - Remove access when projects end
✓ Use View Only when possible - For stakeholders not creating data
✓ Document why - Keep notes on why each External User has access
Communication
✓ Set expectations - Tell External Users what they can access
✓ Provide onboarding - Share relevant documentation
✓ Establish protocols - Define how they should work in your workspace
✓ Stay in touch - Check in on collaboration progress
Compliance
✓ Verify necessity - Confirm external access is required
✓ Audit regularly - Review External User list quarterly
✓ Remove promptly - Delete access when collaboration ends
✓ Track activity - Monitor what External Users are doing
Understanding External User vs Internal User
| Aspect | Internal User | External User |
|---|---|---|
| Primary account | Your organization | Another organization |
| Can be Admin? | Yes | Yes (same powers) |
| Workspace access | Based on role assignment | Based on role assignment |
| Limitations | One person = one primary account | One person = unlimited external accounts |
| Use case | Your employees | Consultants, partners, vendors |
Key point: External Users can have Admin role and exactly the same permissions as internal Users - the only difference is organizational affiliation.
Troubleshooting
Email not recognized as existing account?
- Verify you entered the correct email address
- Confirm the person actually has a CarbonSig account
- They may need to create an account first → Use regular User onboarding
Invitation not received?
- Check if invitation was sent successfully
- Ask recipient to check spam folder
- Resend invitation from User Management
- Verify email address is correct
External User can't see workspace after accepting?
- Verify you assigned them to the correct workspace(s)
- Check that their role has appropriate permissions
- Refresh their account (they may need to sign out and back in)
- Verify invitation was accepted (check User Management)
Need to change their access quickly?
- Go to User Management
- Edit the External User's profile
- Changes take effect immediately
- No need to resend invitation
Related Articles
For more information about user management:
- Understanding User Management
- User Onboarding Process
- Add User from User Management
- Understanding Workspaces
Need Help?
For External Users:
- Contact the organization's admin who invited you
- Email CarbonSig support: support@carbonsig.com
For Admins:
- Visit our Help Center
- Email support@carbonsig.com
Enable secure cross-organization collaboration with External Users! 🌍
Last updated: May 2026