
Publish your Carbon Attested Product (CAP) - publishing page
What is publishing a CAP?
Publishing transforms your completed system into a Carbon Attested Product (CAP), a verified document that certifies the carbon intensity of your product. This certificate can be shared with customers, used in supply chain collaboration, or submitted for third-party verification.
When to publish:
- System shows "Ready" status
- All calculations are complete
- Data has been reviewed and verified - all nodes are green (optional)
- Properties modal fields are populated
- Ready to share carbon data with stakeholders
Before you begin
What you need to decide:
- Product quantity for this attestation
- Product name (can differ from system or output name)
- Carbon credits to apply (optional)
- Attestation assignment details
- Third-party verification requirements (optional)
Step 1: Navigate to the Publish option
From the Analyze page
- Open your system in Analyze mode
- Select the product output you want to publish
- Click the three dots (⋮) menu next to the product
- Select Publish from the dropdown
What you see: The Publishing page opens with your selected product

Step 2: Complete Properties (if needed)
If you haven't filled all Properties fields, a modal appears:
"Complete All Information for Properties"
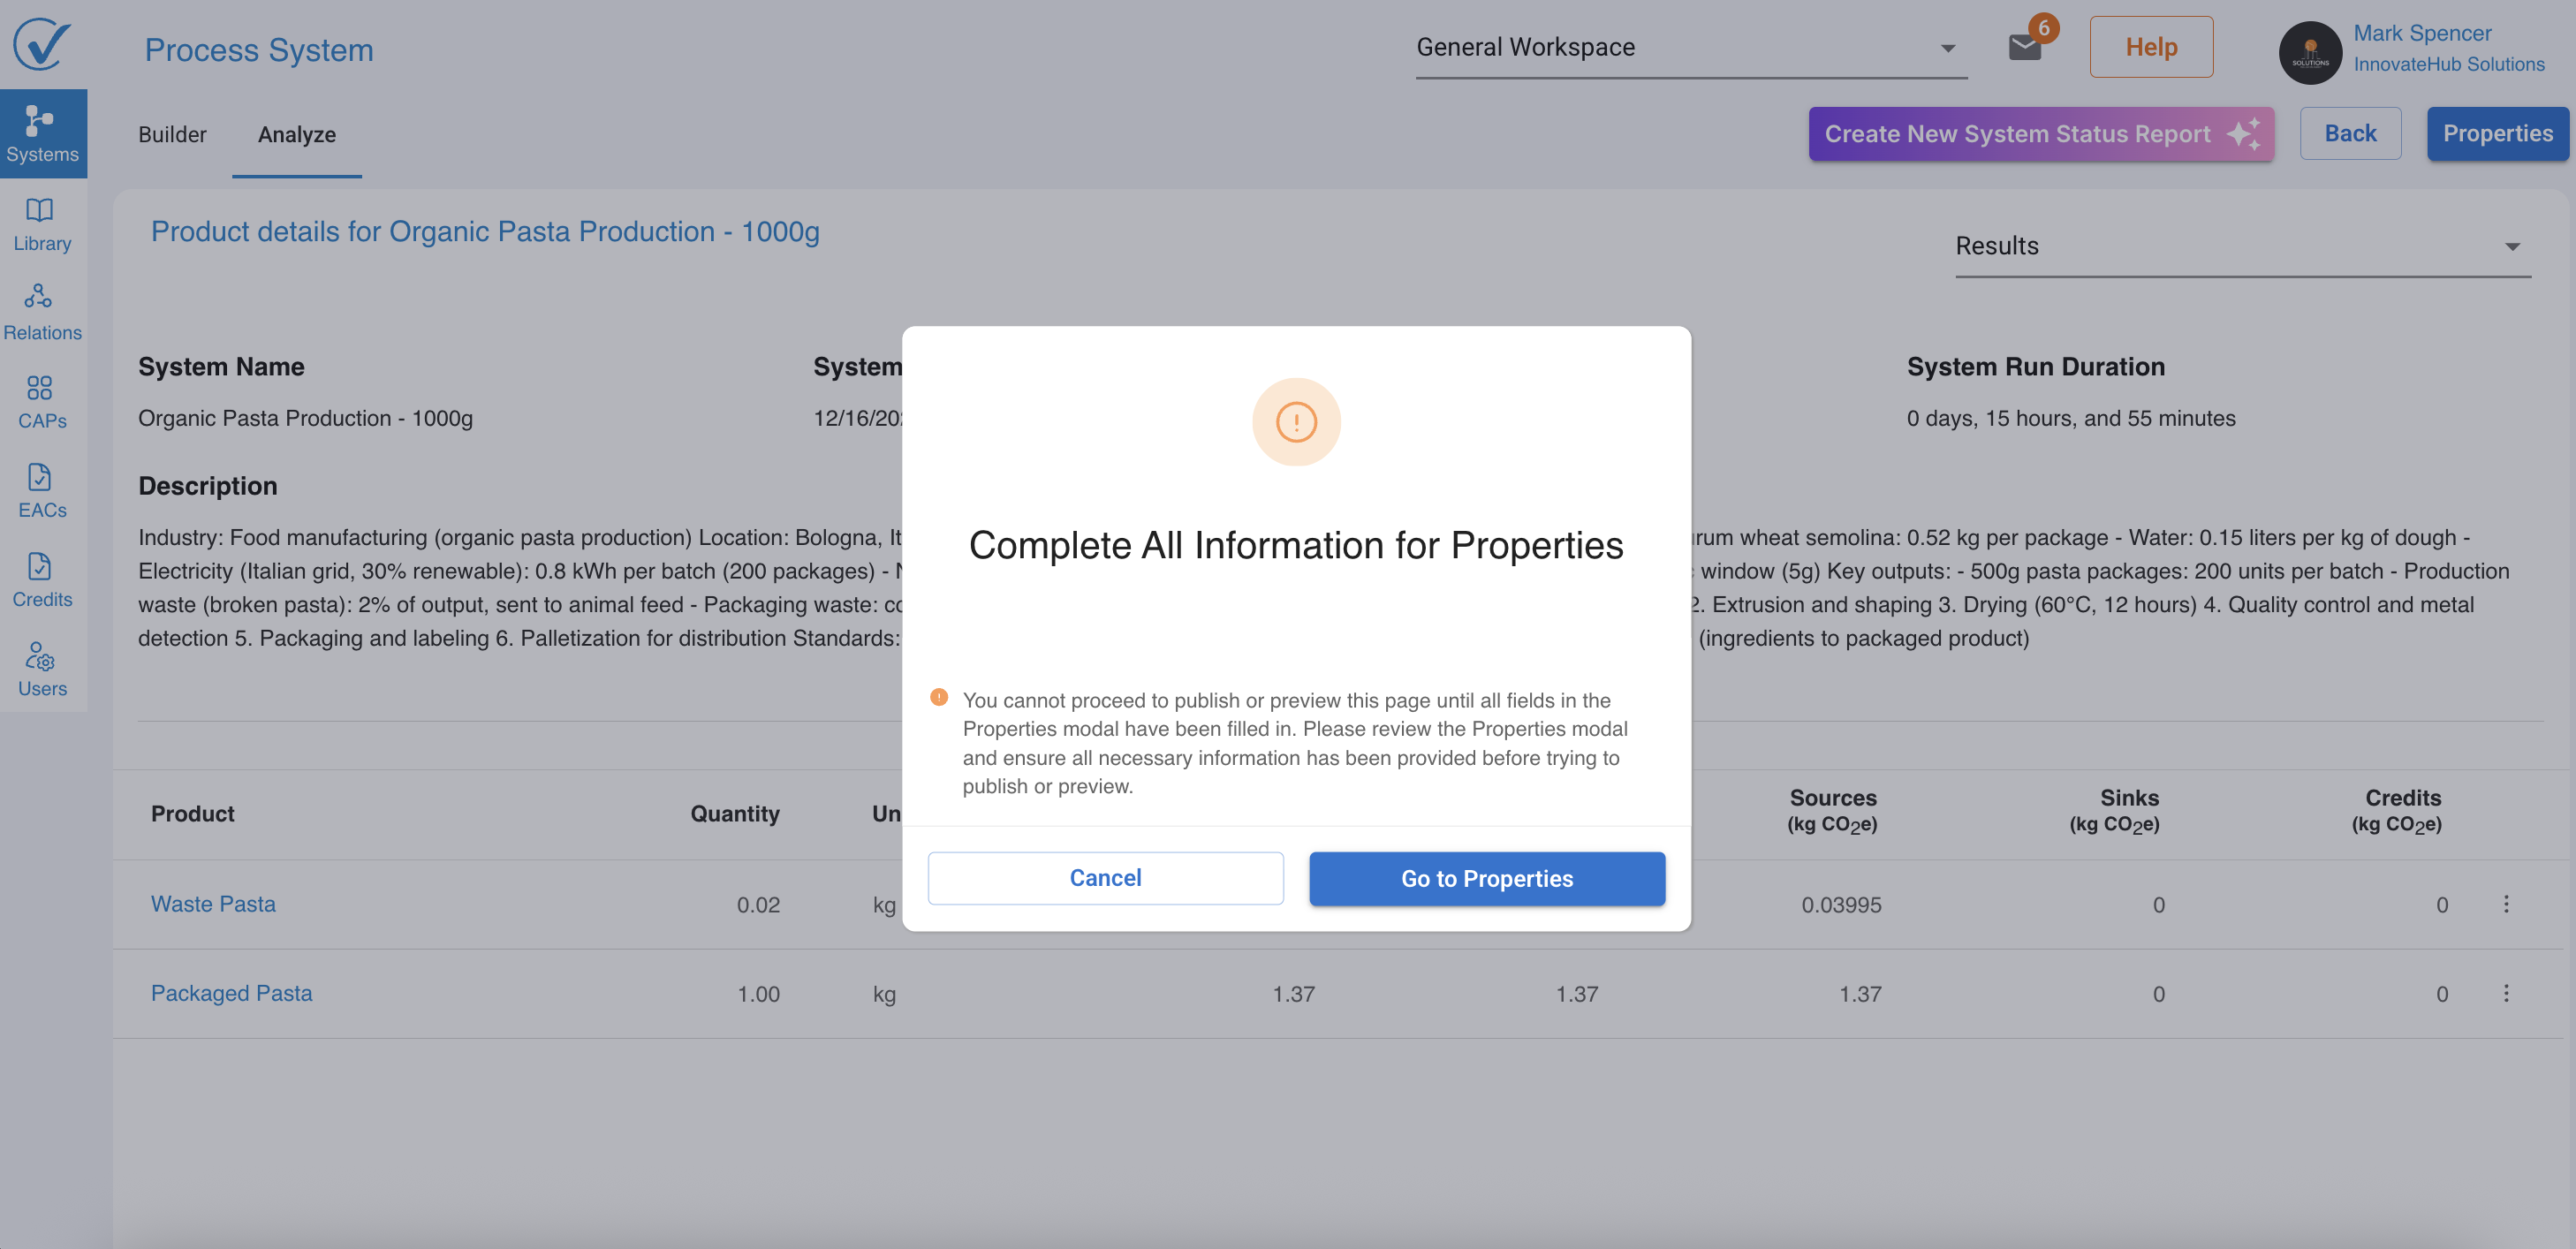
This warning shows when required fields are missing:
- Declaration
- Allocation Rules
- Calculation Methodology
- Cut-Off Rules
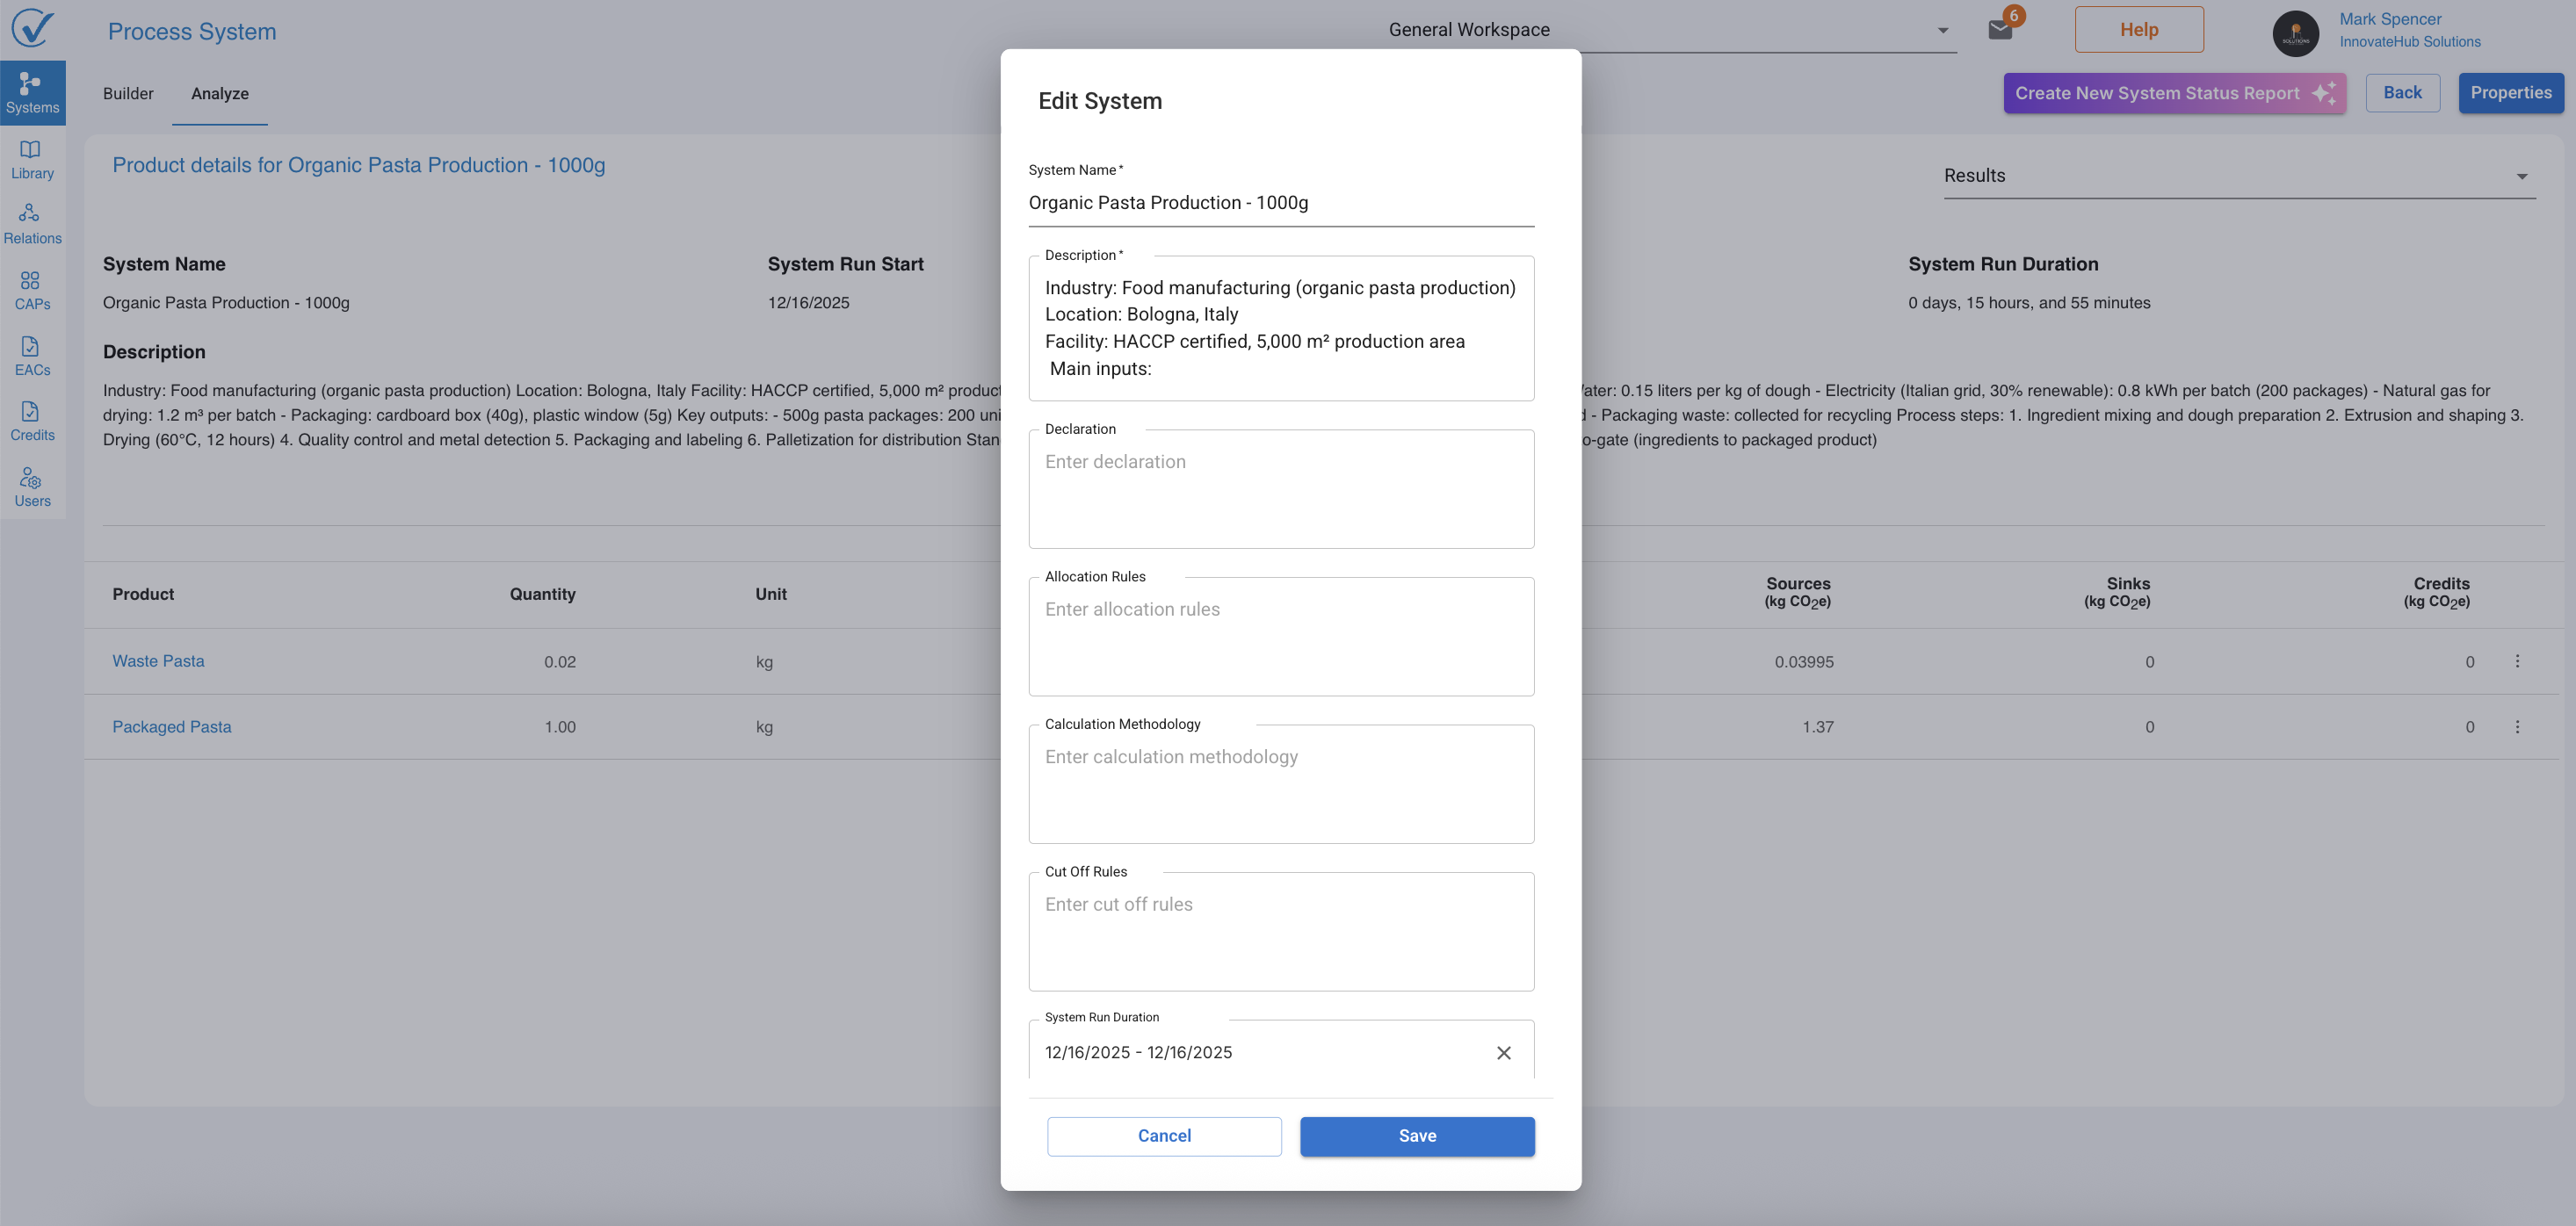
To resolve:
- Click Go to Properties button
- Complete all required fields in the Properties modal
- Click Save
- Return to Publish option
What you see: Once Properties are complete, the Publishing page becomes accessible
⚠️ Important: You cannot proceed to publishing until all Properties fields are populated. This ensures complete documentation for your attestation.
Step 3: Enter product details
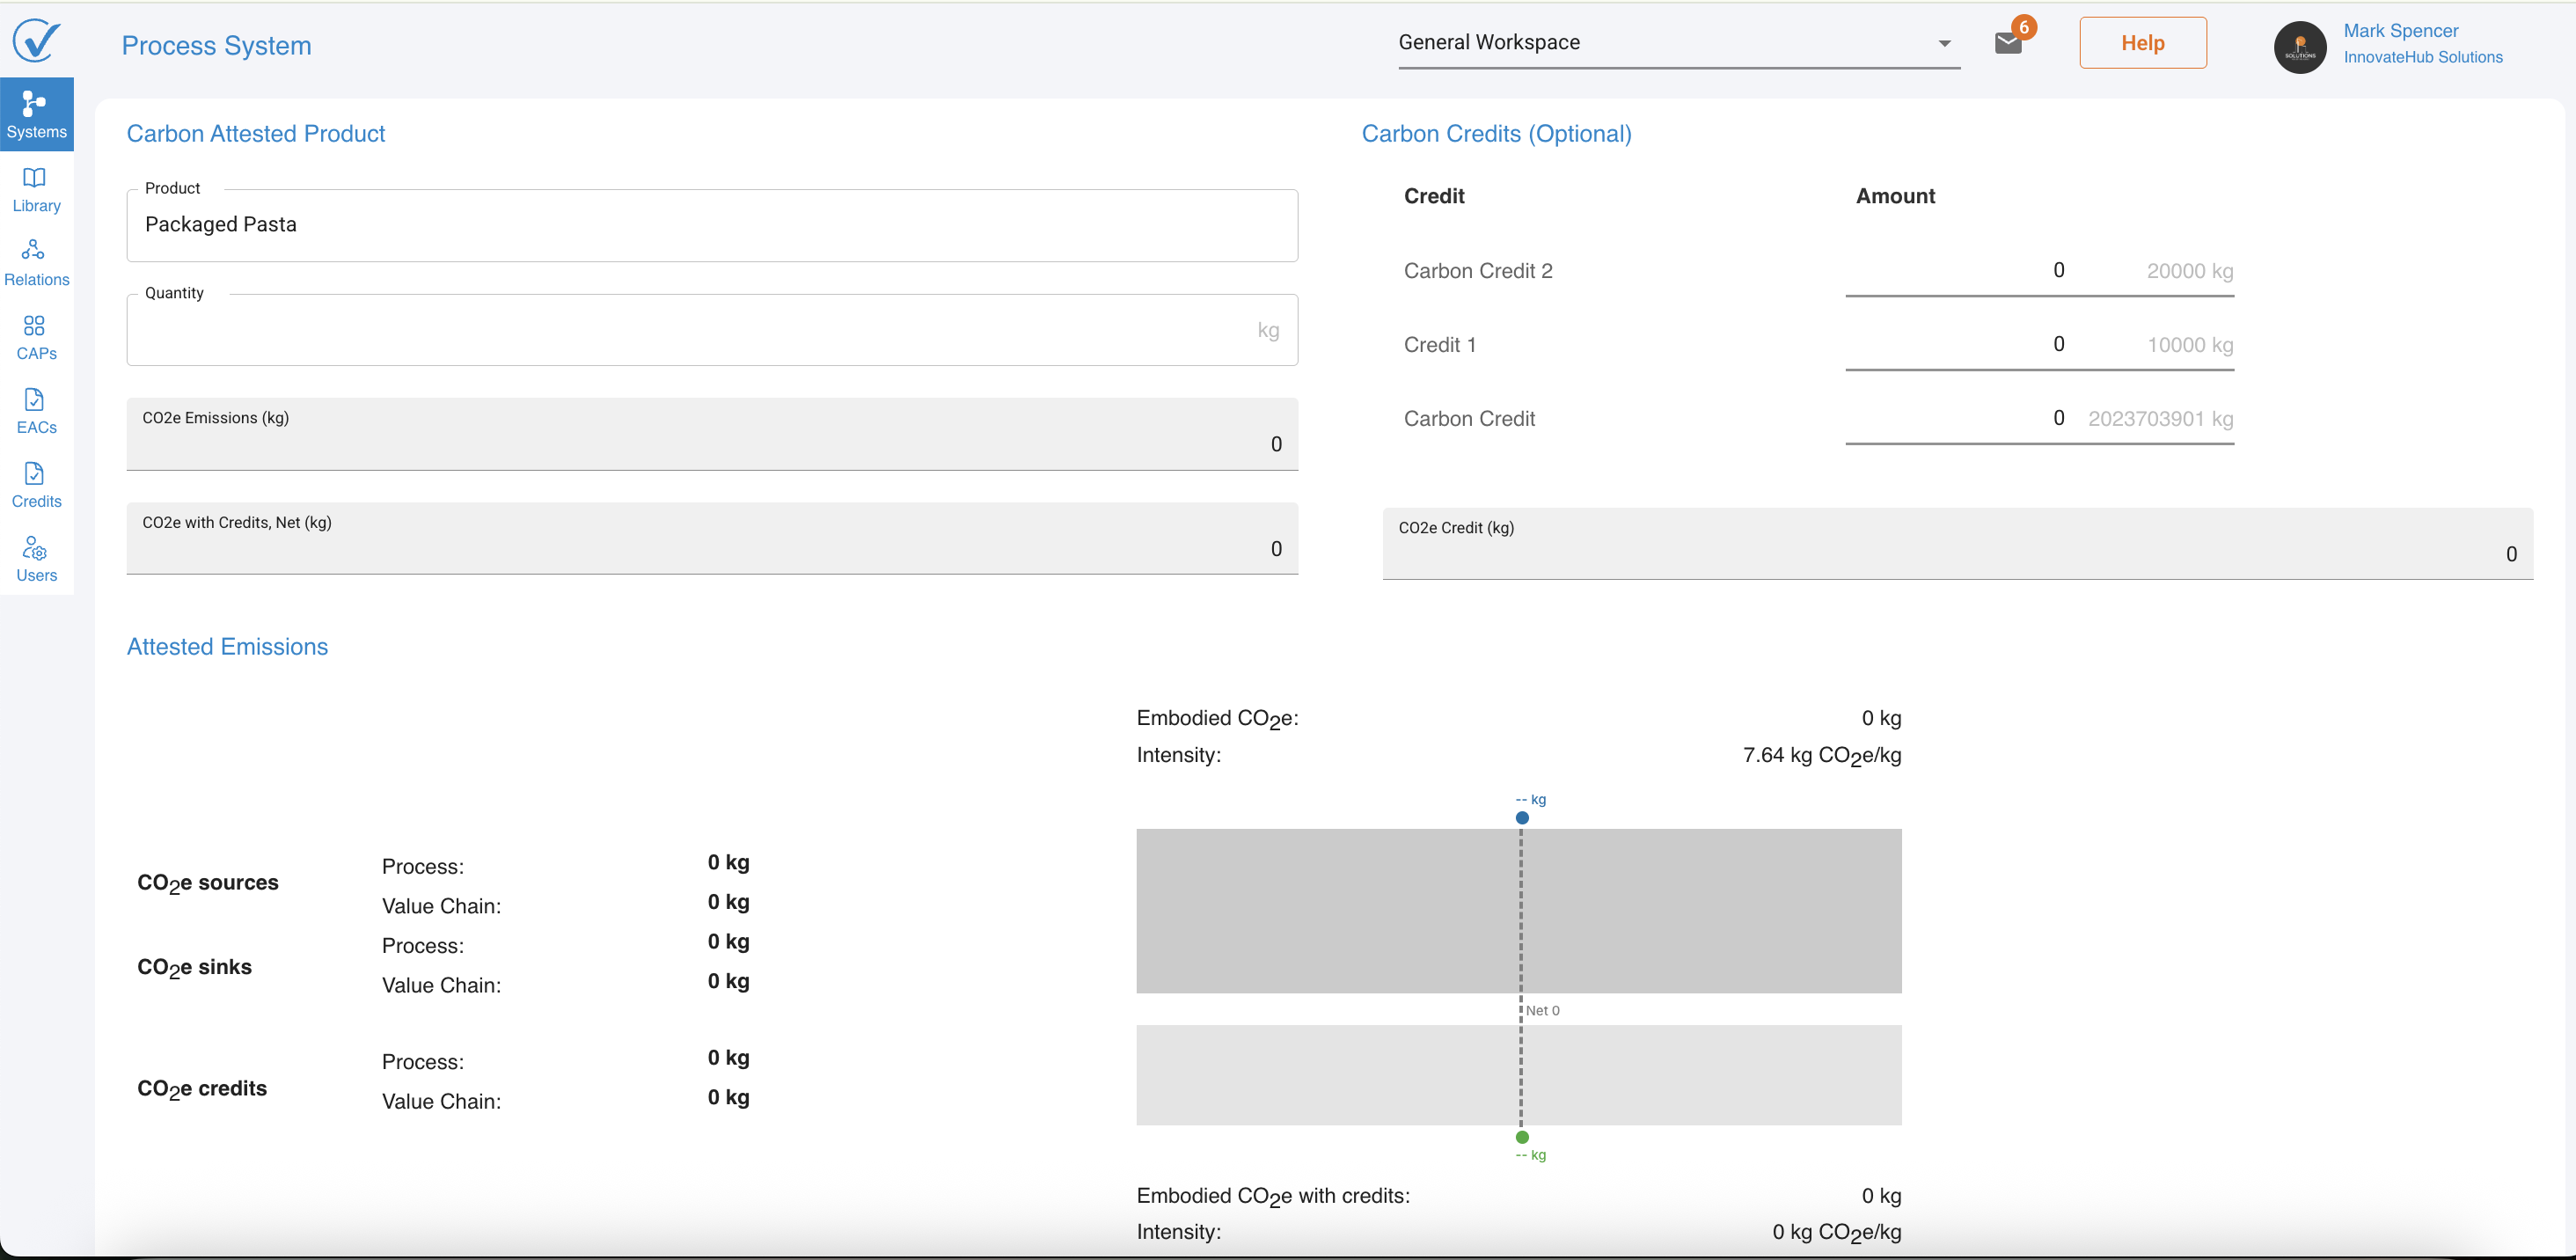
Carbon Attested Product section
Product name field:
- Pre-filled with output node name from your system
- Edit to customize how the product appears on the certificate
- This name displays on the final CAP document
- Use clear, descriptive names for recipients
Example:
- System output: "Packaged Pasta"
- Certificate name: "Packaged Pasta first batch" or "Organic Pasta Production - 1000g"

Quantity field (required):
- Enter the amount of product for this attestation
- Must match the unit defined in your system
- Determines total emissions and intensity calculations
What happens: As you enter quantity, all calculations update dynamically throughout the page
Carbon Credits section (optional)
Add carbon credits to offset emissions.
How it works:
- Enter available credit amounts to reduce net emissions
- Credits apply to the final attestation
- Visual diagram updates to show credit impact
- Final intensity calculation adjusts accordingly
When to use:
- Offsetting residual emissions
- Meeting net-zero commitments
- Providing carbon-neutral products
- Supporting carbon removal projects
Step 4: Review emissions visualization
Attested Emissions diagram
The diagram displays dynamic carbon flow visualization
- CO2e sources
- CO2e sinks
- CO2e credits
- Embodied CO2e: Total emissions before credits (e.g., 1,528.35 kg)
- Intensity: Emissions per unit (e.g., 7.64 kg CO2e/kg)
Net calculations:
- Embodied CO2e with credits: Final emissions after applying credits
- Intensity: Adjusted emissions per unit
Dynamic updates:
- Changes to quantity instantly recalculate all values
- Adding credits shows immediate impact
- Visual bars adjust proportionally
- Blue bars indicate active emission sources
- Gray bars show sinks (if there are any)
- Orange bars show applied carbon credits (if there are any)
Step 5: Complete attestation information
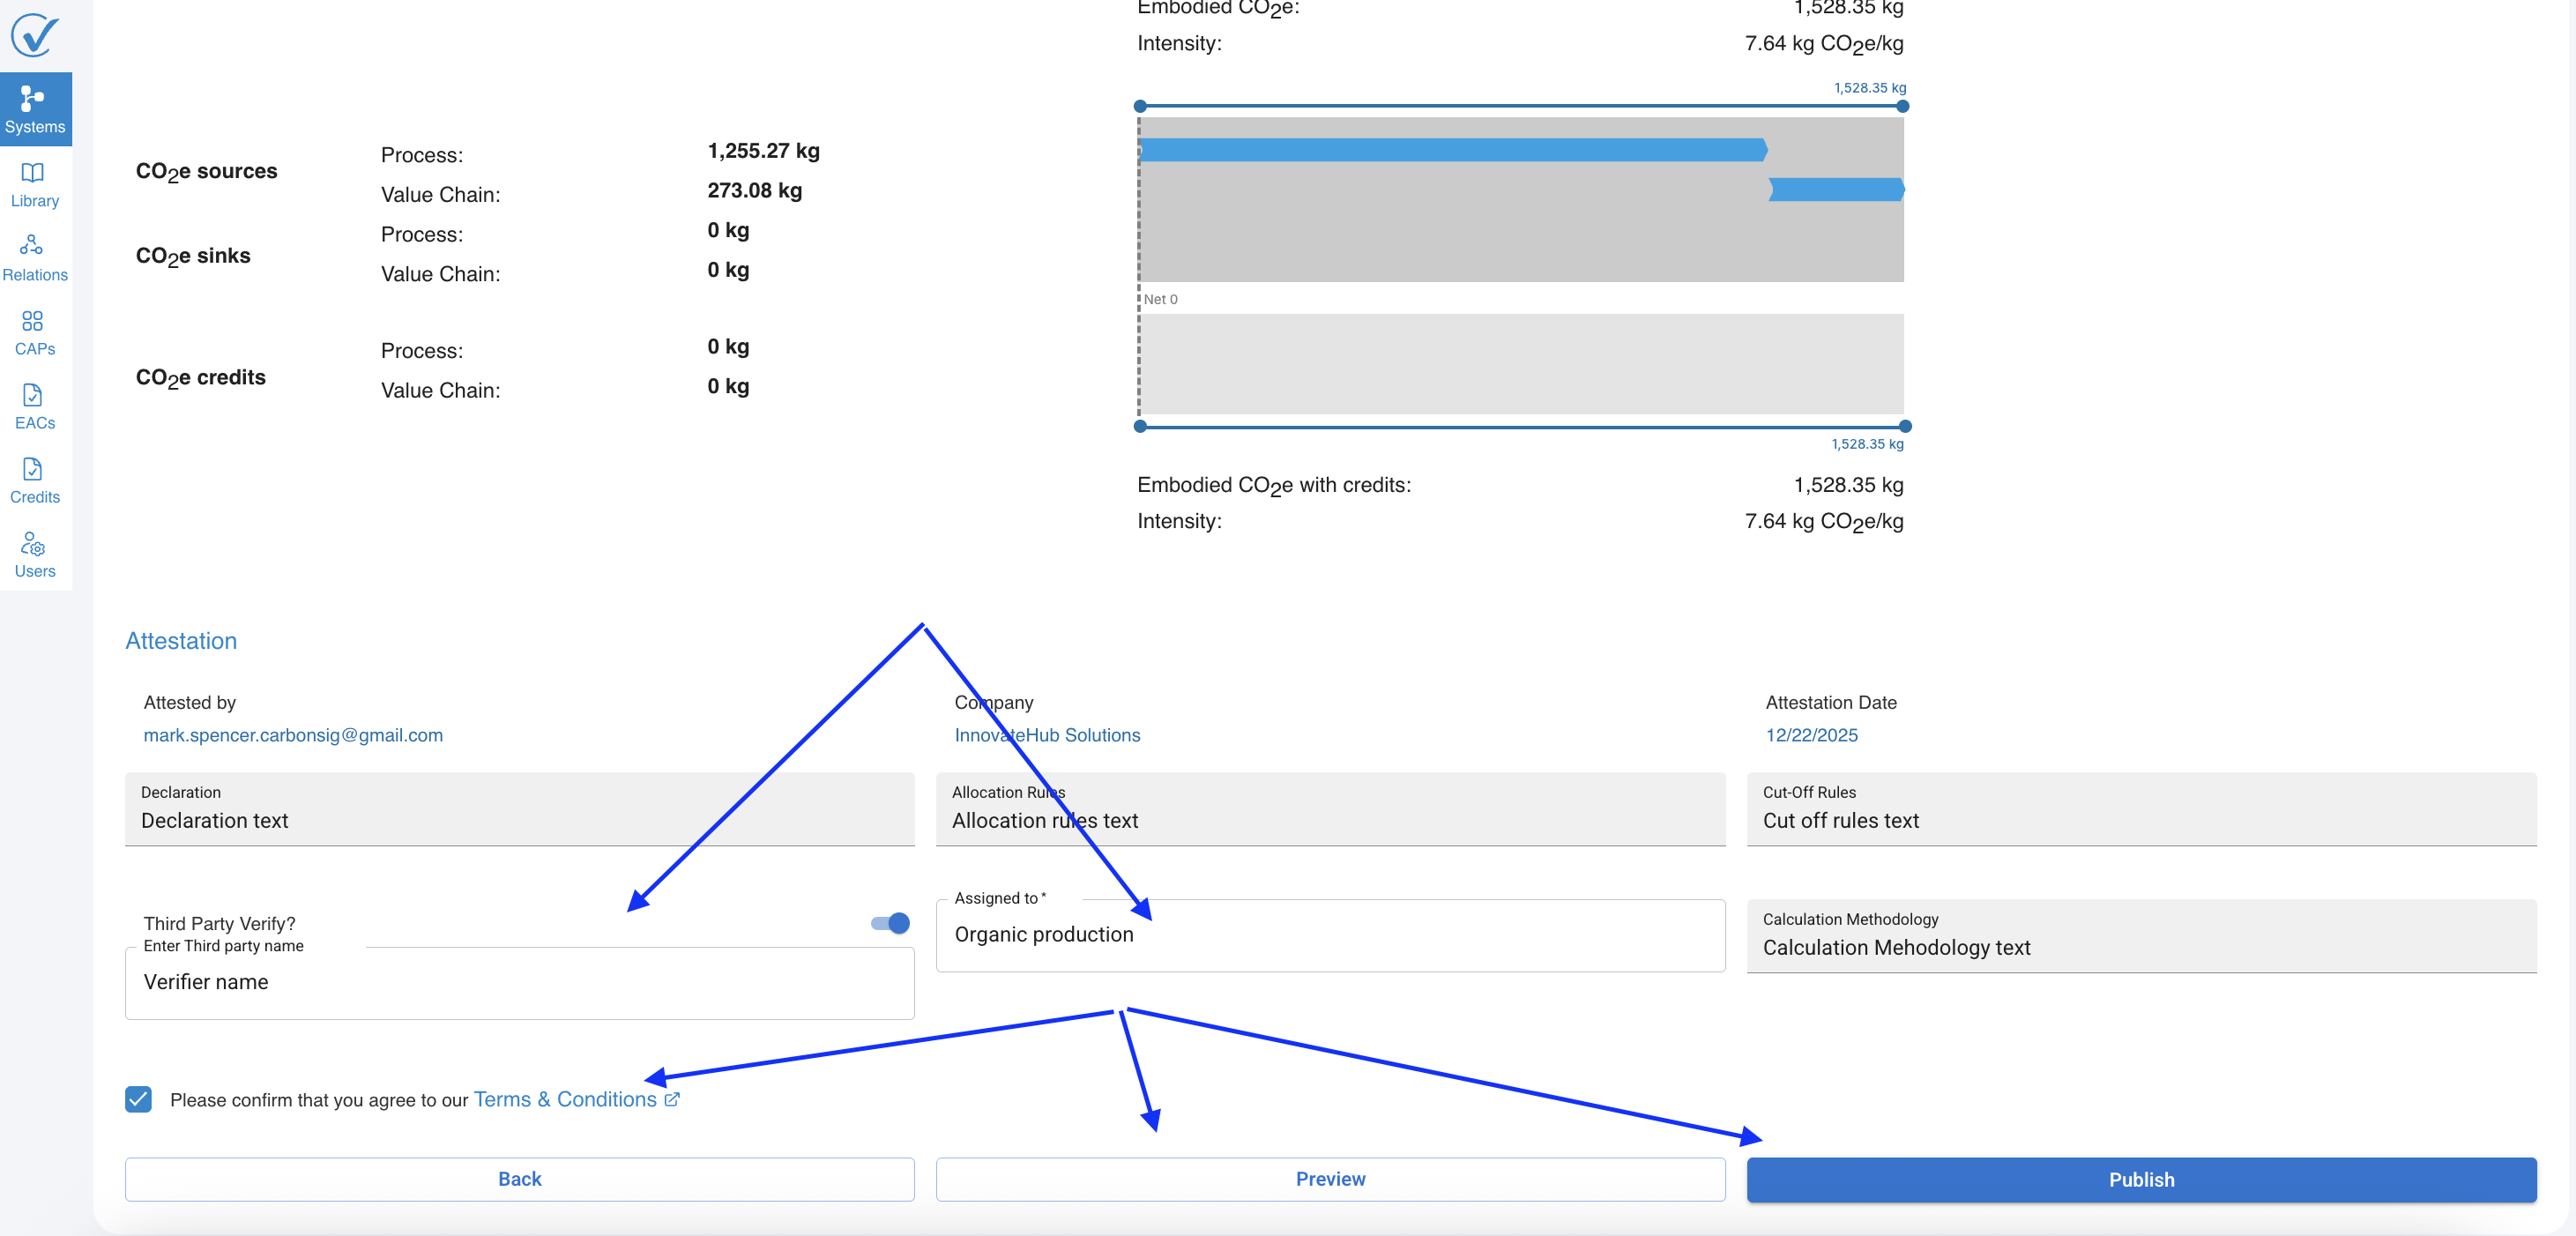
Attestation section
Required fields:
Attested by: Auto-filled with your email (e.g., mark.spencer.carbonsig@gmail.com)
Company: Auto-filled with your organization name (e.g., InnovateHub Solutions)
Attestation Date: Auto-filled with current date (e.g., 12/22/2025)
Additional fields:
Declaration:
- Pre-filled from Properties
- Describes methodology and standards used
Allocation Rules:
- Pre-filled from Properties
- Explains how emissions are allocated
Cut-Off Rules:
- Pre-filled from Properties
- Defines boundary and exclusions
Assigned to (required):
- Enter unique identifier for this certificate
- Links attestation to specific production run or customer
- Examples: "Organic production", "Batch-2025-Q1", "Customer-ABC"
Calculation Methodology:
- Pre-filled from Properties
- Documents calculation approach
Third-Party Verification (optional)
Enable third-party certification:
To activate:
- Toggle Third Party Verify switch ON (turns blue)
- Verifier name field appears
- Enter the name of your verification organization
- This information appears on the final certificate
When to use:
- Regulatory requirements mandate verification
- Customers request third-party validation
- Seeking EPD or other certifications
- Building credibility for market claims
Step 6: Accept terms and conditions
Final required step:
- Locate the Terms & Conditions checkbox at the bottom
- Click to read terms (opens link in new tab)
- Check the box: "Please confirm that you agree to our Terms & Conditions"
What happens: The Publish button becomes enabled (changes from gray to blue)
⚠️ Cannot publish until: Terms checkbox is checked
Step 7: Preview or publish
Preview option
Before finalizing:
- Click Preview button
- Reviews how certificate will appear
- Verifies all information is correct
- No changes are committed yet
- Return to make adjustments if needed
What you review:
- Product name and quantity as it appears on certificate
- All emissions calculations and intensity
- Attestation information and dates
- Third-party verification details (if applicable)
- Visual presentation and formatting
Publish option
When you're ready:
- Verify all information is accurate
- Confirm Terms & Conditions is checked
- Click Publish button (blue)
What happens:
- CAP is generated and saved to your Inventory
- Certificate is created with unique identifier
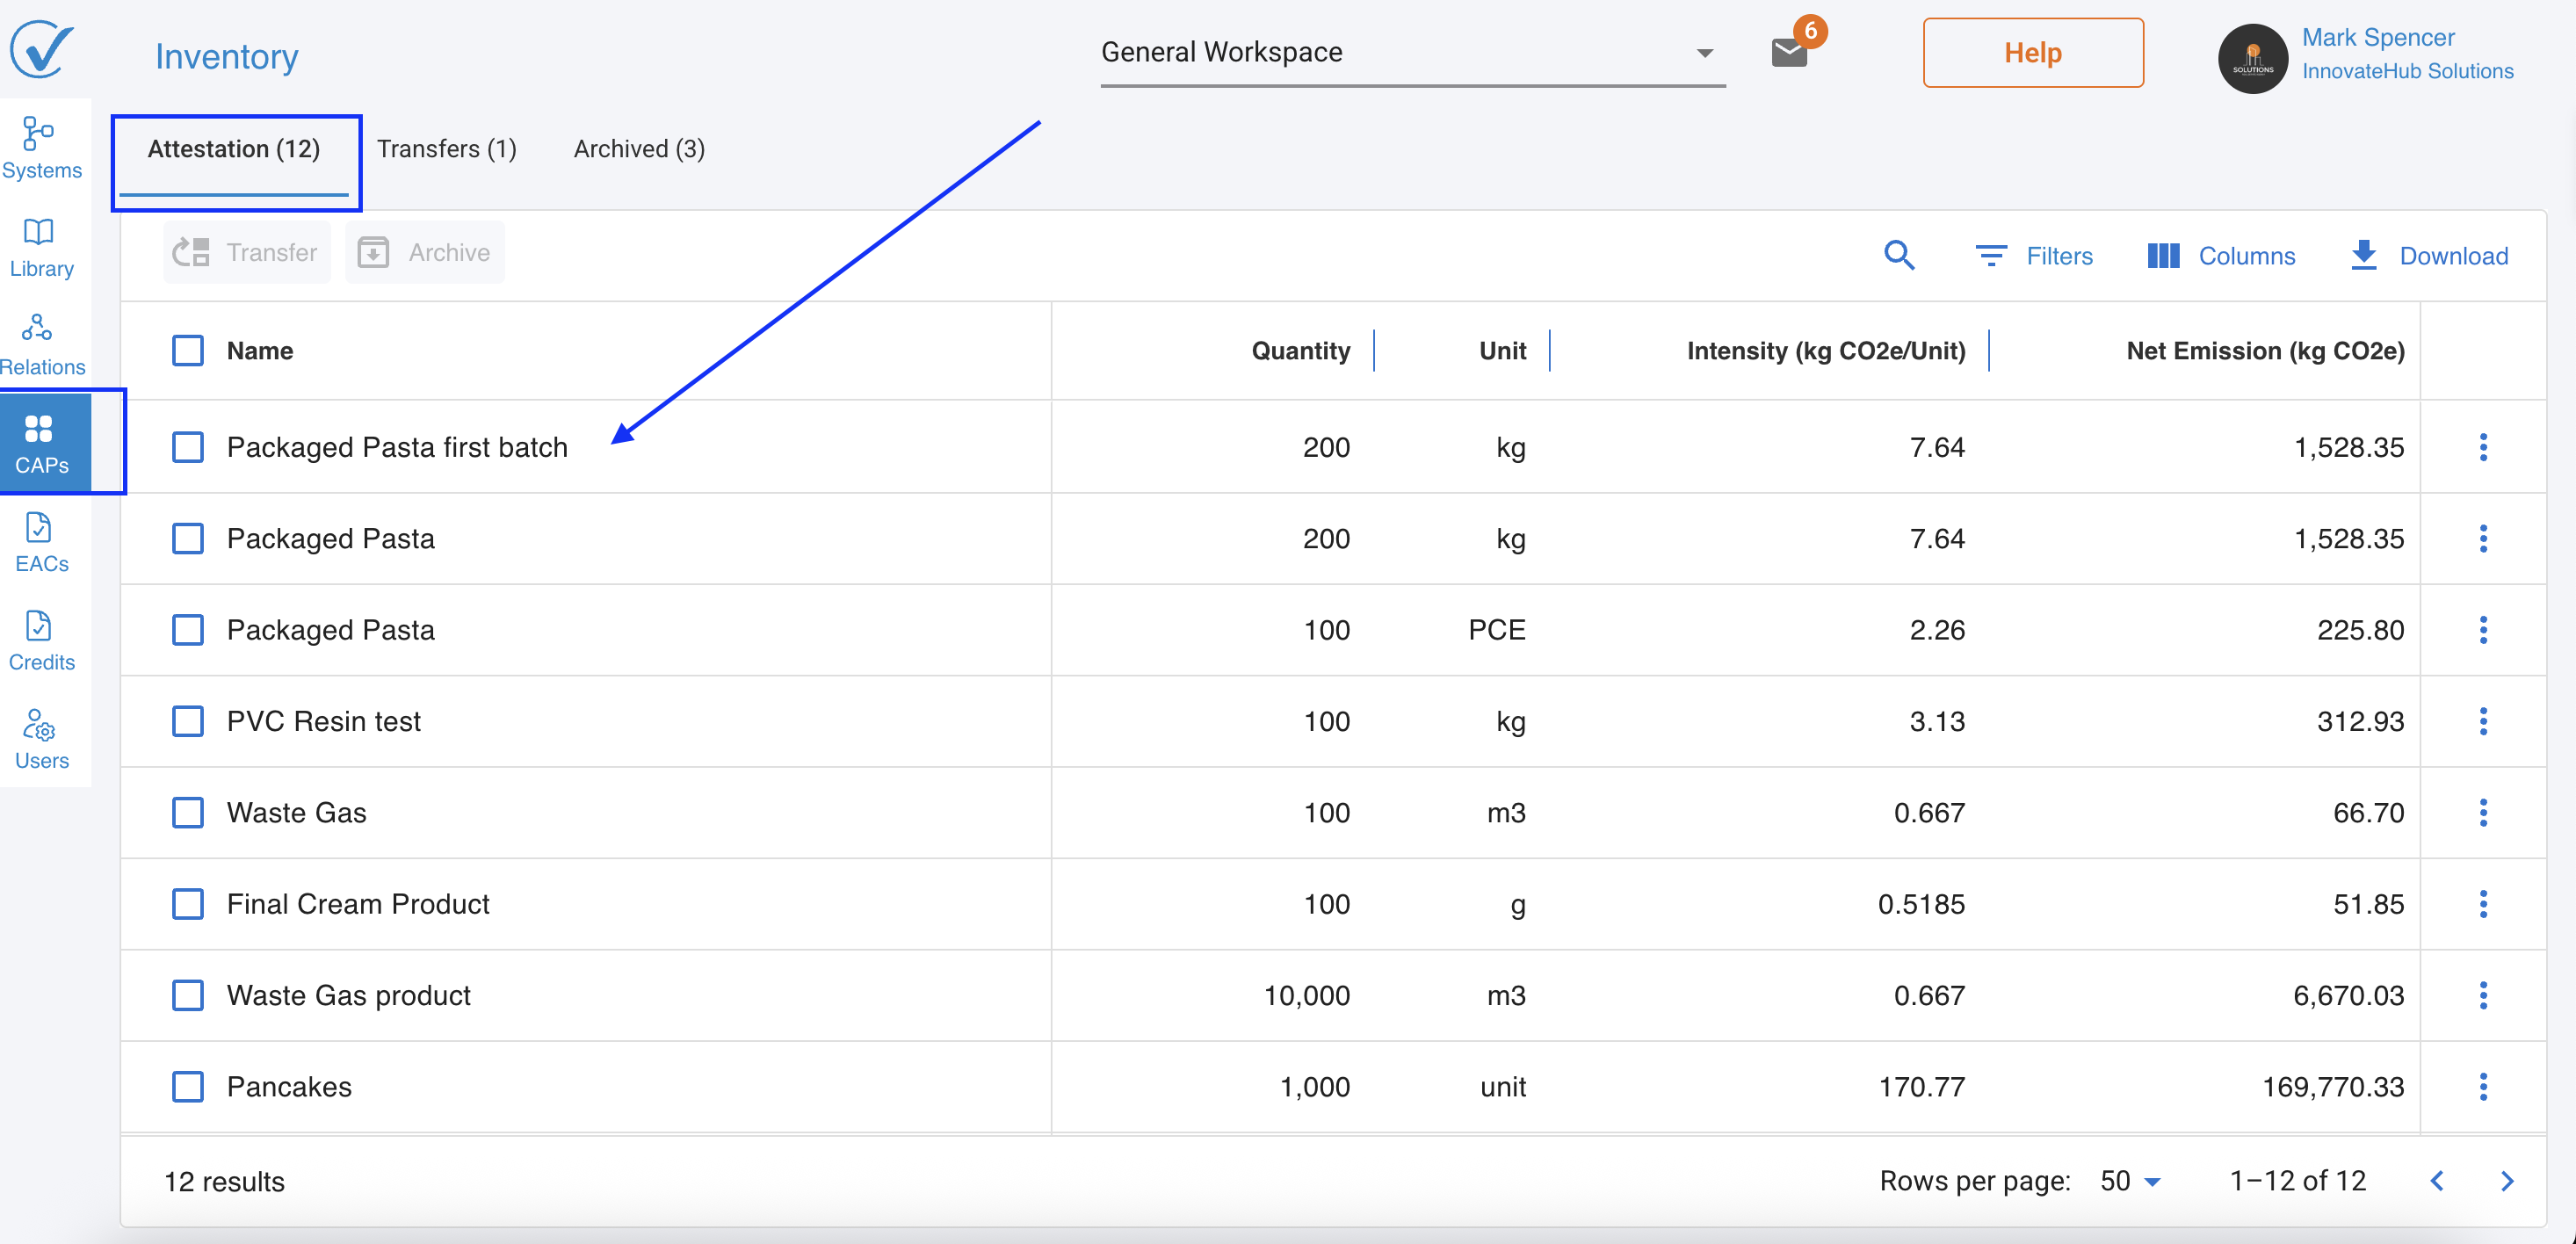
- Appears in Attestation tab of CAPs page
- Can be transferred, shared, or exported
- Permanent record created in your workspace
Immediate actions after publishing:
- View in CAPs Inventory page
- Transfer to customers or partners
- Export for reporting purposes
- Use as input in other systems
- Generate Product Explorer analysis
Understanding the publishing workflow
System Status = Ready
       ↓
Analyze Page → Select Output → Three Dots Menu
       ↓
Click "Publish"
       ↓
Properties Complete? → No → Go to Properties Modal → Fill Fields
       ↓ Yes
Publishing Page Opens
       ↓
Enter Product Name & Quantity
       ↓
Add Carbon Credits (Optional)
       ↓
Review Emissions Diagram
       ↓
Complete Attestation Fields
       ↓
Add Third-Party Verifier (Optional)
       ↓
Check Terms & Conditions
       ↓
Preview (Optional) → Review → Return to Adjust
       ↓
Click Publish
       ↓
CAP Created → Appears in CAP page, Attestation tab.
What makes a successful CAP publication
Data quality checklist
Before publishing, verify:
✓ All system nodes show green (reviewed) status (optional)
✓ Properties fields are complete and accurate
✓ Quantities reflect actual production amounts
✓ Carbon credits are properly documented
✓ Attestation assignment is clear and traceable
✓ Methodology aligns with industry standards
Documentation best practices
Ensure clarity:
- Product name clearly identifies the item
- Quantity units are unambiguous
- Allocation rules are well explained
- Methodology is transparent and complete
- Declaration includes relevant standards (ISO 14067, GHG Protocol...)
Verification considerations
For third-party verification:
- Choose accredited verification bodies
- Provide complete system documentation
- Maintain audit trail of data sources
- Document assumptions and limitations
- Prepare supporting evidence packages
After publishing: next steps
View your CAP
- Navigate to CAPs in left menu
- Find your CAP in Attestation tab
- View details, intensity, and emissions
Share with stakeholders
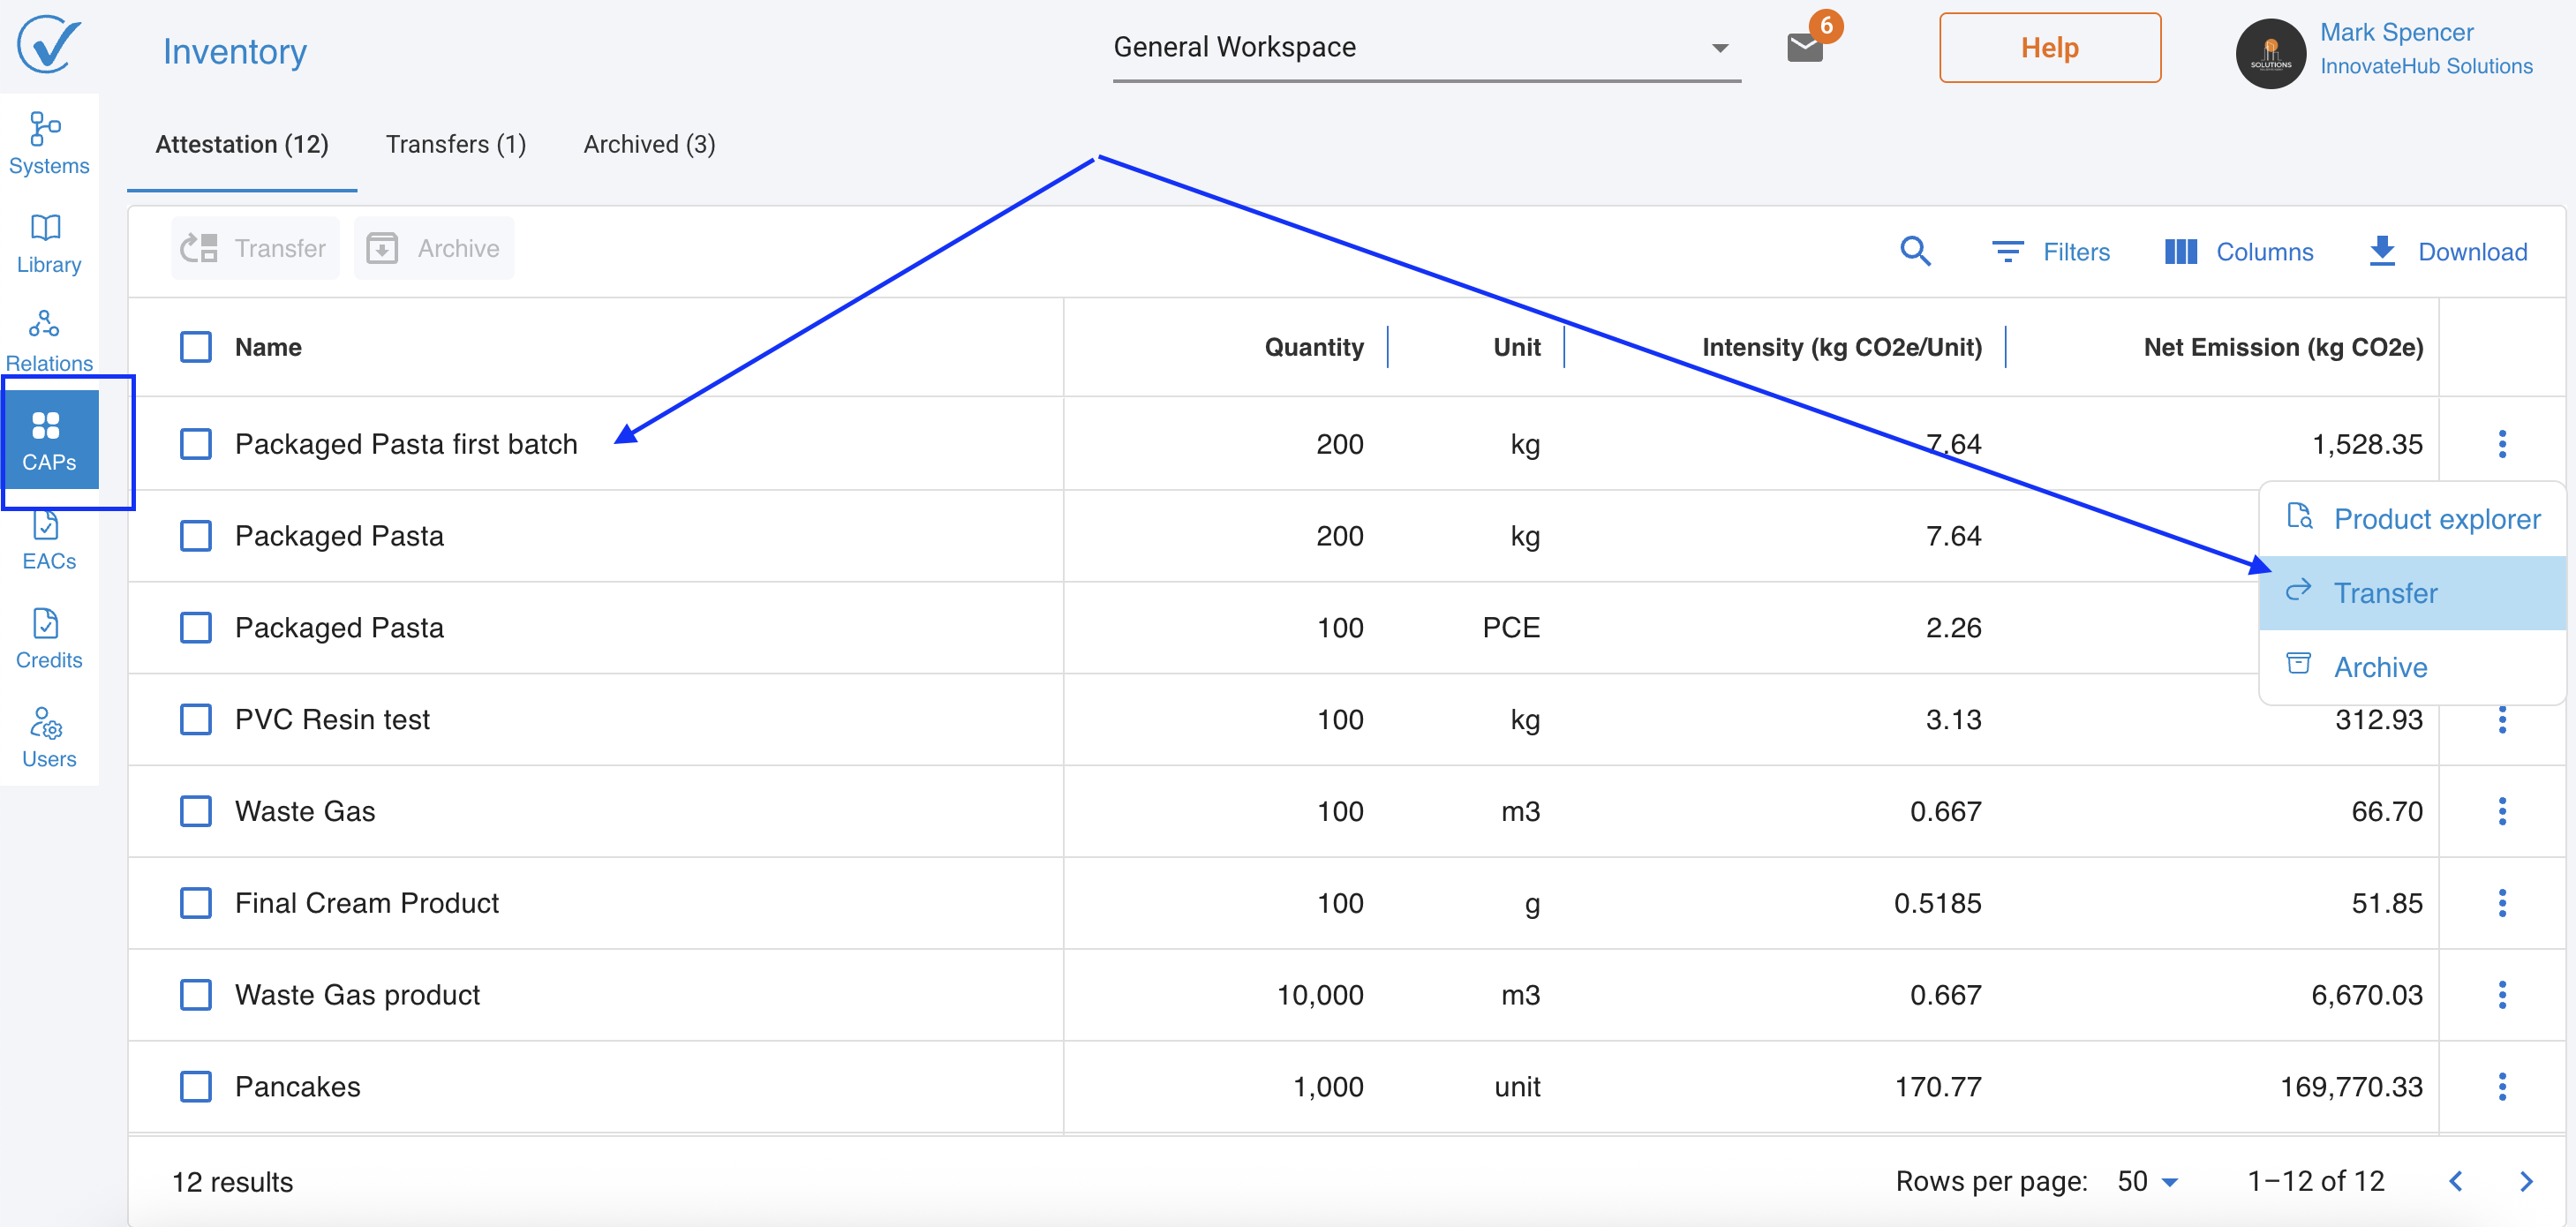
Transfer to customers:
- Click three dots (⋮) next to CAP
- Select Transfer
- Enter recipient's Workspace ID
- Add optional message
- Confirm transfer
What recipients receive:
- Full CAP certificate
- Carbon intensity data
- Attestation information
- System methodology (if shared)
Use in Product Explorer
- Click three dots (⋮) next to CAP
- Select Product Explorer
- Analyze detailed carbon flows
- Identify optimization opportunities
- Generate stakeholder reports

Troubleshooting common issues
"Cannot proceed to publish" message
Possible causes:
- System status is "In Progress", not "Ready"
- Properties fields are incomplete
- Missing required data in system nodes
Solutions:
- Check system status on Systems page
- Complete all Properties fields
- Ensure all quantities and sources assigned
- Refresh page and try again
Publish button remains disabled
Possible causes:
- Terms & Conditions not checked
- Missing required Assigned to field
- Insufficient user permissions (Viewer role)
Solutions:
- Check Terms & Conditions checkbox
- Fill in "Assigned to" field with unique identifier
- Verify you have Admin or Editor role
- Contact workspace administrator for access
Calculations don't update when entering quantity
Possible causes:
- Browser caching issue
- Calculation engine delay
- Connection interruption
Solutions:
- Refresh the browser page
- Clear browser cache
- Wait 5-10 seconds for calculations
- Verify internet connection stable
- Try different browser or contact support if issue persists
Properties modal shows unexpected data
Possible causes:
- Properties not saved after editing
- Old cached data displaying
- Multiple users editing simultaneously
Solutions:
- Re-enter Properties and save explicitly
- Refresh page to load latest data
- Coordinate with team on editing schedule
- Contact support if data loss suspected
Best practices for publishing CAPs
Timing considerations
Publish when:
✓ Production run is complete ✓ All quality checks have passed ✓ Data accuracy is verified ✓ Customer order is confirmed ✓ Ready to communicate carbon footprint
Avoid publishing:
✗ With incomplete or estimated data ✗ Before final quality verification ✗ Without stakeholder review (if required) ✗ During major system updates
Related articles
System Development:
- Quick Start: Build Your First System
- Design Your System (Design Mode)
- Add Data to Your System (Entry Mode)
CAP Management:
Properties and Quality:
Workspace & Collaboration:
Need help?
Questions about publishing CAPs:
- Visit our Help Center
- Email support@carbonsig.com
- Use in-app Feedback tool
Last updated: December 2025