
Entering and Allocating Emissions: Entry Mode
Entry Mode is where you'll input your data and allocate emissions to specific elements in your process system. Think of it as the data room for your system.
In Entry Mode you can:
- Input Your Data: This is where you enter the specific values associated with your chosen parameters.
- Allocate Emissions: Assign emissions to the relevant objects within your process system.
- Define Designation
What You Can't Do (But It's Easy to Switch!):
While Entry Mode focuses on data input and allocation, you can't add or remove inputs, outputs, and processes here. However, switching to Design Mode is a breeze!
Just switch between tabs to seamlessly to modify your system template.
Any changes made in Design Mode will automatically reflect in Entry Mode, ensuring your data stays up-to-date.
Visual Cues: Understanding Data Status
At first glance, the Entry Mode window appears similar to Design Mode. However, there's a key difference: the lines connecting nodes in Entry Mode appear dashed. This visual cue indicates that no data has been entered yet.
Adding Data to Input Nodes:
Ready to populate your system with data? Let's focus on input nodes. Here's how it works:
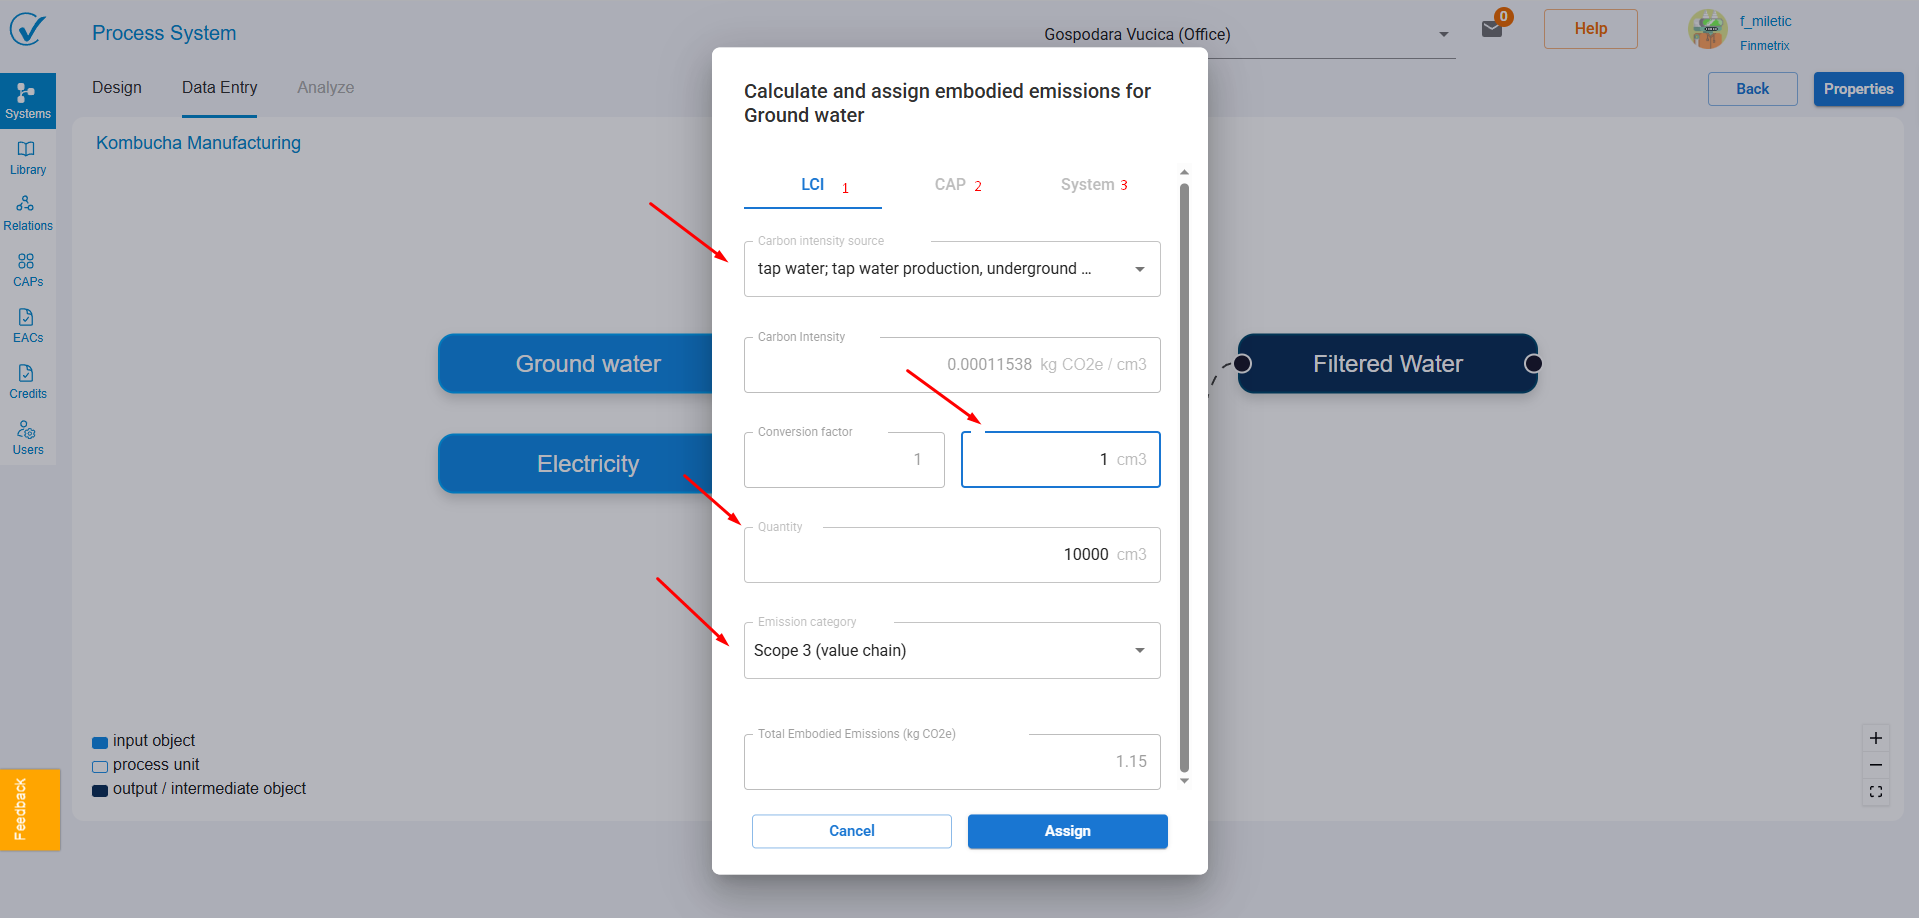
- Click on an Input Node: This will trigger a new window to appear.
- Choose the Emission Source: Select the source of emissions for this input. You have two options:
- Local LCI Library: Choose a pre-defined Life Cycle Inventory (LCI) factor from the built-in library.
- CAP List: Select an existing Attestation Unit from your inventory that's relevant to the input object.
- System List: Select an existing draft system from your system template list that's relevant to the input object.
Filling in the Details:
- Conversion Factor: If you selected an LCI factor, you'll need to enter the appropriate conversion factor.
- Quantity: Specify the quantity associated with this input.
- Automatic Calculations: Once you enter the quantity, the system will automatically calculate the emission intensity and total emissions for this input. The connecting lines will also turn solid to indicate data entry.
Designation Options:
The menu for an input might offer an option to "Change Designation" or similar wording. Selecting this option will likely present a sub-menu with two choices:
- Scope 2 (Energy): This designation typically applies to Scope 2 emissions, representing purchased utilities like electricity, heat, or steam.
- Scope 3 (Value Chain): This designation applies to Scope 3 emissions, representing indirect emissions occurring within your value chain, such as business travel, waste disposal, or transportation of goods.
Choosing the Right Designation:
The designation you choose clarifies the nature of the emission source associated with the input. Here's a quick guide:
- Choose "Scope 2 (Energy)" if the input represents purchased utilities like electricity from the grid or district heating.
- Choose "Scope 3 (Value Chain)" if the input represents an indirect emission source within your value chain, not directly controlled by your organization.
Benefits of Specificity:
By accurately designating your inputs, you're providing valuable context within your process template. This helps you understand the breakdown of your carbon footprint, differentiating between directly controlled Scope 1 emissions (associated with processes) and indirect emissions from your value chain (represented by inputs).
Repeat for All Inputs:
The procedure for adding data is identical for each input node. As you enter data for each input, the corresponding lines will become solid, providing a visual confirmation of completed data entry.